• Just a reminder that you won't be able to start new posts or reply to existings posts in the Archive forum.

    This is where all the old posts go so they can still be used for reference and searched.
  • Welcome to ClassicBroncos! - You are currently viewing the forums as a GUEST. To take advantage of all the site features, please take a moment to register. It's fast, simple and absolutely free. So please join our community today!
    If you have problems registering or can't log into your account, please contact Admin.

radius arm nightmares *need help*

blazinchuck

Bronco Guru
Joined
Jul 14, 2005
Messages
3,319
quick run down...

77 w/ duff arms,4* bushings,cage 3.5" coils,WH 11 leaf 3.5.

the body tends to sit lower on the pass side and little more to the rear(protofab full bumper w/tire and gas can)and now since i put the new motor in...it squats like a 240zx taking off!

so, we took and took measurements of the front. nothing seems to match up to anything. also, before the 3.5" lift was installed it had a complete wh 5.5" lift and 7* bushings.the coils looked great then, but now the dr side coil looks like the bottom is forward. so i thought the stock coil retainers were junked...so i installed the duff lower coil mounts...but didnt help.


...now on the radius arms(trying to check into the "bronco lean fix"). we did as WH has posted before for checking this and correcting this. and at first, it looked like the dr. arm was 1/16th higher than pass.

we have swapped,swapped, and swapped(bushings,caps,lithium greese...and EVENLY TORQUING BOLTS) and i keep ending up with 1",1.5",and 2" difference between the arm and floor(driver arm is always higher than pass side). my floor is not "perfect"...but it aint that dayum far off.when dr. bushings went to pass side(it was the worst-2") swap 1/2 bushings(middle difference-1.5") putting them back like they came off originally was 1"


...please,what it going on????? i have tried to force either arm to gimme the same, but nothing will change these numbers. and im really worried my lean will be worst than it was!!


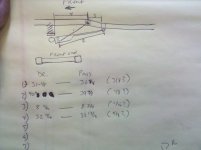
heres a quick pic of some of my notes...

and i even considered maybe a axle tube is tweeked...but some measurements dont show that being the case
 

Attachments

  • IMG_20120210_222005.jpg
    IMG_20120210_222005.jpg
    57.4 KB · Views: 160

bknbronco

Bronco Guru
Joined
Jan 17, 2011
Messages
4,378
Loc.
North Metro, MN
Lets start with the basics....
Are you checking the arms with the axle out of the truck? Just the axle and the arms? Tires on or off?

When i did mine i didnt evenly torque the bolts. Just cranked them down with the impact, and mine were almost perfect. Did you stand the arms upright next to eachother to make sure one isnt bent? Im not sure there is a simple answer im just trying to rule out some things you probably already went through.

Remember it will never be perfect. And if you get lucky and you get it perfect, then a few months down the road when everything seats and settles it wont be perfect anymore.
 
Last edited:

NYLES

Bronco Guru
Joined
Aug 13, 2004
Messages
9,846
ya got a nice new ridin set a springs....and the engine sits to pass side so yeap it leans...everbody know that! got the good shocks on it? may take some of it out.

And eyeballin ya notes yours sits better than mine by a hair! put the dang tape measure up in drive it!

mines always sat driver side hide also, and i did just about every you have with the arms, never could get em to touch the floor together
 

Crude dude

New Member
Joined
Feb 4, 2012
Messages
136
I have come across "C" bushings that were labeled wrong and it twisted everything out of proportion, still running them but I have to hold them up and see how they are supposed to go before installing them. Interesting issue you are having. You have measured the coil length loaded and unloaded and the number of coils per spring? Along with the rear leafs?
 

Socal Tom

Bronco Guru
Joined
Feb 12, 2004
Messages
2,442
Loc.
San Diego, CA
is the ground totally level? have you put the rear of the frame on jack stands to remove any impact from the rear end? how does it sit with the driver in the seat.
Tom
 
OP
OP
blazinchuck

blazinchuck

Bronco Guru
Joined
Jul 14, 2005
Messages
3,319
the coils are within a 1/16th unloaded. havent measured them installed.

i thought about going back to the 7* bushings to see what that changes, but i really didnt want that much caster. my caster was way outa range and when i dropped it down i wanted the bushings duff recommended w/their arms.

i cant be sure how its sitting with me in the seat...but from my seat it looks a lil lower on the pass side.

its my daily driver, so i gotta put this back together by sunday.

the axle is still under the truck, i left the driver shaft connected...but nothing else other than a brake line. i kinda tight on space in the garage...so i left it under the bronco. so the axle is on stands(that are 14"tall) and no tires. so the arms are hanging staright back and im measuring from the heim to the floor.


also, i measured the edge of the lower coil mount back to the arm frame mount. and the coil mount on the dr. side is a 1/2" more forward than the pass. side! but the arms are within 1/16th of being same length. the frame mounts arm right on the frame and square. so how the hell can that be??? that must be whats causing the coil to look bowed forward.


dayum this is aggravating.
 
OP
OP
blazinchuck

blazinchuck

Bronco Guru
Joined
Jul 14, 2005
Messages
3,319
also, ive been checking the radius arm to axle bushings...but i get no up/down travel, only side to side movement. i even started looking at the axle tubes...im at a lost.

i cant be positive...but im sure we measured the arms before we removed them and they were almost level. im worried now, that i will have way more lean than before.
 

Kyle.malone

Bronco Guru
Joined
Mar 9, 2006
Messages
3,077
Loc.
Norman, OK
Have you tried backing the joint at the back of the radius arm off to get your coil to sit directly under the mouting point? I just installed mine and I had to adjust mine like that and still have a small driver side lean as well.
 

Buldozer

Bronco Virtuoso
Joined
Oct 17, 2007
Messages
3,065
Loc.
God's Country
Yours is not any worse than 90% of the rigs running on the road every day....I don't think you will ever notice it and it probably will not even exist going down the road anyway. ;)
 

NYLES

Bronco Guru
Joined
Aug 13, 2004
Messages
9,846
Yours is not any worse than 90% of the rigs running on the road every day....I don't think you will ever notice it and it probably will not even exist going down the road anyway. ;)

Samrtest thing you said all day! And I AGREE!
 

Socal Tom

Bronco Guru
Joined
Feb 12, 2004
Messages
2,442
Loc.
San Diego, CA
.

also, i measured the edge of the lower coil mount back to the arm frame mount. and the coil mount on the dr. side is a 1/2" more forward than the pass. side! but the arms are within 1/16th of being same length. the frame mounts arm right on the frame and square. so how the hell can that be??? that must be whats causing the coil to look bowed forward.


dayum this is aggravating.

I would call Duff's to see what the measurement should be. It sounds like they may have made a mistake.
Tom
 

Crude dude

New Member
Joined
Feb 4, 2012
Messages
136
I am with rustbucket, it sounds like a c bushing is off somehow. They do get marked wrong on occasion so it's a good idea to visually hold the two sides of the bushing together and decide if it's marked right and then install. I installed mine once (which are marked wrong) and it made one side about 2 " lower than the other.
 
OP
OP
blazinchuck

blazinchuck

Bronco Guru
Joined
Jul 14, 2005
Messages
3,319
I really don't see how the bushings can be marked wrong. Its not like there is a right or
Left side...these sound come from one mold. Its get flipped for a front or rear mount. I did check
Them btw. The "front" wording was worn down,but the rear wording was clear. I loosened the dr.side and forced it down with bottle Jack under the frame. Went way below where it should be
And retightened. The dr.arm was within 1/2" of pass side. So I installed them.found the pass frame mount 1/4" farther back,redid that(need to weld it) and found a casting on the driver axle mount holding the lower coil mount up at the rear, not flat like pass side. So I ground that flat. Coil sits better,not dead perfect ..but it will work. Truck sitting more level now. Gonna ride a couple days and recheck things.
 

rtj731

Sr. Member
Joined
Aug 20, 2007
Messages
407
Chuck, I know it's no help, but my 77 is .5" lower on the the passenger side, has been since I got it. Both with stock arms and the cage arms. I swapped arms left to right, change bushings so on and on. Never have figured out the why.
 

Crude dude

New Member
Joined
Feb 4, 2012
Messages
136
Thats what I thought about the urethane bushings, came from a mold and how could it be wrong. I wish I had pictures to show that it is wrong. 3 of the bushings are correct and 1 is wrong. Dont go by what it says, hold them up against each other and see how the diamond looks from the side, that will tell you if they are turning the axle for more/less caster or if one is incorrect.
 
OP
OP
blazinchuck

blazinchuck

Bronco Guru
Joined
Jul 14, 2005
Messages
3,319
Thats what I thought about the urethane bushings, came from a mold and how could it be wrong. I wish I had pictures to show that it is wrong. 3 of the bushings are correct and 1 is wrong. Dont go by what it says, hold them up against each other and see how the diamond looks from the side, that will tell you if they are turning the axle for more/less caster or if one is incorrect.

im not sure im following you on the "diamond"...i have another set of 7* poly bushings, i can look at those. however everything is installed...but it does raise the question, when i swap bushings and it changes the arms----WHY??? it they are right, why would the arms change?? oh well.


Kyle.malone Have you tried backing the joint at the back of the radius arm off to get your coil to sit directly under the mouting point? I just installed mine and I had to adjust mine like that and still have a small driver side lean as well.
im not sure ya should do this, if you talking bout the heim at the frame end of the radius arm...youre gonna change the axle angle. the axle has to be square to the frame.
 
OP
OP
blazinchuck

blazinchuck

Bronco Guru
Joined
Jul 14, 2005
Messages
3,319
Chuck, I know it's no help, but my 77 is .5" lower on the the passenger side, has been since I got it. Both with stock arms and the cage arms. I swapped arms left to right, change bushings so on and on. Never have figured out the why.

i hear ya, i havent ruled out the stock body bushings being too squashed causing some leaning
 
Joined
Nov 18, 2009
Messages
12
I have done quite a few EB Bronco lifts and found that it is very important not to get in a hurry during assembly, tightening, etc.

#1-Make sure you drilled for the rear radius mounts correctly. Is one bracket further back than the other? Should be at least within a 16th of each other. If found to be wrong you can correct by slotting holes on the side that furthest from instruction specifications, install, re-tighten bolts & tack weld in place.

#2-Make sure that the rod ends are screwed in sufficiently (per instructions) and equal on both sides. You can stand the assembled arms up on an even floor or flat piece of steel and measure from the center of the rod end to the floor or plate and adjust accordingly to make sure both sides are equal length. Tighten locking nuts.

#3-Install radius arms and snug rod end bolts just enough so you cannot undo bolts by hand and brackets are squeezed enough to contact rotating ball in rod ends. Find some way to support both radius arms up in normal driving position. They have to be fairly close at this time. I am talking about distance from frame. Small ratcheting straps hooked to frame work well and u can use ratchet to adjust height.

#4- Read installment instructions on "C" bushings and install rear bushings into radius arms. I like to use moly grease/paste on all bushings. Light to medium coat mscdirect.com P/N 00270256.

#5- You will now need two floor jacks to lift the axle up to the arm heights. You will also need some buddies to help keep the axle on the floor jacks and in the correct position/rotation. The axle must also be kept in parallel position in relation to frame rails.

Jack the axle up to correct height and push axle back into radius arms. Again, you can use a couple of cheap small ratchet straps to help keep the axle backed into radius arms by tying them down somewhere in the middle section of the frame and then to the axle.
Use just enough pressure on the ratchet straps to snug axle into radius arm bushing. Do not distort bushings and use same pressure on both sides.

You can now install the front "C" bushings into the original caps and install them onto axle wedges. Screw bolts in far enough so that bottom of head contacts cap and flat cap faces remain parallel to radius arm casting faces. Do not tighten at this point.

Now make sure that the radius arm dimension from some point on frame to radius arm has remained the same on both radius arms. If not adjust to make the same. Within a 1/16.

Start tightening either of the radius arm caps and use a cris cross pattern when tightening. Do about 5 turns per bolt and then jump over to the other side and keep doing the same (jumping from one side to the other) until the front cap faces touch the radius arm cap faces. Torque bolts accordingly.

You can now tighten the rod end bolts in the back.

All of this aligning and tightening is done without springs, trac bar or steering installed. The trick is to tighten all bolts equally, with axle and radius arm assembly hanging in a free state without anything pulling the assembly up, down or sideways. If you tighten the caps with axle sagging on one side or the other that is the set that the "C" bushings will take. If you have been using the bronco with a sag you might want to buy a new set of bushings, as the rubber will conform to the misalignment.

The factory spring coil plates (bottom spring mounts) are very thin and I have not found one yet that was not cracked or severely corroded. This can account for at least 1/4" of misalignment. New spring coil plates are recommended.

You can now install springs and snug axle up to them by lifting jacks equally. Tighten spring coil retainer plate and top spring retainer. Remove ratchet straps, install tires and lower jacks out of the way. The springs are now compressed by the front vehicle weight. You will probably notice that axle is not centered under the vehicle. The trac bar installation should take care of most of this misalignment. An adjustable trac bar is recommended to center front axle under frame. You should also be using the trac bar drop down bracket for the amount of lift that you purchased. Not using a drop down bracket will make it very difficult to install track bar and pull bronco down on one side and negate most of the suspension travel that you just purchased. A very important point to make is making all track bar and steering adjustments with the vehicle weight that you will be using on the streets/trails. Make sure radiator is full, winch or customer bumpers are installed etc.

You can now straighten front wheels and install the drag link to tie rod. An adjustable drag link and drop pitman arm is highly recommended. What you want is to be able to steer the vehicle equal turns left to right and not using a drop down pitman arm will also cause sag.

You can play with the adjustable drag link and the clockable drop pitman arm to center your steering. Not centering the steering will cause bump steer and you will constantly be fighting the to keep the vehicle tracking straight.

Go over every nut and bolt affected by the installation for tightness and condition. Check your brake lines to make sure they are not damaged by moving components or during the installation. Remember that losing a bolt in the suspension or steering will cause catastrophic results including death.

Worn body bushings, rusted or damaged body body mount panels and bent frames also cause sag.

My last bronco had a 5 1/2" James Duff lift with radius arms and it sat straight as an arrow.

Hope this helps,

therifleman
 
Last edited:
Top