• Welcome to ClassicBroncos! - You are currently viewing the forums as a GUEST. To take advantage of all the site features, please take a moment to register. It's fast, simple and absolutely free. So please join our community today!
    If you have problems registering or can't log into your account, please contact Admin.

Raptor Lining Hard Top Advice - Updated - The Build Continues..

Tedster100

Chairman of the Bored
Joined
Aug 25, 2010
Messages
1,762
Ok, I picked up a good hard top with only minor issues and I'm going to Raptor Line it so it's a little tougher than paint. I've also ordered new window gaskets. Any advice or tips to make the process easier or better? I'm a little concerned that maybe I should paint around the window openings and then mask 3/8" so the seals can lay flat instead of on the liner material. Anyone have experience with this? Any advice will be helpful, planning on dis-assembly, sanding and primer this weekend. Thanks!
 
Last edited:

rwill

Sr. Member
Joined
Apr 1, 2010
Messages
522
I would tape edge of mating surface to insure a good flat fit.I have raptor on the inside of my tub and it is thick enough to cause a less than water tight fit.
 

red hot71

Sr. Member
Joined
Nov 26, 2009
Messages
648
Loc.
kent wash.
I learned the hard way as not to paint or liner the top of the bed rails. The added thickness of the liner will cause gapes above the windshield. Plus liner material sprayed were the lower doors seals go are bad also.

So when it comes to the top and anywere seals have to set against I would recommend against any kind of liner.
 

greatguy57078

Contributor
Bronco Guru
Joined
Jul 15, 2006
Messages
3,429
I am lining the inside and the underside of my Bronco. I am also coating the inside of the halfcab. I am using the tintable Raptor liner, so I was even considering coating the outside of the halfcab. I am always afraid of hail damage as I drive my Bronco daily. %)
 
OP
OP
Tedster100

Tedster100

Chairman of the Bored
Joined
Aug 25, 2010
Messages
1,762
All good points. I ordered new window seals so I guess I'll clean that surface and paint & then tape the width of the seal so I don't have an issue installing or being watertight. Guess I'll stick to paint on the maiting surfaces too so I don't have clearance problems. Thanks for the responses!
 
OP
OP
Tedster100

Tedster100

Chairman of the Bored
Joined
Aug 25, 2010
Messages
1,762
Pulled the windows out and removed the rear gate. I'm floored at the lack of any rust on this top! there's surface rust here and there but nothing that needs any metal work!! Needs new seam sealer then I'm going to sand it down, primer and get it painted & Raptor lined as quick as I can. Thanks to jcb9089 for selling me the top, It's going to be a great addition!
 

tasker

Contributor
all knowing of nothing
Joined
Jun 2, 2006
Messages
20,785
Loc.
NH
looking forward to see it, pics?
 
OP
OP
Tedster100

Tedster100

Chairman of the Bored
Joined
Aug 25, 2010
Messages
1,762
Well, didn't get it sanded and primered but I did get it taken apart. Here's the pictures for Tasker. Notice the 70's style 'fro comb in the second picture, it would probably work for a squatch too!
 

Attachments

  • P1010060.jpg
    P1010060.jpg
    101.5 KB · Views: 166
  • P1010068.jpg
    P1010068.jpg
    81.3 KB · Views: 125
  • P1010067.jpg
    P1010067.jpg
    81.3 KB · Views: 124
  • P1010065.jpg
    P1010065.jpg
    70 KB · Views: 128
  • P1010064.jpg
    P1010064.jpg
    94.8 KB · Views: 132
  • P1010063.jpg
    P1010063.jpg
    67.7 KB · Views: 144
  • P1010066.jpg
    P1010066.jpg
    77.5 KB · Views: 154
  • P1010061.jpg
    P1010061.jpg
    100.1 KB · Views: 170

Fireball05

Bronco Guru
Joined
Oct 7, 2012
Messages
1,822
Looks good! Are you reusing the old glass? If so, how did you remove it? Will you be buying new seals for the 3 pieces of glass, or reusing those as well?
 
OP
OP
Tedster100

Tedster100

Chairman of the Bored
Joined
Aug 25, 2010
Messages
1,762
The seals / rubber was checked and had some major cracks. I couldn't see doing all the paint & liner work and having to replace them later. I just cut the inside with a utility knife and they poped right out. With two people you could probably work the inside seal and get them out without damaging the seal. The glass also has a purple tint applied so having it out will make it a lot easier to remove the tint film.
 

Fireball05

Bronco Guru
Joined
Oct 7, 2012
Messages
1,822
The seals / rubber was checked and had some major cracks. I couldn't see doing all the paint & liner work and having to replace them later.

I've said the same many times so far in my build, but in this case it's a bit bigger hit to the wallet at $150 for the 3 seals. Oh well, do it once and do it right :)

Are you having the interior raptor lined too?
 
OP
OP
Tedster100

Tedster100

Chairman of the Bored
Joined
Aug 25, 2010
Messages
1,762
Yes, going to put the liner on the inside and outside. Should be interesting to see what it ends up looking like. I need to get some seam sealer & replace all that too, it's all cracked but I found that a little heat from a heat gun and the stuff comes out pretty easy.
 

Fireball05

Bronco Guru
Joined
Oct 7, 2012
Messages
1,822
Sorry, I meant to ask if you were doing the interior of the vehicle. Was wondering how many raptor kits you thought you would use.

Also, you might want to check out Baja 71s build thread. His painter used some self leveling seam sealer for the hardtop. Turned out really great.
 

AaronWelch

Full Member
Joined
Jun 19, 2012
Messages
304
Loc.
Atascocita, TX.
I am planning on doing raptor liner in my interior and under body. From what I read you should be able to do total interior with one kit and have some left over (does not include doing top).
Aaron
 
Last edited:
OP
OP
Tedster100

Tedster100

Chairman of the Bored
Joined
Aug 25, 2010
Messages
1,762
Sorry, I meant to ask if you were doing the interior of the vehicle. Was wondering how many raptor kits you thought you would use.

Also, you might want to check out Baja 71s build thread. His painter used some self leveling seam sealer for the hardtop. Turned out really great.

I did the interior with Durabak in a tan color. I like it but it does tend to scuff and retain dirt marks. If I had to do it again it would just be black or maybe a charcol in the Raptor Liner.

I saw the thread on Baja71's build, really like the look, think that's the way I'm going to go too.
 
OP
OP
Tedster100

Tedster100

Chairman of the Bored
Joined
Aug 25, 2010
Messages
1,762
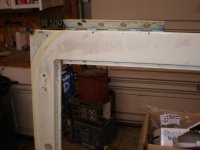
Ok, so in between everything else going on I've done a little more dis-assembly and sanding. Finally conceeded and pulled the sunroof out after looking at the dry rotted seal at the window, it's scrap. Going to pick up a new one this week. Got all the new seals and a new handle for the gate so all the parts are here.

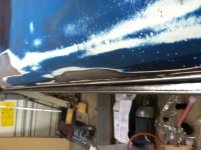
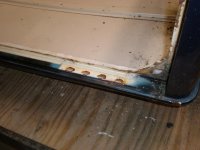
Still can't believe how solid this thing is. I used a heat gun and pulled all the old seam sealer out and used a wire wheel to clean up the gutter. I'm hoping to primer tonight after a little more prep but I haven't added any filler or welded a single thing on this top!

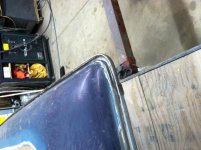
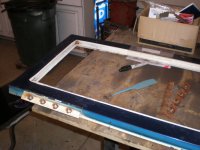
I started to install the new self leveling seam sealer last night, SEM brand, works great I just didn't get enough. It should also be noted that if you pull all the old seam sealer out it will take 5 tubes at $35 each to put it back level with the top of the drip rail, oh yea and $60 for the gun. It's not cheap but it's the look I'm going for and will keep water from sitting in the rail so at this point I'm all-in. Another thing to note, this stuff really self levels, after spending 15 min trying to level up the gutters I got it about as good as possible. Problem is that the rail on the sides is sloped to the front and back around the b-pillar area. This caused some material (not much) to drip over the front corner. If I had to do it again I'd level the front and install that half and then level the back and install that half once the front cures enough (10-15 min).

I'm planning on getting the whole thing in primer and then painting the gasket surfaces and mounting surfaces with a black satin paint so it will match up with the liner. I may also add some duplicolor bed liner to the bottoms where it bolts to the bed and windshield. It's easily brushable and has a fine texture compared to the Raptor liner and will keep it from getting scratched up when it's off but still seal up with the new gaskets.
 

Attachments

  • IMG_0056.jpg
    IMG_0056.jpg
    99.5 KB · Views: 104
  • IMG_0064.jpg
    IMG_0064.jpg
    99.8 KB · Views: 86
  • IMG_0065.jpg
    IMG_0065.jpg
    86.6 KB · Views: 87
  • IMG_0054.jpg
    IMG_0054.jpg
    109.4 KB · Views: 87
  • IMG_0052.jpg
    IMG_0052.jpg
    120.6 KB · Views: 91
  • IMG_0051.jpg
    IMG_0051.jpg
    80.9 KB · Views: 86
OP
OP
Tedster100

Tedster100

Chairman of the Bored
Joined
Aug 25, 2010
Messages
1,762
Well, didn't get all the pics I wanted to post but I got a few. Stopped at the pick & pull & got a roof rack for the project. Thought I better do it now rather than later. Chevy Astro Vans have an aluminium rack that's easy to cut down to size. Got it mocked up and punched all the holes. Installed nutserts at all the mounting locations. I'm thinking the windows will go in this weekend so it can be masked and the Raptor Liner installed.
 

Attachments

  • IMG_0069.jpg
    IMG_0069.jpg
    108.6 KB · Views: 82
  • IMG_0075.jpg
    IMG_0075.jpg
    94.7 KB · Views: 88
  • IMG_0077.jpg
    IMG_0077.jpg
    95.1 KB · Views: 86
  • IMG_0081.jpg
    IMG_0081.jpg
    53.6 KB · Views: 86
  • IMG_0080.jpg
    IMG_0080.jpg
    74.2 KB · Views: 88
  • IMG_0079.jpg
    IMG_0079.jpg
    70.2 KB · Views: 94
  • IMG_0072.jpg
    IMG_0072.jpg
    114.8 KB · Views: 71
Top