• Welcome to ClassicBroncos! - You are currently viewing the forums as a GUEST. To take advantage of all the site features, please take a moment to register. It's fast, simple and absolutely free. So please join our community today!
    If you have problems registering or can't log into your account, please contact Admin.

Rebuild a Remote Mirror

AZ73

Bronco Guru
Joined
Mar 28, 2012
Messages
3,813
This topic has come up a few times recently and I've posted a few pictures of the inside of the remote mirror, but I thought I'd post how I rebuilt mine by replacing some parts with parts scavenged from a reproduction Mustang remote mirror. The Mustang remote mirrors are available from any number of vendors.

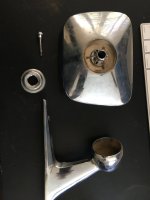
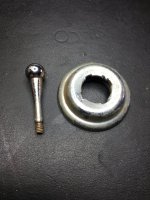
To remove your current mirror, unscrew the 2 screws holding the base to the outside door, and unscrew the chrome trim piece from around the joystick on the inside of the door. it has 4 notches in itthat you can tap with a screwdriver to unscrew. You can unscrew the joystick now if desired. Carefully feed the joystick mount and cables through the door to remove.
 

Attachments

  • IMG_2634.JPG
    IMG_2634.JPG
    251.2 KB · Views: 53
  • IMG_2801.JPG
    IMG_2801.JPG
    119.8 KB · Views: 74
OP
OP
AZ73

AZ73

Bronco Guru
Joined
Mar 28, 2012
Messages
3,813
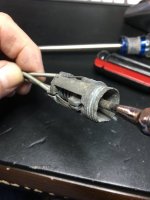
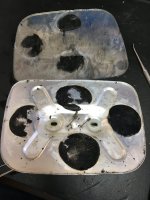
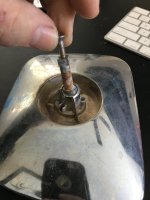
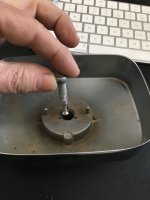
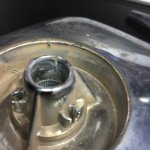
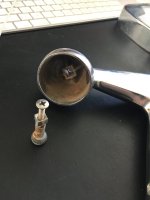
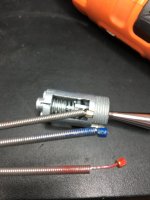
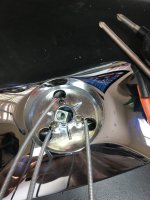
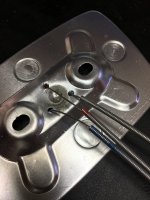
Next unscrew the mirror housing screw from the mirror housing base and pull the mirror housing off the base, feeding the cables through the base for slack. What you'll see is this (picture 1): a "lever" the screw goes into with a ball on the end for the housing to rotate around. Since I was going to replace the cables with the new ones from the Mustang mirror, I just cut the old ones and pulled the mirror and mirror backing plate out of the housing. NOTE the colors at both ends of the end of the cables. This is important to make sure your joystick operates the correct way and not the opposite. (pictures 2 & 3 are the new cables, but the old cables had the same colors). I soaked the mirror and backing plate in boiling water to loosen the adhesive, and pulled the mirror off the backing plate, then pulled the wire ends with the crimping sleeves through the front. (picture 4). OPTIONAL FOR LUBRICATING THE MIRROR HOUSING BALL: If you place the housing mirror side down and tap the lever from the other side, both the backing plate ball and the housing ball and lever will come out. The backing plate rotates on a ball that's pressed into the housing. (picture 5,6,7,8). BE CAREFUL when loosening the cable housing holes in the back of the mirror housing to pull the cable housing out. It's pot metal and very fragile. (picture 9). Pry them opening ever so slightly. If you've had a problem tightening this screw but the housing is still loose, you may have cracked the ball swivel point. (picture 9) You'll have to repair or replace the housing.

If you accidentally break your mirror or just want to replace it because of scratches or corrosion, I found a replacement here:

https://www.autozone.com/collision-...p/k-source-door-mirror-glass-99145/430266_0_0
 

Attachments

  • IMG_2802.JPG
    IMG_2802.JPG
    134.8 KB · Views: 91
  • IMG_2605.JPG
    IMG_2605.JPG
    187.3 KB · Views: 89
  • IMG_2604.JPG
    IMG_2604.JPG
    133.1 KB · Views: 90
  • IMG_2608.JPG
    IMG_2608.JPG
    199.5 KB · Views: 88
  • IMG_2757.JPG
    IMG_2757.JPG
    142.5 KB · Views: 87
  • IMG_2755.JPG
    IMG_2755.JPG
    109.3 KB · Views: 81
  • IMG_2754.JPG
    IMG_2754.JPG
    123.8 KB · Views: 74
  • IMG_2756.JPG
    IMG_2756.JPG
    113.2 KB · Views: 91
  • IMG_2603.JPG
    IMG_2603.JPG
    168.4 KB · Views: 85
  • IMG_2752.JPG
    IMG_2752.JPG
    147.6 KB · Views: 84
Last edited:
OP
OP
AZ73

AZ73

Bronco Guru
Joined
Mar 28, 2012
Messages
3,813
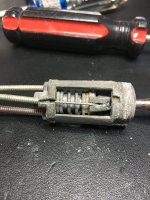
The control lever housing was very weak. Worse than pot metal. To undo the crimping sleeves you'll have to set up something to press the lever in to relieve the pressure of the spring, then tilt the lever to unclip each of the crimping sleeves. I barely touched mine and it disintegrated. Thus the decision to replace the whole unit with the Mustang reproduction.

Mark on the control lever housing the correct color locations of the cables. Compress the spring and removed the new cable outer sleeve from the bottom of the housing, then push the inner cable and crimping sleeve up and disloged them from the control. You'll need to remove the cables because you will need to work with them while not under tension and potentially shorten them.
 

Attachments

  • IMG_2800.JPG
    IMG_2800.JPG
    251.1 KB · Views: 86
  • IMG_2610.JPG
    IMG_2610.JPG
    248.4 KB · Views: 74
  • IMG_2905.JPG
    IMG_2905.JPG
    340.7 KB · Views: 69
  • IMG_2604.JPG
    IMG_2604.JPG
    133.1 KB · Views: 53
Last edited:
OP
OP
AZ73

AZ73

Bronco Guru
Joined
Mar 28, 2012
Messages
3,813
Unfortunately picture 1 & 2 are of the Mustang mirror backing and housing because I didn't get pictures of the Bronco's. The idea is the same and the parts look similar, but because the Mustang mirror is much smaller than the Bronco mirror, it's better to not use it. Cut the crimping sleeves off one end of all 3 cables. Take your new cables and measure them to 1-2" longer than your old ones if needed (different repo's have different lengths). Better to have more cable than less. Pull the new cables out of their sleeves and thread the ends without the crimping sleeves through the 3 holes in the old mirror backing plate. (picture 1 shows the cable sleeves on but they have to be off for the next step.). Make sure you thread the correct color through the correct hole. If you pulled the mirror housing and backing plate balls out, lubricate and repalce them. Slide the 3 cables through the Mirror housing, then put the sleeves back on and crimp the sleeves into the housing. (picture 2,3)
 

Attachments

  • IMG_2605.JPG
    IMG_2605.JPG
    187.3 KB · Views: 57
  • IMG_2607.JPG
    IMG_2607.JPG
    220.9 KB · Views: 57
  • IMG_2802.JPG
    IMG_2802.JPG
    134.8 KB · Views: 65
Last edited:
OP
OP
AZ73

AZ73

Bronco Guru
Joined
Mar 28, 2012
Messages
3,813
Feed the cables through the mirror door mount arm and screw the mirror housing to the door mount arm making sure the cables don't get crimped. I don't have a picture of this but you get the idea from picture 1.
 

Attachments

  • IMG_2759.JPG
    IMG_2759.JPG
    116.5 KB · Views: 52
OP
OP
AZ73

AZ73

Bronco Guru
Joined
Mar 28, 2012
Messages
3,813
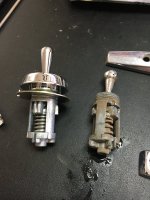
Pull the cables tight so the mirror backing plate is snug against the ball and the 2 pins on the housing are in the backing plate. You'll now need to best guess where to crimp the sleeve stops so there's just tension from the spring. Too much tension and you won't be able to compress the spring enough to put the outer cable sleeve into the joystick housing. Too little and the mirror will be loose and you'll have poor control. All 3 cables must have the same distance from the sleeve stop to the outter cable. I made my best guess after measuring a couple of times, crimped the sleeve stops, compressed the spring in the control unit (1), tilted the lever for more room, and slid the stop into the head of the control unit lever end (2) then pulled the outter cable into it's position at the bottom of the control unit (3). PAY ATTENTION TO THE COLOR ORIENTATION!!!. It should look similar to this when done (Picture 2). Couldn't find a picture of when I finished it.

If I remember correctly I had to cut the sleeve stop down a little in lenght to get it to fit into the control unit lever end.

When you're done, test it for function and tightness (the spring should JUST be compressed. Thread the control unit back through the door and into the hole in the inner door, screw the mirror arm back onto the door, and secure the trim nut onto the control unit. It will only fit oriented one way. Then re-install the glass mirror with adhesive.
 

Attachments

  • IMG_2905 copy.jpeg
    IMG_2905 copy.jpeg
    348.3 KB · Views: 99
  • IMG_2760.JPG
    IMG_2760.JPG
    116.6 KB · Views: 78

ngsd

Contributor
Bronco Guru
Joined
Mar 2, 2019
Messages
2,701
Great write up, thanks for helping us.
 
Top