Things are looking a lot better now after you advice.
I got the frame in the correct Hight on timber blocks and installed the black 7° bushings. I liked the build of them better
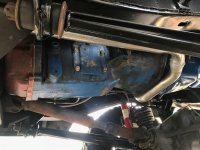
The engine is pretty level. Question is how much can I lower it in the back before it hits the body. To get better front and rear driveshaft angel?
I will have 2" or 3" body lift
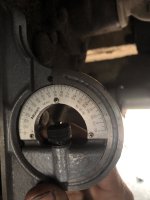
I can now see the caster degree. The coil spring seat is almost level
I am not sure how accurate this is..
The Np205 is sitting a bit to high don't you think?
I don't like this. Please remove the castle nut on the upper ball joint, and measure caster on the machined face of the inner knuckle "C". Compare that number to your 9 degree number. I have never used the outer knuckle for the measurement, so I don't know if it is exactly accurate. You will know the relative difference when you check against the knuckle.
It is impossible for me to know if the NP205 is too high. So if you take a straight edge, and measure from the output shaft centerline to the bottom of the frame, them I can tell you the answer. The engine does not sit in the frame at level. It is usually 5(?) degrees angle. (I can't remember exactly, but I can measure one tomorrow in the workshop.)
I think with the V8-configuration, that you can drop the NP205 many inches and the engine never contacts the body.
So:
Step 1, set suspension at design height. (DONE!)
Step 2, set caster at 7 degrees positive.
Step 2A, Establish steering tie rod location (high steer, low steer, etc)
Step 2B, Establish track bar location and angle, including lowering brackets, raising brackets, etc.
Step 2C, Establish drag link location and angle, including pitman arm and steering box location.
Step 2D, Verify range of motion with front axle while coils are not installed. Go up, down, and fully left and right. Take note of pitman arm to tie rod interference. Take note of track bar bracket to tie rod interference. Ensure track bar and drag link are parallel, and as long as possible. (Usually with TRO and track bar frame bracket, this is important.)
Step 3, set engine angle / build crossmember.
Step 3A, (optional, but I always do it...) Measure front driveshaft angle. Cut and turn knuckles to achieve 0 degree delta. Question your choice of a cast wedge D44 at this step, and acquiesce to your poor choice of axle. Understand that caster is more important than u-joint wear. But this will be your first necessary compromise)
Step 4. set rear axle pinion inclination.
Step 4a. (optional) question your choice of 9 inch rear axle. The combination of low pinion, long transmission, long adapter, and long NP205 will push the rear driveshaft to a very short length. Perhaps too short for your choice of CV joint? If your rear driveshaft angle is too steep, go back to step 3. At 3.5 inch lift, you are near the limit of the 1310CV max operating angle. So do this immediately.
Step 5. Measure carefully for driveshafts. Order driveshafts.
Step 6, resume construction and re-install suspension.
Step 7, install shock absorber frame mounts. (add additional mounts for future use if desired.)
Step 8, (optional) remove everything, and send frame for media blast and powdercoat.
Step 9, install body.
Don't be discouraged. You will find your optimum location. It will all fit, and work.


