Jason72Bronco
Full Member
- Joined
- Feb 16, 2015
- Messages
- 156
Review: TBP Headers + Duff Dual Exhaust Install
(This post is very long and detailed)
Project: Remove existing exhaust and replace with Tom’s Bronco Parts (TBP) stainless headers and James Duff dual exhaust.
Starting Point: Fairly stock 1972, with 302 and 3 speed column shift. Moderate lift, 1.5 inch by my measurement. (Previous owner did it, so not certain on exact inches.) Old and rusty long headers which were leaking (loudly) at head gasket. Old custom dual exhaust with mufflers just in front of rear axle and exiting to the side behind rear wheels.
New Parts:
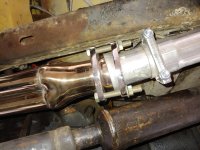
Tom’s Bronco Parts Headers - V8, STAINLESS STEEL (fits 289, 302 & 351w): Two packages delivered quickly and contained all parts present as shown on website. Headers look shiny and very well made, nice materials, bends and welds. Right away I could tell that there would be more clearance for removing bolts, which is nice if you’ve ever had that issue. Came with Hedman galvanized bolts with 3/8 heads. (Also very nice for clearance, as my current bolts are 7/16. That 1/16 inch can make a world of difference in clearance for a socket.) Standard metal gaskets (not sure of brand) and flanges to attach/weld to your exhaust of choice and bolt to the header 3-bolt flange. Also include was a short piece of pipe with metal “tab” across it—I have no idea what that is for. No instructions. Just what is described on the TBP website. https://www.tomsbroncoparts.com/pro...66-77-early-ford-bronco-new-fits-289-302-351w
James Duff Customizable Aluminized Dual Exhaust: Arrived in about two weeks, and surprisingly all in one box…very well packed. All parts present as described and depicted on website. Includes intermediate exhaust tubes, 2.5” clamps to join tubes, hanging equipment (two hanging points per side), mufflers and tailpipes. As the part description implies, this system is customizable. I thought I ordered the Cherry Bomb Vortex, but I think I ended up with the Cherry Bomb Pro. (No regrets, more on that later.) I opted for the 90 degree behind-the-wheels exhaust end/tips. Instructions were thorough, but Duff might consider more and better pictures and in color. The pictures of the mounting points are important and were difficult to make out. https://www.dufftuff.com/Dual_Exhaust_66_75_Early_Classic_Bronco_Aluminized_p/3095.htm
From Duff, I also added the “#3093 TBP Header Adapter” which are two pre-bent and measured flanges that allow mating up to the TBP headers. So, I used these instead of the two generic flanges that came with the headers. (Each side was different and no instructions were provided by Duff to identify which one went on which side, which would be nice. It becomes obvious once you are doing the install, but that is pretty far along to be guessing.) (Note to vendors: This collaboration between vendors to make two good products work with each other is a super idea, and was a big selling point for me on the setup I chose, so I could do the install myself without welding. We need more collaboration like that between vendors.)
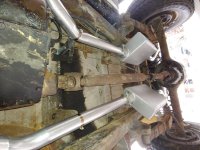
Disassembly: My existing system was probably at least 25 years old. I do like to salvage parts and use them elsewhere if I can or give them to someone who can use them, but this exhaust was toast. No way this was just unbolting apart. Cutting wheel and sawzall took care of removal. As far as unbolting the headers, I was really worried about the rusty bolts and how bad removal might be. I did not want to break one a bolt in the head. To make matters worse, out of the 16 bolts I could get a socket around maybe 3 of them due to the way the headers were made and with the 7/16” head size, they were just too close to the tubing to use a socket. It was going to have to be an open end wrench and a prayer to the no-stripping gods. I soaked the bolts for two days with Liquid Wrench. I warmed up the engine to get some expansion of bolt holes, and went about removal. To my surprise, they came off fairly easy. Not sure if it was my prep or they were already loose, but who cares.
Header install: If you’ve ever installed headers, it can sometimes seem like an impossible 3-D puzzle. But on the passenger (RH) side, the headers dropped in easy and fit like a glove. Put the gasket on (clean and dry surfaces) and bolted it up. I torqued the bolts to 155 inch/pounds (about 13 ft./pounds). The TBP/Hedman came with no instructions on torque specs, but I used the interweb to research it and ended up with this. I almost recommend doing the RH after the LH side, because it was so easy that you are misled into how much more difficult the drivers (LH) side will be!
The LH side took a lot more to fit in the headers. I ended up having to remove the valve cover, unbolt my brake booster and M/C setup from the firewall and move it out of the way (although I was able to do this without opening up the lines, which was nice), disconnect the shift linkage near the firewall and move the linkages out of the way and remove the clutch release spring. I tried from both top and bottom, and eventually going in from the bottom I got the sucker in. It was definitely one of those projects that once you get it in you step back and look at it and think “ok, time for a beer before I put all this crap back together.”
Exhaust Install. I read the instructions provided by Duff twice, three times, and laid out the exhaust on the floor ahead of time, and the install isn’t really that bad. The most important part is patience and re-adjustments until it is right before you tighten everything up. I started at the front on each side and worked my way back, installing pieces and hanging mounts. One of the mounts on each side calls for drilling a hole in your frame to attach the mounting point, which thankfully I did not have to do because the previous hanger was close enough that I could use that hole. Drilling those holes in the frame would have been a bitch.
I started installing and tightening from the front to the back, because even the smallest movement at the front can move a lot at the back. This will make sense when you do it. Also, I used silicon spray at each joint to help with movement until I clamped things down. I found it helpful to use a permanent marker to mark across each tube at the joints with a big “X” across the joint so that I could use it as a reference point each time something shifted or moved when making the adjustments. Eventually, with patience, you can get everything adjusted and clear of rubbing or bumping and tighten everything down. I found using a ratchet-style open end wrench the best for tightening the clamps instead of a socket, so you can see the threads and keep them even on each side of the clamp as you tighten.
After I loosely installed the tail pipes to the mufflers, I stood about 30 feet behind the truck and eyeballed that they were level and how far to cut them so they don’t stick out past the tires. I ended up cutting about seven inches off of the supplied pipes.
Followup to install. After test driving it a couple of miles, I needed to re-adjust the drivers side exhaust where it was getting very close to the rubber brake line on the rear axle. Other than that it has worked fine. After two or three drives with the new setup I re-tightened all the clamps and I re-torqued the header bolts, and actually none of them had moved much, if at all. I will probably check the torque again after a few months. The super-shiny headers did discolor some from the heat near the engine, but that is expected, and was noted on the TBP website prior to purchase. Still they look great.
Review: Overall the sound is great, in my opinion. With no more leak at the gasket from my old headers it sounds so much better in the engine area and no more backfiring, and actually runs smoother. The exhaust note is very smooth and fairly quiet and deep at idle and just what I wanted. I have a mild cam, and so at idle there is a nice low “lope.” When you get on the gas pedal, it is, well, loud. Very loud. And I like it! The Cherry Bomb mufflers make a loud angry bark at full throttle and a perfect snap, crackle, pop on deceleration. (Not backfiring, just snappy rumble.) My setup will wake up the neighbors, but only when I want to…. If you just drive like grandma and don't go full throttle, the volume is just fine. As far as added power from this setup? I have no idea. I’m not drag racing this rig, and I already had a header/dual setup, so it is difficult to say. I certainly don’t feel like I lost any power. Either way the appearance and sound makes it well worth the install.
All in all I’d rate the whole setup 4.5 out of 5 stars, with ease of installation about a 3/5 and a value as “best in value.”
(This post is very long and detailed)
Project: Remove existing exhaust and replace with Tom’s Bronco Parts (TBP) stainless headers and James Duff dual exhaust.
Starting Point: Fairly stock 1972, with 302 and 3 speed column shift. Moderate lift, 1.5 inch by my measurement. (Previous owner did it, so not certain on exact inches.) Old and rusty long headers which were leaking (loudly) at head gasket. Old custom dual exhaust with mufflers just in front of rear axle and exiting to the side behind rear wheels.
New Parts:
Tom’s Bronco Parts Headers - V8, STAINLESS STEEL (fits 289, 302 & 351w): Two packages delivered quickly and contained all parts present as shown on website. Headers look shiny and very well made, nice materials, bends and welds. Right away I could tell that there would be more clearance for removing bolts, which is nice if you’ve ever had that issue. Came with Hedman galvanized bolts with 3/8 heads. (Also very nice for clearance, as my current bolts are 7/16. That 1/16 inch can make a world of difference in clearance for a socket.) Standard metal gaskets (not sure of brand) and flanges to attach/weld to your exhaust of choice and bolt to the header 3-bolt flange. Also include was a short piece of pipe with metal “tab” across it—I have no idea what that is for. No instructions. Just what is described on the TBP website. https://www.tomsbroncoparts.com/pro...66-77-early-ford-bronco-new-fits-289-302-351w
James Duff Customizable Aluminized Dual Exhaust: Arrived in about two weeks, and surprisingly all in one box…very well packed. All parts present as described and depicted on website. Includes intermediate exhaust tubes, 2.5” clamps to join tubes, hanging equipment (two hanging points per side), mufflers and tailpipes. As the part description implies, this system is customizable. I thought I ordered the Cherry Bomb Vortex, but I think I ended up with the Cherry Bomb Pro. (No regrets, more on that later.) I opted for the 90 degree behind-the-wheels exhaust end/tips. Instructions were thorough, but Duff might consider more and better pictures and in color. The pictures of the mounting points are important and were difficult to make out. https://www.dufftuff.com/Dual_Exhaust_66_75_Early_Classic_Bronco_Aluminized_p/3095.htm
From Duff, I also added the “#3093 TBP Header Adapter” which are two pre-bent and measured flanges that allow mating up to the TBP headers. So, I used these instead of the two generic flanges that came with the headers. (Each side was different and no instructions were provided by Duff to identify which one went on which side, which would be nice. It becomes obvious once you are doing the install, but that is pretty far along to be guessing.) (Note to vendors: This collaboration between vendors to make two good products work with each other is a super idea, and was a big selling point for me on the setup I chose, so I could do the install myself without welding. We need more collaboration like that between vendors.)
Disassembly: My existing system was probably at least 25 years old. I do like to salvage parts and use them elsewhere if I can or give them to someone who can use them, but this exhaust was toast. No way this was just unbolting apart. Cutting wheel and sawzall took care of removal. As far as unbolting the headers, I was really worried about the rusty bolts and how bad removal might be. I did not want to break one a bolt in the head. To make matters worse, out of the 16 bolts I could get a socket around maybe 3 of them due to the way the headers were made and with the 7/16” head size, they were just too close to the tubing to use a socket. It was going to have to be an open end wrench and a prayer to the no-stripping gods. I soaked the bolts for two days with Liquid Wrench. I warmed up the engine to get some expansion of bolt holes, and went about removal. To my surprise, they came off fairly easy. Not sure if it was my prep or they were already loose, but who cares.
Header install: If you’ve ever installed headers, it can sometimes seem like an impossible 3-D puzzle. But on the passenger (RH) side, the headers dropped in easy and fit like a glove. Put the gasket on (clean and dry surfaces) and bolted it up. I torqued the bolts to 155 inch/pounds (about 13 ft./pounds). The TBP/Hedman came with no instructions on torque specs, but I used the interweb to research it and ended up with this. I almost recommend doing the RH after the LH side, because it was so easy that you are misled into how much more difficult the drivers (LH) side will be!
The LH side took a lot more to fit in the headers. I ended up having to remove the valve cover, unbolt my brake booster and M/C setup from the firewall and move it out of the way (although I was able to do this without opening up the lines, which was nice), disconnect the shift linkage near the firewall and move the linkages out of the way and remove the clutch release spring. I tried from both top and bottom, and eventually going in from the bottom I got the sucker in. It was definitely one of those projects that once you get it in you step back and look at it and think “ok, time for a beer before I put all this crap back together.”
Exhaust Install. I read the instructions provided by Duff twice, three times, and laid out the exhaust on the floor ahead of time, and the install isn’t really that bad. The most important part is patience and re-adjustments until it is right before you tighten everything up. I started at the front on each side and worked my way back, installing pieces and hanging mounts. One of the mounts on each side calls for drilling a hole in your frame to attach the mounting point, which thankfully I did not have to do because the previous hanger was close enough that I could use that hole. Drilling those holes in the frame would have been a bitch.
I started installing and tightening from the front to the back, because even the smallest movement at the front can move a lot at the back. This will make sense when you do it. Also, I used silicon spray at each joint to help with movement until I clamped things down. I found it helpful to use a permanent marker to mark across each tube at the joints with a big “X” across the joint so that I could use it as a reference point each time something shifted or moved when making the adjustments. Eventually, with patience, you can get everything adjusted and clear of rubbing or bumping and tighten everything down. I found using a ratchet-style open end wrench the best for tightening the clamps instead of a socket, so you can see the threads and keep them even on each side of the clamp as you tighten.
After I loosely installed the tail pipes to the mufflers, I stood about 30 feet behind the truck and eyeballed that they were level and how far to cut them so they don’t stick out past the tires. I ended up cutting about seven inches off of the supplied pipes.
Followup to install. After test driving it a couple of miles, I needed to re-adjust the drivers side exhaust where it was getting very close to the rubber brake line on the rear axle. Other than that it has worked fine. After two or three drives with the new setup I re-tightened all the clamps and I re-torqued the header bolts, and actually none of them had moved much, if at all. I will probably check the torque again after a few months. The super-shiny headers did discolor some from the heat near the engine, but that is expected, and was noted on the TBP website prior to purchase. Still they look great.
Review: Overall the sound is great, in my opinion. With no more leak at the gasket from my old headers it sounds so much better in the engine area and no more backfiring, and actually runs smoother. The exhaust note is very smooth and fairly quiet and deep at idle and just what I wanted. I have a mild cam, and so at idle there is a nice low “lope.” When you get on the gas pedal, it is, well, loud. Very loud. And I like it! The Cherry Bomb mufflers make a loud angry bark at full throttle and a perfect snap, crackle, pop on deceleration. (Not backfiring, just snappy rumble.) My setup will wake up the neighbors, but only when I want to…. If you just drive like grandma and don't go full throttle, the volume is just fine. As far as added power from this setup? I have no idea. I’m not drag racing this rig, and I already had a header/dual setup, so it is difficult to say. I certainly don’t feel like I lost any power. Either way the appearance and sound makes it well worth the install.
All in all I’d rate the whole setup 4.5 out of 5 stars, with ease of installation about a 3/5 and a value as “best in value.”