Yup! Dominoes will get you every time! ;D


Community
Buy / Sell


Bronco Tech
3 Arm Wiper Setup
Fix Motor Mount
Roll Cage Braces
Throttle Body 65mm
Wheel Alignment
Heat Riser Replacement
Vent Window Repair
Center Console Mount
Straighten Bumper
Ford 6R80 6 spd
More Tech...
Fix Motor Mount
Roll Cage Braces
Throttle Body 65mm
Wheel Alignment
Heat Riser Replacement
Vent Window Repair
Center Console Mount
Straighten Bumper
Ford 6R80 6 spd
More Tech...

-
Welcome to ClassicBroncos! - You are currently viewing the forums as a GUEST. To take advantage of all the site features, please take a moment to register. It's fast, simple and absolutely free. So please join our community today!If you have problems registering or can't log into your account, please contact Admin.
You are using an out of date browser. It may not display this or other websites correctly.
You should upgrade or use an alternative browser.
You should upgrade or use an alternative browser.
'Tis the season
- Thread starter eb66to77
- Start date
AHHH, that is the like the fifth time you had to stab that piece isn't it? I feel for you, I am on trans 2 in this truck.
Recipe:
VEGETARIAN LASAGNA
1 lg. jar spaghetti sauce
1 lb. broccoli, well drained
1 lb. spinach, well drained
Mushrooms, well drained
1 lg. carton cottage or ricotta cheese
1 egg
Parmesan cheese
Noodles
Spread a layer of spaghetti sauce in bottom of 9 x 13 inch pan, then a layer of noodles. Mix together broccoli, spinach and mushrooms. Spread over noodles. Mix together cottage cheese, egg and 1/4 cup Parmesan cheese. Spread over vegetable layer. Another layer of noodles. Spread remaining spaghetti sauce, sprinkle Parmesan cheese over top. Cover tight with foil and bake 45 minutes at 325 degrees. Remove foil and bake 15 minutes. Let stand 10 minutes before serving.
I split the cottage cheese with ricotta and also started with the spinach mix instead of the eggplant. I dried the eggplants for only 15 minutes and they were great. Also I put thin slices of provolone over the top over the tomato slices so ti would brown. I love baked cheese. My wife and son had some and loved it.
marc
Jr. Member
that sounds oh so firmiliar. what started as a couple small fixes turned into a complete frame off. with more time than money i've fabbed most of it myself, i sure like that mig. i was asured by the po there was absolutly no bondo but while sanding to prep for paint i found as much as 3/4" thick in spots. the list is quite long as you all are firmiliar with i'm sure, it's almost done and can't wait to drive. looking forward to sob.
marc
marc
Ok, it has been a bit but I finally am putting this back together. I did some adjusting to the panel size which will also bring the price down a bit. I am currently putting everything in place and plumming. Bill, thanks for the quick tech help. Gotta love hotlines!;D
http://www.silverfellatio.com/?page_id=205
Oh yeah, pics!


http://www.silverfellatio.com/?page_id=205
Oh yeah, pics!
Getting a little further. It is slow going right now but I wanted to finish my dual battery tray build first and then tackle the trans stuff all together.
I am going to contact the guy who made these for me with the final measurements and then post his info. I don't have the time to put together a package right now.
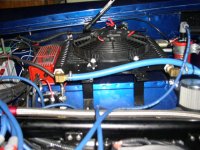
I still need to get some wires in the loom and clean some stuff up but it is coming along now. Let me know what you think!
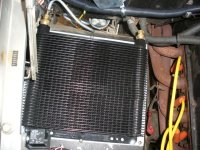
I am using a B&M stacked plate cooler pn-70266
Perma-Cool Fan 8"
Fan relay and thermostat harness. Ebay Item

I am going to contact the guy who made these for me with the final measurements and then post his info. I don't have the time to put together a package right now.
I still need to get some wires in the loom and clean some stuff up but it is coming along now. Let me know what you think!
I am using a B&M stacked plate cooler pn-70266
Perma-Cool Fan 8"
Fan relay and thermostat harness. Ebay Item
Last edited:
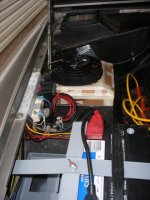
Ok so I got the battery tray finally where I want it and finished the welding, cleaned it, and painted it. I used metal exterior paint as I haven't decided on what batteries to run, only the size and want to go gel. The battery I have now is a liquid battery so I didn't want to ruin powder coating or another expensive coating if the battery leaks.
Here is how it looks. Let me know what you think.


Here is how it looks. Let me know what you think.
Last edited:
73stallion
Bronco Guru
cool idea with the hood prop rods, and i really like that louvered fender!
- Joined
- Aug 22, 2005
- Messages
- 14,498
I used this one. http://www.jegs.com/p/B&M/751118/10002/-1/10535
I put my cooler in the same spot but I did not cut the inner fender. Even with the vents I thought there would be too much goo slung from the tire hitting the top of the wheel well.
I put my cooler in the same spot but I did not cut the inner fender. Even with the vents I thought there would be too much goo slung from the tire hitting the top of the wheel well.
Attachments
clownshoe
Jr. Member
Looks good, I would run a couple yellow tops but I think I remember you saying you don't like the Optimas.
Smitty
Smitty
73stallion
Bronco Guru
Thanks Ben! The bodyshop guy didn't think I needed all the brackets to chucks hood prop system so I had to improvise.
Did you get my PM?
yes i did, every little bit will help right now. trying to sell my trailer for some living cash also...
recoiljunky
Bronco Guru
That lasagna looks fine!
Flash69
Bronco Guru
You did a good job cleaning up that fender. I didnt see no eggplant in that eggplant recipe.
You did a good job cleaning up that fender. I didnt see no eggplant in that eggplant recipe.
HAHA, I just looked at it again. That is the wrong recipe. I can't find the damn right one now. anyway, it was close, just add egg plant.
Thanks for the compliments. I wanted to clean that mess up for a while.
csjr
Full Member
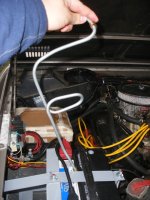
Good work. Clean wiring under the hood makes SUCH a difference in appearance and performance. What kind of connectors are those on your wiring? Are they just standard crimps with shrink wrap?
The wire connectors are a mix of crimped and soldered. some of the higher load jobs are crimped and soldered. I unwittingly got a small box of 16-18ga. ring terminals that didn't allow the nylon sheath to come off of it so there may be a few crimp only and carry a load but there is plenty of slack and nothing has yet to heat up with the truck running. Also there are NO butt connectors! Every wire that meets another wire got soldered.
Thanks for the compliments on the organization. The engine bay was kind of a quick thrown together thing just before I started deploying and have always wanted to clean it up and add a couple things. I am a 30 minute ride from where my welder is so I have to plan and plan again before I make the trip to do any of that and everything takes forever to do.
Thanks again folks, your opinions mean a lot to me.
Also I wanted to add that I am adding an underhood fuse block so that I can minimize some of the wires that hook to the solenoid. I pull power for all the relays off of it but I am gonna combine a couple of them. I am going to wind up with five relays in there so it is gonna get pretty tight on the solenoid.
Ok made some progress. Starting to mock everything up that is needed and then take it all apart and prep and paint what gets it. Still have some pieces to fabricate.
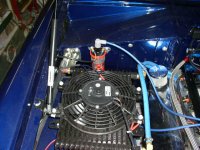
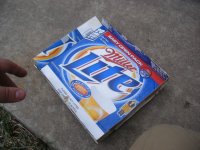
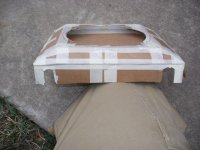
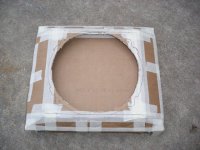
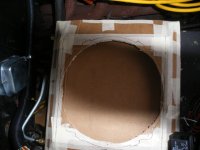
I decided to shroud the cooler to direct air through it so it cannot escape back into the engine compartment. I am going to build a fresh air duct that pulls air from the passenger side hood vent with a baffle to keep water out. Check out my dynamic and super accurate template I am using. The only problem was I had to drink the 20 beers first to be able to use the box. I am sure my measurements suffered but all is fair in love and Broncos right?
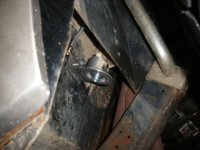
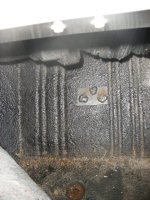
I mounted the filter on the floor pan and am building a shield for it that will come off easy to replace the filter and keep the mud and debris off the filter element. It is not inline with the tire while tracking straight. We will see if it will work. If not then I will move it. There is just limited space on that frame rail due to the headers, starter, and exhaust.
I decided to shroud the cooler to direct air through it so it cannot escape back into the engine compartment. I am going to build a fresh air duct that pulls air from the passenger side hood vent with a baffle to keep water out. Check out my dynamic and super accurate template I am using. The only problem was I had to drink the 20 beers first to be able to use the box. I am sure my measurements suffered but all is fair in love and Broncos right?
I mounted the filter on the floor pan and am building a shield for it that will come off easy to replace the filter and keep the mud and debris off the filter element. It is not inline with the tire while tracking straight. We will see if it will work. If not then I will move it. There is just limited space on that frame rail due to the headers, starter, and exhaust.
Attachments
-
 DSCF2996--small.JPG78 KB · Views: 37
 -
 DSCF2990--small1.JPG91.8 KB · Views: 18
 -
 DSCF2989--small.JPG66 KB · Views: 20
 -
 DSCF2988--small.JPG67.3 KB · Views: 19
 -
 DSCF2987--small.JPG79.1 KB · Views: 32
 -
 DSCF2985--small.JPG88.6 KB · Views: 30
 -
 DSCF2983--small.JPG72.9 KB · Views: 23
 -
 DSCF2982--small.JPG85.3 KB · Views: 45
 -
 DSCF2998--small.JPG77.7 KB · Views: 31
Similar threads
- Replies
- 5
- Views
- 2K
- Replies
- 0
- Views
- 825
- Replies
- 39
- Views
- 4K