• Welcome to ClassicBroncos! - You are currently viewing the forums as a GUEST. To take advantage of all the site features, please take a moment to register. It's fast, simple and absolutely free. So please join our community today!
    If you have problems registering or can't log into your account, please contact Admin.

Topsy turvy

OP
OP
Howard2x4x4

Howard2x4x4

Contributor
Bronco Guru
Joined
Apr 19, 2014
Messages
2,474
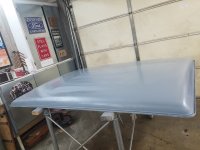
And another sorta successful day in beautiful West Michigan. Remember the comment about, "Don't have time to do it right, but got time to do it over."? Well, I could never be a doctor 'cause I don't have the patience. Moved some of the freshly painted parts and tipped them over. They must have been watching the paint mixing cup.
20220817_152324.jpg 20220817_152407.jpg 20220817_152419.jpg
 
OP
OP
Howard2x4x4

Howard2x4x4

Contributor
Bronco Guru
Joined
Apr 19, 2014
Messages
2,474
Took that big ole roll of foamed viny and cut a few chunks off to try them on for size. Spent most of a day tryin' to find a way to bevel the ends of the foam strips in order to fit the contour better. Sure made a mess of me! Dust and dust and more dust, even with a fan set up to blow it away! Kept nibblin' away at 'em until they were probably close enuff.
20220817_160341.jpg 20220818_103550.jpg 20220819_164848.jpg 20220819_161022.jpg 20220818_155745.jpg 20220818_155709.jpg
 
OP
OP
Howard2x4x4

Howard2x4x4

Contributor
Bronco Guru
Joined
Apr 19, 2014
Messages
2,474
Awright, big talker, now what? Well, howzabout I glue them suckers in! I put a row of double-sticky carpet tape around the perimeter and sprayed 3M adhesive in the interior portions of all four areas, one at a time. And stuck them in, one at a time.
20220819_103149.jpg 20220819_161022.jpg 20220819_163900.jpg 20220819_164848.jpg
 
OP
OP
Howard2x4x4

Howard2x4x4

Contributor
Bronco Guru
Joined
Apr 19, 2014
Messages
2,474
Finished the day by fitting the cross pieces and end pieces. Thought to myself, "That'll do, Pig". Another day in beautiful West Michigan!

20220819_165424.jpg
 
Last edited:
OP
OP
Howard2x4x4

Howard2x4x4

Contributor
Bronco Guru
Joined
Apr 19, 2014
Messages
2,474
Fitting them in is one thing; fastening them in is a bronco of another color. Started with the back brace and made like a sailor going into the wind - tack and tack and tack and...... 20220822_165014.jpg 20220823_140344.jpg 20220825_153501.jpg
 
OP
OP
Howard2x4x4

Howard2x4x4

Contributor
Bronco Guru
Joined
Apr 19, 2014
Messages
2,474
The front brace was not as easy. (Editors note: the back brace wasn't even close to "easy") Due to the front brace eventually having to connect with the windshield frame and also the curves along both axis, a bit more finigalling and bracing was required. I had to weld nuts to washers and to the brace. After the welding here and there, a bit of grinding and sanding and primimng.

20220823_140456.jpg 20220823_143357.jpg 20220823_142044.jpg 20220823_150108.jpg 20220825_153451.jpg
 
OP
OP
Howard2x4x4

Howard2x4x4

Contributor
Bronco Guru
Joined
Apr 19, 2014
Messages
2,474
With the end pieces secured, it was time for a bit of weld grinding, sanding and a bit of bondo.
20220825_165048.jpg 20220825_165102.jpg
 
OP
OP
Howard2x4x4

Howard2x4x4

Contributor
Bronco Guru
Joined
Apr 19, 2014
Messages
2,474
And for my next trick...... Gluing and taping the cross braces and the side braces in place, in preperation for welding them in as soon as get another round tuit. I ran double sticky carpet tapefrom side to side where the cross braces were to go. Then placed a small bead of two-part panel adhesive at the ends where the cross members would go and carefully set the bows in place. The side braces were clamped in place next. Next step will be to weld the side braces in place just as was done with the front and rear braces.
20220826_131140.jpg 20220826_130811.jpg 20220826_132252.jpg 20220826_132302.jpg
 
OP
OP
Howard2x4x4

Howard2x4x4

Contributor
Bronco Guru
Joined
Apr 19, 2014
Messages
2,474
Thanks 71 CA Bronco, I am hoping it'll do the trick!

Got the side braces welded in.

20220902_112944.jpg 20220902_112955.jpg
 
OP
OP
Howard2x4x4

Howard2x4x4

Contributor
Bronco Guru
Joined
Apr 19, 2014
Messages
2,474
After a bunch of sanding and filling, I think I sprayed the final coat of primer/sealer. At leats, I hope so.
20220903_141013.jpg 20220903_141024.jpg 20220903_141034.jpg 20220903_141043.jpg 20220903_141052.jpg
 
OP
OP
Howard2x4x4

Howard2x4x4

Contributor
Bronco Guru
Joined
Apr 19, 2014
Messages
2,474
Sprayed the color - Ford White Gold, single stage urinethane. Even when it's easy, it ain't easy.
20220904_160703.jpg 20220904_160723.jpg
 
OP
OP
Howard2x4x4

Howard2x4x4

Contributor
Bronco Guru
Joined
Apr 19, 2014
Messages
2,474
Well, I'm not exactly thrilled with the way it that worked out, but gonna call it good enough for now. Next step is to re-mount the top to the rotissorri in order work on the top of the top. Hmm, that's not redundant, is it?
 

Attachments

  • 20220905_143333.jpg
    20220905_143333.jpg
    144.3 KB · Views: 83
Last edited:
OP
OP
Howard2x4x4

Howard2x4x4

Contributor
Bronco Guru
Joined
Apr 19, 2014
Messages
2,474
Got the top off the rotisserri and "turvied" and sanded just a bit.
20220906_091732.jpg 20220906_123851.jpg 20220906_103417.jpg
 
OP
OP
Howard2x4x4

Howard2x4x4

Contributor
Bronco Guru
Joined
Apr 19, 2014
Messages
2,474
Well, awrighty then! After the sanding in the previous post, I wanted to spray some epoxy primer/sealer in the drip rail gutters in order to encapsulate areas where rust had been and possibly still was. Really pleased with how the drip gutters turned out. After spraying, I brushed some epoxy sealer/primer into the gutters with a brush.
20220907_153140.jpg 20220907_153140.jpg 20220907_153151.jpg 20220907_153204.jpg 20220907_153218.jpg
 

Attachments

  • 20220907_153511.jpg
    20220907_153511.jpg
    158.6 KB · Views: 79
OP
OP
Howard2x4x4

Howard2x4x4

Contributor
Bronco Guru
Joined
Apr 19, 2014
Messages
2,474
Rolled the top back outside again to do a bit of fussin' and filling and sanding in preparation for the 'goop'. The drip rail cleaned up pretty good, so I put some masking tape on to protect the areas that I did not want to 'goop'. Glad I did! Picked up a double-barrel tube of high-build, self-levelling seamseal from Wyricks and a doublebarrel caulk gun from my good buddy Rich, a former body man. The 'goop' came with a mixing tip. It was now or never, so I circled the top while caulking 'goop'. Made two trips around. Wearing gloves, I smoothed the goop beads out with my pinkies, trying to get goop into every nook and cranny, though I have no idea what a cranny is. Let the goop harden for 10-15 minutes and then pulled the tape. Don't wanna toot my own horn (honk-honk), but I'm pretty pleased with the results. Honk-honk. Howard in beautiful west Michigan.
20220908_113756.jpg 20220908_151233.jpg 20220908_154048.jpg 20220908_160800.jpg 20220908_161324.jpg 20220908_160910.jpg 20220908_164429.jpg 20220908_165036.jpg
 
OP
OP
Howard2x4x4

Howard2x4x4

Contributor
Bronco Guru
Joined
Apr 19, 2014
Messages
2,474
Thanks guys! Yeah, I reckon I did, cautiously optimistic, anywho. Today I ventured into somewhat unknown, or at least unexpected, territory. The top is not as oil can free as I had hoped, prolly due to the foam-backed vinyl. As a consequence, the dips and rolls of the sheet metal were not as solid as I had hoped. Aw, heck! So I set about block sanding and filling and spraying high build primer and block sanding and spraying high-build, yada, yada, yada. Pretty much sanding dust every where and all over, in every nook and now I know where my cranny is.
Coming close to being pert-near good enuff. Couple more bouts with high build tomorrow and then maybe, just maybe, some base/clear.
20220909_165527.jpg
20220909_165542.jpg
 
Last edited:
Top