Community
Message Forum
Photo Gallery
Event Calendar
Book Reviews
Bronco Wallpaper
Bronco FAQ
Link Back to CB!
Photo Gallery
Event Calendar
Book Reviews
Bronco Wallpaper
Bronco FAQ
Link Back to CB!

Buy / Sell


Bronco Tech
3 Arm Wiper Setup
Fix Motor Mount
Roll Cage Braces
Throttle Body 65mm
Wheel Alignment
Heat Riser Replacement
Vent Window Repair
Center Console Mount
Straighten Bumper
Ford 6R80 6 spd
More Tech...
Fix Motor Mount
Roll Cage Braces
Throttle Body 65mm
Wheel Alignment
Heat Riser Replacement
Vent Window Repair
Center Console Mount
Straighten Bumper
Ford 6R80 6 spd
More Tech...

Install the app
-
Welcome to ClassicBroncos! - You are currently viewing the forums as a GUEST. To take advantage of all the site features, please take a moment to register. It's fast, simple and absolutely free. So please join our community today!If you have problems registering or can't log into your account, please contact Admin.
You are using an out of date browser. It may not display this or other websites correctly.
You should upgrade or use an alternative browser.
You should upgrade or use an alternative browser.
Transfer Seat Part 2
- Thread starter rydog1130
- Start date
- Joined
- Jun 19, 2014
- Messages
- 4,091
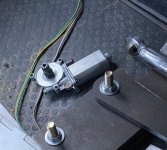
A little more done today. I added the spur gear that mates up to the rack that will hopefully drive the seat in and out of the truck. My other two vehicles have a similar set up where a spur gear attached to the same window motor powers my seats forwards and backwards via a gear rack. Well I thought I could pop off the gear on the motor and then pop mine on, not the case. First the the diameter of the new gear was about 1/64 of an inch too small so Todd and I had to find a drill bit the correct size to mill it in order for it to fit. Then we had to remove the pinch points on the gear face of the motor so the whole drive gear and spur gear came out. It was pretty easy to take apart. I thought maybe the old gear was keyed on the shaft to keep it from spinning but it’s actual locked in via a plate that sits in the nylon gear. We sat and discussed several options on how to attach the new gear since the new one would not fit in the locking system and was too small to be milled. We thought about making a collar to fit over the new gear and milling the sides so it would fit but that’s just too much extra work. So we slid both gears on the shaft and Todd tig welded ten together. The extra length will work now w/ the motor as it gives me room to mount it to the outer box without cutting into it! Here’s a few pics



- Joined
- Jun 19, 2014
- Messages
- 4,091
There’s two motions to this system. 1. Moving the seat in and out of the vehicle which the wiper motors driven gearWhat is the connection between the hydraulic system and the spur gear on the wipers? Kinda got my curiosity up.
Randy
This is some great engineering! Looking forward to seeing it operate.
- Joined
- Jun 19, 2014
- Messages
- 4,091
Thanks once I get the inner slide together I’m going to load test it to see if there’s any flex. I’m hoping these 500lb drawer slides are substantial enough to hold my weight. I’m thinking that since the slides are boxed in it will prevent any twistThis is some great engineering! Looking forward to seeing it operate.
I trust that you’re gonna static load test before you hop on and try it out. Learned the hard way with a climbing deer stand that my weight was more than the attached parts would stand. LolThanks once I get the inner slide together I’m going to load test it to see if there’s any flex. I’m hoping these 500lb drawer slides are substantial enough to hold my weight. I’m thinking that since the slides are boxed in it will prevent any twist
Randy
- Joined
- Jun 19, 2014
- Messages
- 4,091
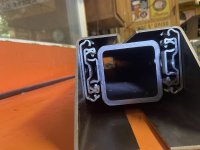
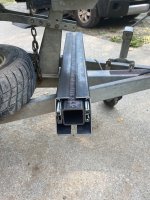
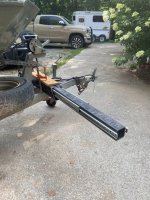
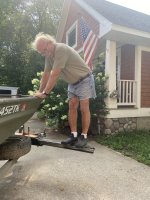
Ok so today was kinda of a make or break point. Either this thing was going to work or not work once we put weight on it. We got the inner square stock mounted and it seemed to slide in and out pretty good. I was trying to think of the best way to test it out and thought about clamping it with a board on top to the car hoist arms but my dads mustang was occupying the hoist. I looked around and saw the boat trailer and said that’ll work. We clamped it on there and extended the tube out and drum roll……….,…………………………………………….
It worked lol, it held my dads weight without a budge and he’s close to 200lbs I’m assuming since these are rated to 500lbs it will handle the seat and me just fine. Here’s some pics!
Only thing I noticed is my inner tube is mounted on the slides on a slight angle downward. I though we had it correctly spaced but the end of the tube must of slipped about 1/8” - 3/16” so I’ll need to take out the screws at the end and adjust it then drill and tap some new holes. If I don’t correct this it’ll potentially cause my gear rack system to bind up


- Joined
- Jun 19, 2014
- Messages
- 4,091
- Joined
- Jun 19, 2014
- Messages
- 4,091
Ok had a little hiatus on the project with summer coming to an end but finally getting back to projects with newly acquired time in my hands (kids are in school!) I fixed the gap issue! These slides have a vertical oblong hole so I drilled a small hole then put in a self tapped and removed all but the rear screws on the slides. Adjusted the height then tightened down the self tapers, marked new holes and drilled! I also mocked up the hydraulic cylinder that will power the up down portion of this unit. Looks like too much was added on as the 4 link isn’t sitting parallel. Will need to have Todd cut and reweld or get a unit with a threaded end! Anysways hope to have more progress but next week!


Is there any chance you could/would post a set of drawings (I would pay) and specs of this item??? I am certainly interested in seeing the final design in action. As an aside, would mirror image work for the passenger side??
Randy
Randy
- Joined
- Jun 19, 2014
- Messages
- 4,091
Hi speeder I posted up specs earlier in the post, yeah you could assemble the parts in reverse fashion but once they’re welded together then that’s it. It would actually require less work than the drivers side because you won’t have to drop the floor pan like you will with the driver side.Is there any chance you could/would post a set of drawings (I would pay) and specs of this item??? I am certainly interested in seeing the final design in action. As an aside, would mirror image work for the passenger side??
Randy
- Joined
- Jun 19, 2014
- Messages
- 4,091
So I was on hiatus with this project as fall hunting took priority for my free time! Winter is here and there’s no ice to fish so that means bronco seat is back online! This is the unit that will lift or lower the seat once it’s out of the vehicle.

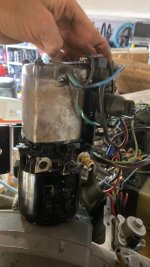
I cleaned up all the contacts and dumped fresh oil in it. I couldn’t figure out the wiring on the switch that controls the relays as they were cobbled together with wire nuts. We took a short cut and just bridged the relays with a screwdriver to test it out and I’m surprised it seems to work well with no binding. Next will be to load test it with some actual weight! Hopefully the video will work!

I cleaned up all the contacts and dumped fresh oil in it. I couldn’t figure out the wiring on the switch that controls the relays as they were cobbled together with wire nuts. We took a short cut and just bridged the relays with a screwdriver to test it out and I’m surprised it seems to work well with no binding. Next will be to load test it with some actual weight! Hopefully the video will work!
- Joined
- Jun 19, 2014
- Messages
- 4,091
I’m hoping so!!Looking good! I’m betting that the “weight test” is gonna go as smoothly as video shows…at least I’d bet on it.
Ra
Similar threads
- Replies
- 11
- Views
- 1K
City: Lanett
Price: $375
- Replies
- 0
- Views
- 10


