• Welcome to ClassicBroncos! - You are currently viewing the forums as a GUEST. To take advantage of all the site features, please take a moment to register. It's fast, simple and absolutely free. So please join our community today!
    If you have problems registering or can't log into your account, please contact Admin.

Vintage Air Gen V Install

lars

Contributor
Been here awhile
Joined
Jun 29, 2001
Messages
3,166
Loc.
NorCal flatlands
Ran the wiring from the ecu to the trinary switch so was able to wrap that up.

i ran the extra wire for ground signal just in case I decide to use that at some point. So 2 wires are my standard compressor ok to run circuit and the other side with a ground trigger when pressure is too high all in a nice connector and run through the fender and will be under the battery so you don’t see anything.

View attachment 908765
Hopefully you are going to put a grommet or similar in the hole the wires are running through, so they don't chafe eventually. Deburring the hole isn't good enough.

These work well: https://www.steinair.com/product-category/cable-management/snap-bushings/
Source: https://www.heyco.com/Hole_Plugs/product.cfm?product=Snap-Bushings-1
 
OP
OP
ba123

ba123

Contributor
Bronco Guru
Joined
Oct 29, 2022
Messages
1,948
Loc.
CA
Hopefully you are going to put a grommet or similar in the hole the wires are running through, so they don't chafe eventually. Deburring the hole isn't good enough.

These work well: https://www.steinair.com/product-category/cable-management/snap-bushings/
Source: https://www.heyco.com/Hole_Plugs/product.cfm?product=Snap-Bushings-1
Thanks, I couldn’t decide if I was going to or not since that’s a stock hole and it’s smooth and painted and the wire in a loom, but I prob should anyway, thanks!
 
OP
OP
ba123

ba123

Contributor
Bronco Guru
Joined
Oct 29, 2022
Messages
1,948
Loc.
CA
Find me. I'm not that far from you. I made mine from 2024-T3 aluminum aircraft sheet metal since that's a fave medium for me. Check mine out in person and if you are interested I can make one. Pic below has black-ish goop on it. That's just aircraft fuel tank sealant, slathered on so it doesn't sound buzzy when stuff rattles against it.
So, that glovebox...it fits with your Vintage Air right? Why do they send such a tiny one?

The VA one will definitely not work for me. I'd like to have my ecu right behind where the glovebox is since the sloping cowl is gone on mine and I have the perfect spot there. I'd like to be able to reach it and I'll have to be able to remove either the whole glovebox or the back of it.

I'll likely have to wait until I'm done but hard to figure out. My dash is going to be tough enough to put in since I welded my cage in forever ago. Annoyed about that but that's what I was sold on years ago.
 

lars

Contributor
Been here awhile
Joined
Jun 29, 2001
Messages
3,166
Loc.
NorCal flatlands
So, that glovebox...it fits with your Vintage Air right? Why do they send such a tiny one?

The VA one will definitely not work for me. I'd like to have my ecu right behind where the glovebox is since the sloping cowl is gone on mine and I have the perfect spot there. I'd like to be able to reach it and I'll have to be able to remove either the whole glovebox or the back of it.

I'll likely have to wait until I'm done but hard to figure out. My dash is going to be tough enough to put in since I welded my cage in forever ago. Annoyed about that but that's what I was sold on years ago.
My glovebox fits with the VA evaporator because I made it to fit. And keep in mind my main goal was a glovebox that I could r&r through the glovebox opening in the dash. And if I had eliminated the sloping cowl (which I would've done if I was starting from scratch) then I would've had room above the evaporator for the ECU. Though as often as I r&r the ECU I'm glad I put it in a more accessible place.
 
OP
OP
ba123

ba123

Contributor
Bronco Guru
Joined
Oct 29, 2022
Messages
1,948
Loc.
CA
I think I am most of the way through this, or have the ability to be but I’ve to finish some other things and only doing what I can. On that note, it seems EASIER than I expected it to be but maybe that cause I’ve never done AC and expected it to be difficult. Can’t say for sure but I think anyone can do it and the only difficult things for me are non-normal things like hiding my lines or the way I’m doing the electrical.

On that note, I just finished all the lines to the bulkhead in the engine bay:
IMG_6035.jpeg
Running my heater lines took some thought and creativity (and some hope that it would work). The BXR setup expects you to run the lines in from and around and I don’t want that. The stock Mustang heater tubes would not work for me because of the temp sensor and the space needed for that setup but I liked the idea of hard lines running back and under the intake.

I ran flexible black stainless heater hoses (cheap on Amazon) and I read these hoses are great but read the fittings suck and fail so I got some silicone 3/4” to 5/8” adapter that fit perfectly.
IMG_6034.jpeg

You can see them under there but you won’t with the valve cover on.
IMG_6037.jpeg

My other thought was, Vintage Air makes some aluminum hard heater lines with a fitting on one end and a barn on the other and different lengths. That was option 2 if this didn’t work but would need to find a tubing bender for 5/8.

My next steps are to finish up my wiring and install the Evaporator. I still have to terminate the ends of the line that go from the bulkhead to the compressor and the compressor to the condenser but waiting to do that until I run my fuel lines so I make sure it’s out of the way.
 

lars

Contributor
Been here awhile
Joined
Jun 29, 2001
Messages
3,166
Loc.
NorCal flatlands
Looking good. With the instrument panel out it's much easier. As in, night and day. With the panel in place, it's an entirely different project. Cue my remove-through-the-opening glovebox. Removing the cowl slope helps too. While hiding your plumbing might've made some aspects more difficult, in some ways that made it easier as well. Looking back, I would describe my experience as just this side of nightmare. Driving around today in 98° heat with it blasting on me made it entirely worthwhile.
 

Madgyver

Contributor
Bronco Madman
Joined
Jul 30, 2001
Messages
14,898
I split my dash for easy access and removal with cage in place.
 

Attachments

  • 270073382_10221126815826112_4290707457638718025_n.jpg
    270073382_10221126815826112_4290707457638718025_n.jpg
    204.1 KB · Views: 89
OP
OP
ba123

ba123

Contributor
Bronco Guru
Joined
Oct 29, 2022
Messages
1,948
Loc.
CA
I split my dash for easy access and removal with cage in place.
Wwwait, what?

@Madgyver, you really are MAD! I mean that’s pretty damn smart as all hell, but I can’t bring myself to do that with my nice new pretty dash. I love the idea though!
 

Madgyver

Contributor
Bronco Madman
Joined
Jul 30, 2001
Messages
14,898
Wwwait, what?

@Madgyver, you really are MAD! I mean that’s pretty damn smart as all hell, but I can’t bring myself to do that with my nice new pretty dash. I love the idea though!
Not noticeable when all put together, gauge cluster and column trim. I also did the same with the FireBronco dash with a custom cage.
 

Attachments

  • 370178539_10224497339367094_2297944576871807242_n.jpg
    370178539_10224497339367094_2297944576871807242_n.jpg
    72.8 KB · Views: 103
  • 245049237_10220735931094238_2183775570430002112_n.jpg
    245049237_10220735931094238_2183775570430002112_n.jpg
    194.8 KB · Views: 100
  • 129758354_10218852280364147_55900362792075266_n.jpg
    129758354_10218852280364147_55900362792075266_n.jpg
    204.6 KB · Views: 97
  • 120365990_10218416862438971_7238265795154829042_o.jpg
    120365990_10218416862438971_7238265795154829042_o.jpg
    138.1 KB · Views: 106
OP
OP
ba123

ba123

Contributor
Bronco Guru
Joined
Oct 29, 2022
Messages
1,948
Loc.
CA
Worked on my electrical this weekend so had to work in a little of the ac with it.

Tough to run so many wires along the side where the ac Evap is, if I’d thought of that I might have put the efi oanel on the other side but done now.

Pulled down my efi to efi panel harness, left my coil harness and my battery wires, as well as coil relay which will all run behind the Evap and then the efi harness will have to run right on top of it.
IMG_6078.jpeg
IMG_6079.jpeg
Gonna finish connecting the compressor relay to my MS3 ecu and then finish the ac lines and hope there is room for everything, but there is a good amount of room right on top of the Evaporater.

The wiring for the Dakota Digitsl Vintage Air control seems well designed and splices into the system nicely. I’ll run that tomorrow maybe.
 
OP
OP
ba123

ba123

Contributor
Bronco Guru
Joined
Oct 29, 2022
Messages
1,948
Loc.
CA
Worked on this a bunch this am trying to make things fit how I want them. The hoses are tough. Really no idea why VA made those heater hose fitting so darn long. I could cut them and flare them kinda like Todd did but I think the inside ones I need to bend inward just right as they are wrong at 90° for me. I could just bend them by hand as it’s aluminum but I have a different tubing bender coming later this week that I’d like to try on these so I’ll wait.
IMG_6088.jpeg

On the other side though, the #10 AC hose is HUGE and wrong for me because I need that space for my ecu and this hose totally screws that up, so I have to change from a 135° to a 90° and that still was t good enough so I need to bend the 90° fitting outward to make room.

IMG_6090.jpeg IMG_6092.jpeg IMG_6094.jpeg
Just want to point out a ground spot. Maybe obvious but the heater control valve has a eyelet and if you put the valve inside like I am or close, you can put that ground eyelet right there on the front mount.

And speaking of the valve…if you put it inside, the best spot was just left of the rear mount. Make sure you leave enough hose for it to go all the way past as the right side of the valve needs more room.
IMG_6071.jpeg
Picture is of Evap turned on its side and the top of this pic is the back.
 

Attachments

  • IMG_6091.jpeg
    IMG_6091.jpeg
    257.6 KB · Views: 129
OP
OP
ba123

ba123

Contributor
Bronco Guru
Joined
Oct 29, 2022
Messages
1,948
Loc.
CA
Testing my Dakota Digital controller for the VA system and it’s not working. I was told by VA that all gen IV controllers will work when I asked the question specifically but not so sure and worried at this point since this controller is a main part of my Bronco at this point in my console and I don’t want any other.
 
OP
OP
ba123

ba123

Contributor
Bronco Guru
Joined
Oct 29, 2022
Messages
1,948
Loc.
CA
This digital control for the VA is already mounted in my custom console so really not sure how this is gonna go. I could have anew piece made and use a different controller, but this one fits the look. I did test run with the stock controls and seems to respond.

IMG_6105.png
I emailed Dakota Digital tech support and hopefully they can help me make it work.
 
OP
OP
ba123

ba123

Contributor
Bronco Guru
Joined
Oct 29, 2022
Messages
1,948
Loc.
CA
So, Dakota Digital support emailed me back and said:
"The DCC-4000 has not been approved to work with the GEN V system. We currently have no information on it but our engineering dept is looking into it. I will keep you posted if anything changes."

Hopefully they can do something sooner rather than later. I'll have to just hook up the stock controls for now I guess.
 
OP
OP
ba123

ba123

Contributor
Bronco Guru
Joined
Oct 29, 2022
Messages
1,948
Loc.
CA
Moving on for now.

Trying to hide these big hoses is anything but easy. Normal routing is a piece of cake though.

I needed this #8 line that runs from the compressor to the condenser hidden. Much easier to do how the BC kit does it. They flip the condenser and then run a small #6 line right underneath. I wish I’d done that and flipping it wouldn’t work for my radiator—seems like there is less room for me on that side (Lars said he slid his over which could work) but anyway, I decided to try to run a #8 hard line.

I originally tried to run it just like they do the #6 but it did t seem to work right for me. It bumped into my radiator bracket. I probably could’ve done it but I decided to just go to the front of the condenser.

IMG_6113.jpeg IMG_6114.jpeg

Worked great where I put it but you could see that aluminum through the grill which I didn’t like so I wrapped it with wire loom for that part. It’s also got a couple pieces of silicon hose to keep it from rattling.
IMG_6116.jpeg
IMG_6115.jpeg
 
OP
OP
ba123

ba123

Contributor
Bronco Guru
Joined
Oct 29, 2022
Messages
1,948
Loc.
CA
So, Dakota Digital support emailed me back and said:
"The DCC-4000 has not been approved to work with the GEN V system. We currently have no information on it but our engineering dept is looking into it. I will keep you posted if anything changes."

Hopefully they can do something sooner rather than later. I'll have to just hook up the stock controls for now I guess.
HUGE shout out to Dakota Digital. I emailed their support, as I said, and already, today, they said they have figured out the solution and are sending me a new harness with the changes needed at no charge.

These things are expensive, but when you get service like that it makes it all worth it! I’m stoked!
 
OP
OP
ba123

ba123

Contributor
Bronco Guru
Joined
Oct 29, 2022
Messages
1,948
Loc.
CA
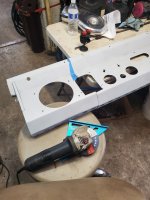
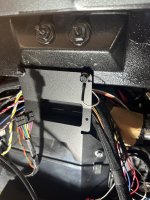
Another part I was still stuck on was the heater fittings inside the cab. With the bulkhead assembly right there, there is not much room and man, those VA heater fittings are HUGE! They work great inside the engine compartment but inside, they kinda hit the vent ports on the evaporator.

So, the choices were:
1) see if I can bend the 90° heater fittings I already bought
-result no good. They were still too long
2) Get 135° or thereabouts fittings
Looking at the pics closely, it seems they stick out further and then come back, no thanks.
3) modify some
I chose to cut the straight ones that came with the kit and then flare them. Flaring no so easy. My tool doesn’t flare that big of tubing. Bought a tubing beader on Amazon that says it does 5/8 but wasn’t clear that is does 5/8” ID tubing and this is 1/2” ID. Only thing I found was a beader from Earls that everyone says it sticks when you want to take it out but I had no choice.

This is how I used it:
1) cut the tubing to the length I wanted (I did a little over 3/4” beyond the nut)
2) lubed the tool with WD-40 and tried to lube the roller beads.
3) When I used the tool, I left a gap and did not put it in all the way. I wanted the bead close to the edge anyway. I did this because I wanted some slack to be able to tap the tool with a hammer and push it down into the tubing and be able to push the beads inward by doing so. Worked flawlessly. I used a bulkhead fitting that came in the kit that I wasn’t going to use to attach the heater fitting to so it would be tight when cutting and tight when bearing and then out it in a vice.
IMG_6178.jpeg
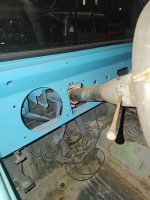
All the engine compartment AC lines are done. Man, not much room on the drivers side either. I’ll need to protect the hoses from the exhaust and my steering shaft is tight there too but hey, that’s what they do with modern cars right? TIGHT!!!
IMG_6189.jpeg
A 135° #8 hose would be better but the fill fitting faces towards the engine. If I have any trouble I might have to find a different fitting.
 
OP
OP
ba123

ba123

Contributor
Bronco Guru
Joined
Oct 29, 2022
Messages
1,948
Loc.
CA
Ok, so sometimes things don’t go exactly as planned. If something does work correctly it’s a bummer and you might ask yourself, “what did I do wrong? Did I miss something?”.

What if it wasn’t you? People make mistakes, we’re only human and there’s this thing called “human error” for a reason.

Anyway, I received the updated harness from Dakota Digital, test fit everything and tested. Turning it on, it would only blow at full speed and the display wouldn’t turn on. I knew there was nothing wrong with the unit because it works with the stock controls.

Seemed to me like the display wasn’t getting power or ground so I asked for the pinout to test. Turns out the pins were reversed and they’re sending me a replacement but I spliced to test for my own peace of mind.

Houston, we have liftoff.
IMG_6229.jpeg

I’ll take a better pic when installed the right way.
 

bronco italiano

Contributor
Bronco Guru
Joined
Feb 1, 2004
Messages
2,173
2 questions on the AC pump

1- What size/part number was the "block" in the rear for attaching the hoses
2- On the electrical pigtail to AC pump, which wire is the at hot wire? I have 2 wire setup with no markings on pump or pigtail.
Thanks,
 
OP
OP
ba123

ba123

Contributor
Bronco Guru
Joined
Oct 29, 2022
Messages
1,948
Loc.
CA
2 questions on the AC pump

1- What size/part number was the "block" in the rear for attaching the hoses
2- On the electrical pigtail to AC pump, which wire is the at hot wire? I have 2 wire setup with no markings on pump or pigtail.
Thanks,


So happy to help with this cause I spent a TON of time figuring everything out so if I can make it so someone doesn’t have to do all that agian, then great!

1) I wrote that on Page 1 in my list of parts, but might not have been clear. It is this:
045017 OEM FORD COMP BLOCK FITTING STR #8 - #10
2) If you're looking directly from the front, the ground is the LEFT side (away from the connector clip). That was not easy to find. I searched everywhere (both on this site as well as other sites including Explorer Forums and could not find it). I eventually came across a wiring post by @904Bronco here: https://classicbroncos.com/forums/threads/electrical-gurus-please-comment.247410/ (giving credit)

I'm not sure why that didn't come up when I searched for it. Also needs a diode running from Negative TO the Positive side:
1695679923090.jpeg


Diode would look like this but voltage reverse of what shown. Stripe on positive side.
[ATTACH type="full" width="547px" alt="Anode
Direction of current flow
Cathode
Diode
TechTerms.com "]910916[/ATTACH]

So the diode just runs between the two. If you just make one wire longer (the length of the diode) it's easy to just splice it in line and shrink wrap and not have the connections right next to each other so they don't short.
 

Attachments

  • 1695680513331.png
    1695680513331.png
    108.8 KB · Views: 19
Top