• Welcome to ClassicBroncos! - You are currently viewing the forums as a GUEST. To take advantage of all the site features, please take a moment to register. It's fast, simple and absolutely free. So please join our community today!
    If you have problems registering or can't log into your account, please contact Admin.

Welding Advice

Chief Master Sergeant

Retired U.S. Air Force
Joined
Nov 6, 2002
Messages
5,193
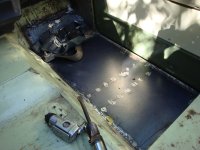
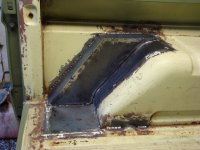
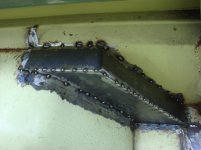
As we weld in the new pans, I'm getting some serious burnthrough on some of the thinner metals I had to grind rust from. I'm using a Millermatic 180 (220) and have turned it down as low as I can and still get a decent weld, but I'm still burning this stuff up. I'm using sheielding gas and the auto function for the welder. Someone recommended running smaller welding wire, as I'm using .30 right now. Any other suggestions? Seeing some of the projects you guys do with severe rust shows me I'm doing something wrong.
 

bmc69

Contributor
Bronco Guru
Joined
Jun 11, 2004
Messages
11,872
Go with the smaller .023" wire diameter, certainly, but more importantly, buy or make a solid copper backing 'plate' to back up the spot you are welding. Eastwood sells several different ones.
 

motoman

Bronco Guru
Joined
Jan 29, 2002
Messages
1,729
Loc.
Phoenix, AZ
Steve told me about using copper or aluminum square or spoon and clamp on the back side. You will not burn through.... for Christmas he bought me this....

http://www.eastwood.com/welders-helper.html

I was welding in a piece of strap to the doorsill and blew through the kick panel. We got the brass spoon out and wahlah easy fill.... give it a try!
 

ViperTed

New Member
Joined
Dec 16, 2011
Messages
6
I just finished welding in my floor pans using .023" wire on my Millermatic with no burn through problems. Buy a spool of thinner wire and give THAT a try! Plus it doesn't dump quite as much ugly filler in your weld on thin materials (= less grinding for me)
 

Crawdad

Bronco Guru
Joined
Feb 16, 2011
Messages
3,635
Run by the Fab Shop and see if they might give you a chuck of aluminum or brass to borrow. The more pieces the better, say three. They will absorb lots of heat and becomes too hot to hold. Use another piece and allow the other to cool off (in water). Make sure to clean the bare metal with SS brush and use alcohol to clean. I would try this approach before buying 0.023. If still blowing holes with al or brass behind then go to 0.023 wire.
 

JLBachs

Full Member
Joined
Feb 4, 2011
Messages
333
I switched to the .023 and had pretty good luck - also hammered a piece of copper water line flat but left an end round to insert a piece of dowel and it works as a cheap backer -
Not sure how the Millers are set up but after running a lot of .030 through the Lincoln with a .025-.035 drive roll, I had to replace the drive roll to get it to spool out the .023 without slipping
 

pcf_mark

Bronco Guru
Joined
Jun 11, 2010
Messages
3,594
Smaller wire will help and backing with a non-ferrous piece of material will help you fill holes.

Are you trying to run continuous beads? If you try to strike an arc and weld for an inch or more your are going to put so much heat in the panel it will blow through.

I stitch in floor panels with 1/2" long beads spaced 3-4" apart. Then seal the seems with quality seam sealer. Ford did less than that!
 

Broncobowsher

Total hack
Joined
Jun 4, 2002
Messages
35,059
As stated above, thinner wire will really help. The super thin rusty metal doesn't help either, but that is what you are trying to fix.

There is also technique. I have done it so long I just know what I am doing. learned it on a roomates '66 chevelle. The basic plan is tack welds. 1-2 seconds of weld, when the pool is turning white hot, release the trigger. When it is back down to only red hot (2-3 seconds) put another tack weld on it. Just keep stacking it. If the metal is too thin it will simply vaporize, which isn't that big of a problem becasue it is too thin anyway. I rebuild a LOT of firewall that way.

Esab has a wire I saw at SEMA that may help as well. EZgrind is designed to be easier to grind back the welds for body work.
 

surfer-b

Contributor
Bronco Guru
Joined
Sep 7, 2006
Messages
2,974
Use .023 wire and just spot weld, start on one end and jump to the opposite. Just keep tacking opposites to let it cool which will keep it from bucking and warping. You can see in this pic where I replaced the pans I was maybe halfway through and it was plenty strong, once I finished there was only about .25" gap between spot-welds then I used seamsealer all the way around.
The last 3 pics you can see a little better what I'm talking about for spot welding.
 

Attachments

  • 1976 Bronco Buildup 010.jpg
    1976 Bronco Buildup 010.jpg
    287.4 KB · Views: 110
  • 1976 Bronco Buildup 055.jpg
    1976 Bronco Buildup 055.jpg
    277.2 KB · Views: 106
  • 1976 Bronco Buildup 056.jpg
    1976 Bronco Buildup 056.jpg
    275.9 KB · Views: 99
  • 1976 Bronco Buildup 059.jpg
    1976 Bronco Buildup 059.jpg
    71.7 KB · Views: 109

BicksBronc

Full Member
Joined
Feb 7, 2007
Messages
341
Loc.
Concord, NC
Go with the smaller .023" wire diameter, certainly, but more importantly, buy or make a solid copper backing 'plate' to back up the spot you are welding. Eastwood sells several different ones.

This is what we've done and it works great!
 
OP
OP
Chief Master Sergeant

Chief Master Sergeant

Retired U.S. Air Force
Joined
Nov 6, 2002
Messages
5,193
The main culprit area is the thin metal support along the drivers side, under where the door is. I replaced the metal against the seat base, but thought I could get away with using the old, existing metal from that support. I tried to spot weld at the best spots, but it simply burned that thin metal up and left holes. I piled the metal up in an attempt to fill the holes, but it kind of looks like ass. I tried to beat it apart and can't, so it's strong, just ugly. I think I'll just fill this area with seam sealer and call her good. We plan to line the floor anyway. I will be looking for a piece of copper though. Thanks for all the great advice. I already have the smaller wire and will change it out before we start the passenger side pan.
 

chico68

Jr. Member
Joined
Feb 21, 2011
Messages
83
I am currently replacing my floor pans and ran into the same problem. I cut out the lip along the door area and had some 18 gauge folded at 90 degrees. I then drilled holes and spot welded that against the rocker. pretty easy to do and you definitely wont burn through with new fresh metal underneath.

I was able to use .030 with a lincoln 130 and had no issues. A few tips for colder welds: Make sure you are using 75% argon, 25% co2. Push the puddle rather than pull it, extend you wire stick-out slightly.
 
OP
OP
Chief Master Sergeant

Chief Master Sergeant

Retired U.S. Air Force
Joined
Nov 6, 2002
Messages
5,193
I am currently replacing my floor pans and ran into the same problem. I cut out the lip along the door area and had some 18 gauge folded at 90 degrees. I then drilled holes and spot welded that against the rocker. pretty easy to do and you definitely wont burn through with new fresh metal underneath.

I was able to use .030 with a lincoln 130 and had no issues. A few tips for colder welds: Make sure you are using 75% argon, 25% co2. Push the puddle rather than pull it, extend you wire stick-out slightly.

Thanks! I did this for the support under the seat area, but like I said, I thought the door side was good. I guess I was wrong. ;D We'll do a better job on the passenger side. I'm using the 75% Argon-25% CO2 now. I'll try the push method too. Thanks!
 

Rustytruck

Bronco Guru
Joined
Feb 24, 2002
Messages
10,875
Your wire feed may be too slow. Pratice on some scrap and try faster wire and work the spot weld like a tornado. start on the thick outside of the hole and go around the out side of the hole working around to the center. kind of like this symbol @ I actually go counter clockwise. Make sure your ground is on the bottom layer of your weld pieces.
 

HoldMyPocket

Full Member
Joined
Mar 16, 2010
Messages
354
Loc.
OC, CA
they all beat me to it but .23 wire for sure and just spot welds. (figured one more of the same recommendation would confirm it :p )
 

bad 68

Sr. Member
Joined
Jul 1, 2010
Messages
921
Loc.
Northest Washington
This is all good advise. .023 wire. 75-25 shielding gas, Stitch weld only until you see white hot.
1 that no body touched on is sight. Make sure your welding helmet lexan is clean and splatter free. If you can't see your puddle and how your manipulating your weld your never going to make a great weld, just and OK weld.
 
Top