• Welcome to ClassicBroncos! - You are currently viewing the forums as a GUEST. To take advantage of all the site features, please take a moment to register. It's fast, simple and absolutely free. So please join our community today!
    If you have problems registering or can't log into your account, please contact Admin.

Brake booster / master cylinder fitment strategy

1buckeyefan1

Sr. Member
Joined
Sep 21, 2017
Messages
632
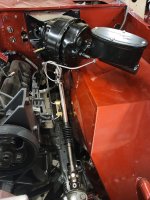
So in my course of collecting parts for my '74, I wanted to clean up my brake setup under the hood. I cleaned up the bracket, powder coated it and also painted the booster. It was converted to front disc / rear drums by the PO using the WH bracket/vacuum booster kit. It had a janky inline prop valve, so when i put it back together, i used the 76-77 one that mounts to the frame.

I also wanted to clean up the master cylinder to match the rest, so I ordered the black billet version from Toms... and I was bored last winter, so I had my local hardware laser etch the bronco logo onto the empty space... pretty sweet (I thought)

So as I'm now putting it back together, i realize that the new master cylinder exits on the driver side and my stainless line kit is obviously made for the standard passenger side exit. Before I ditch my shiny new custom master cylinder, i was hoping to get some advice:

1.) Is anyone aware of a similar black billet master cylinder setup that exits on the passenger side? I've looked at most all of the vendors and they all seem to exit on the driver side. I'd like to keep my custom MC cover if possible
2.) I've also seen the bottom-mount prop valves like WH sells.. this could potentially reverse the direction and give me a nice adjustable prop valve.. but what to do with the frame-mounted prop valve? could I simply leave it at 50/50 so it doesn't affect the proportioning?
https://www.wildhorses4x4.com/produ...cket-Line-Kit-Left/Bronco-Proportioning-Valve
3.) have some new stainless brake lines made up to go under the MC and attach to the right side? I haven't found any sources online that stock these.
4.) scrap the shiny billet master cylinder and pickup a standard Raybestos version and maybe powder coat it so it doesn't rust and look like crap
https://www.amazon.com/gp/product/B000C75MVS/?tag=cbama-20

I'm trying to resist the temptation to convert to hydroboost, especially after I put the time and $$ into cleaning up my vacuum boost setup. This will likely be street only w/ 33's and 4.56 gears, so I think vacuum should work just fine.

Also, should the vacuum booster be rubbing the inner fender? There is no clearance and likely going to rub through the paint after a couple of trips. i'm pretty sure it's all back together correctly, but unsure why i now have zero clearance.
 

Attachments

  • master cylinder 1.jpg
    master cylinder 1.jpg
    103.4 KB · Views: 46
  • master cylinder 2.jpg
    master cylinder 2.jpg
    147.9 KB · Views: 42
  • master cylinder 3.jpg
    master cylinder 3.jpg
    105.3 KB · Views: 37
  • master cylinder 4.jpg
    master cylinder 4.jpg
    117.4 KB · Views: 36
  • master cylinder 5.jpg
    master cylinder 5.jpg
    122.3 KB · Views: 46

DirtDonk

Contributor
Bronco Guru
Joined
Nov 3, 2003
Messages
47,641
Is there any fudge room to loosen the fasteners on the bracket, the booster and the master to let them flex upward a little bit?
And what about extra washers that you may have had originally on the bottom two bolts of the bracket? Do you think that’s possible?
People often do that to add clearance if it’s needed. But then you have to or check that you don’t have a good clearance with the tip of the master.
Especially a larger than stock one.

I don’t know what would be involved in using two proportioning valve. In theory I don’t see anything wrong, but since it’s not normally done and it is your braking system, I would wait for an expert to proclaim its logic or stupidity!😁
Since the second one is adjustable you can leave it at minimal effect and probably get away with it. But I would still question it.
Better to have new lines made probably.

There are plenty of master cylinders that have ports on both sides, some of which look like yours. But if Toms is having that one made specifically for them it may not be an exact fit for something like a Wilwood or other.

Seems like the most expedient way will be to have new lines made.
Once you make sure that you have clearance at the booster that is.

And speaking of which… How did you have that powder coated? Did you disassemble it completely, or did they?
I know powder coating is a lot thicker than we expect and causes clearance issues with other components. But I would have a hard time imagining it coating thick enough to change the clearance in a case like this.
But that thought process just made me curious about how it was done.
 
OP
OP
1buckeyefan1

1buckeyefan1

Sr. Member
Joined
Sep 21, 2017
Messages
632
Is there any fudge room to loosen the fasteners on the bracket, the booster and the master to let them flex upward a little bit?
And what about extra washers that you may have had originally on the bottom two bolts of the bracket? Do you think that’s possible?
People often do that to add clearance if it’s needed. But then you have to or check that you don’t have a good clearance with the tip of the master.
Especially a larger than stock one.

I don’t know what would be involved in using two proportioning valve. In theory I don’t see anything wrong, but since it’s not normally done and it is your braking system, I would wait for an expert to proclaim its logic or stupidity!
Since the second one is adjustable you can leave it at minimal effect and probably get away with it. But I would still question it.
Better to have new lines made probably.

There are plenty of master cylinders that have ports on both sides, some of which look like yours. But if Toms is having that one made specifically for them it may not be an exact fit for something like a Wilwood or other.

Seems like the most expedient way will be to have new lines made.
Once you make sure that you have clearance at the booster that is.

And speaking of which… How did you have that powder coated? Did you disassemble it completely, or did they?
I know powder coating is a lot thicker than we expect and causes clearance issues with other components. But I would have a hard time imagining it coating thick enough to change the clearance in a case like this.
But that thought process just made me curious about how it was done.
Thx Paul, good ideas on getting extra clearance. Adding washers to the bottom two bolts makes complete sense..and nudging it up a little bit.

Re: powder coating. I did the bracket and it's all mechanical, so I just had to ream out the inner spacers a bit and it all fit back together. The master cylinder appears to be a wilwood-stle that Tom's sells pre-coated. I didn't think there was a difference in exit sides until I went to install it.

I'm still weighing between new lines and a basic master cylinder.

Sent from my SM-N981U1 using Tapatalk
 

Apogee

Contributor
Bronco Guru
Joined
Nov 26, 2005
Messages
6,037
Wilwood offers their die-cast aluminum units in standard and compact configurations, so if I assume you're running a Ø1" bore like the factory, then the part numbers below should apply. These have outlet ports on both sides, so you can plumb them either way.

WIL-260-14959-BK Compact Ø1" bore w/o pushrod
WIL-260-14957-BK Compact Ø1" bore w/ pushrod

WIL-260-8555-BK Standard Ø1" bore w/o pushrod
 

DirtDonk

Contributor
Bronco Guru
Joined
Nov 3, 2003
Messages
47,641
And if the Tom's is a private label Wilwood (doubt it though, if the price is much different) then the top might fit a different model.
But what about trading it in on another from Tom's? Do they offer versions for both for manual and power brakes? If so you got the manual version (ports facing the driver's side) and if they have a matching booster version (ports on the passenger side) then maybe your issues have just been minimized.

Paul
 
OP
OP
1buckeyefan1

1buckeyefan1

Sr. Member
Joined
Sep 21, 2017
Messages
632
Wilwood offers their die-cast aluminum units in standard and compact configurations, so if I assume you're running a Ø1" bore like the factory, then the part numbers below should apply. These have outlet ports on both sides, so you can plumb them either way.

WIL-260-14959-BK Compact Ø1" bore w/o pushrod
WIL-260-14957-BK Compact Ø1" bore w/ pushrod

WIL-260-8555-BK Standard Ø1" bore w/o pushrod

Thanks guys! I ended up picking up a Wilwood WIL-260-8555-BK. Hopefully it's a slightly better MC and I can simply bolt onto my existing brake lines. I'll add some pictures when it's finally installed.
 
Top