• Welcome to ClassicBroncos! - You are currently viewing the forums as a GUEST. To take advantage of all the site features, please take a moment to register. It's fast, simple and absolutely free. So please join our community today!
    If you have problems registering or can't log into your account, please contact Admin.

Explorer/Saginaw Serpentine Swap

77broncodriver

Full Member
Joined
Nov 21, 2009
Messages
344
Hey guys,


I wanted to document my Explorer front dress swap. I know there is a detailed article in the tech section but this one is a bit different as I will be using a saginaw power steering pump instead of the Explorer unit. I also have been having a hard time keeping it cool in the summer with my current electric fan setup so hopefully Ill have better luck with the clutch fan.


The engine in my bronco is the newer mustang style with the 50oz balancer btw.


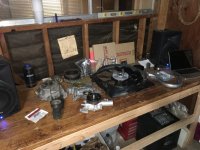
The parts I have gotten so far are:


From Pick n Pull:

2000 Ford Explorer 5.0L

Alternator Bracket​

Alternator​

Timing Cover​

Balancer​

Fan​

Waterpump Pulley​

PS Pump Idler​

Thermostat Housing​

1994 Ford Explorer 4.0L

Fan Shroud​


From Wildhorses 4x4

5.0 Crossover Tube​

Explorer/Saginaw Bracket​

Serpentine PS Pulley​

Highflow Thermostat​


Autozone

2000 Ford Explorer 5.0L

Waterpump​

Fan Clutch​

Belt Tensioner​

870K6 Serpentine Belt​


RockAuto

2000 Ford Explorer 5.0L

Front Main Seal​

Timing Cover Gasket​

Oil Pan Gasket​

Thermostat Gasket​

Speedway Motors
Straight Hose Connector 9171763-1.75​


I probably forgot to get a couple things and don't know what coolant hoses I will be using till I get it together so I will update the parts list as I go on. Im hoping to have it all done in the next week or so and finally not have to deal with it squealing all the time!


-Evan
 

Attachments

  • IMG_0395.jpg
    IMG_0395.jpg
    134.7 KB · Views: 211
  • IMG_0396.jpg
    IMG_0396.jpg
    154.7 KB · Views: 196
  • IMG_0398.jpg
    IMG_0398.jpg
    122.7 KB · Views: 185
  • IMG_0399.jpg
    IMG_0399.jpg
    116.6 KB · Views: 192
  • IMG_0397.jpg
    IMG_0397.jpg
    109.4 KB · Views: 169
Last edited:
OP
OP
77broncodriver

77broncodriver

Full Member
Joined
Nov 21, 2009
Messages
344
does anyone know if there is a plate that goes between the water pump and the timing cover like on the regular bronco set up? I forgot to look on the back of the water pump at the junkyard when I grabbed the timing cover.
 

sanndmann3

Bronco Guru
Joined
Jun 13, 2007
Messages
1,774
No, no plate in between the cover and the pump if I'm recollecting correctly...
 
OP
OP
77broncodriver

77broncodriver

Full Member
Joined
Nov 21, 2009
Messages
344
Do you have a part number for the serp belt you are going to use? Thanks, David


Not yet. Once I get it all on I will measure and go find the right one at the part store. Will add it to the parts list with the part number.


Sent from my iPhone using Tapatalk
 

Cooper

Full Member
Joined
May 7, 2006
Messages
293
Loc.
Northeast
Going to make sure I follow this thread - subscribing.
Thanks for going through the trouble.
 
OP
OP
77broncodriver

77broncodriver

Full Member
Joined
Nov 21, 2009
Messages
344
I have ran into problems after problems tonight. I got the timing cover on after taking of the part on the cam that drives the mechanical fuel pump and grinding the pin so the washer sits flat.

The first problem was when I went to put the oil pan back on it wouldn't fit the way I got it off so I had to take my 2 into 1 down to get the pan back up. Not too big of a deal but had to work fast before the rtv on the corners and where the timing cover meets the block started to dry.

After that I put the balancer/water pump/thermostat and housing on without any problems other than I didn't label all the bolts at the junkyard so it took a while figuring out which bolt went where.

I then put on the alternator bracket and alternator and went on to put the wild horses saginaw bracket on when I started to run into problems. First I put on the bracket for the idler and then couldn't figure out how to bolt the idler on. The directions say to use the original hardware but that wouldn't work. (see pic of how its suppose to mount, stock special bolt is not long enough to use provided spacer) Ill have to call tomorrow to see what they say but take a look at the pictures on this post and see what you guys think.

I then put the bracket on the power steering pump by taking off the back 2 bolts on the pump and bolting on the bracket then bolted that to the engine. This went pretty smooth until there was a big puddle of power steering fluid on the garage floor.... Im hoping you guys could help me solve this, take a look at the pic of the pump, it is leaking from between the actual pump part and the reservoir part. all the bolts are tight but its leaking pretty fast. I gave up for the night and just put a bucket under it to catch the rest.

I will post another update tomorrow. I have the whole day to work on it so hopefully I can get a lot done!

-Evan
 

Attachments

  • IMG_0406.jpg
    IMG_0406.jpg
    81 KB · Views: 88
  • IMG_0405.jpg
    IMG_0405.jpg
    132.8 KB · Views: 83
  • IMG_0404.jpg
    IMG_0404.jpg
    76.5 KB · Views: 83
  • IMG_0403.jpg
    IMG_0403.jpg
    77.7 KB · Views: 96
  • IMG_0402.jpg
    IMG_0402.jpg
    77 KB · Views: 99
  • IMG_0408.jpg
    IMG_0408.jpg
    83.6 KB · Views: 83

GWBronco

Full Member
Joined
Mar 25, 2006
Messages
209
For the steering pump. There is an o-ring that goes around the pump body that seals against the housing, that appears to be missing or needs to be replaced.
 
OP
OP
77broncodriver

77broncodriver

Full Member
Joined
Nov 21, 2009
Messages
344
For the steering pump. There is an o-ring that goes around the pump body that seals against the housing, that appears to be missing or needs to be replaced.


Is the pump just pressed into the housing to seal it or do the mounting bolts keep it all together? Looks like I need to get a o-ring kit.


Sent from my iPhone using Tapatalk
 
OP
OP
77broncodriver

77broncodriver

Full Member
Joined
Nov 21, 2009
Messages
344
Quick update:

Talked with wild horses. Throughout 96 and 2001 there were a few different styles of idler pulleys in the explorers. They are sending me out a spacer that should work for the one that I have.

Got a seal kit for the power steering pump to fix that issue.

I put the the pulley on the power steering pump and it looks like it is set back about 3/8" compared to the rest of the pulleys and balancer. I am going to go bet some spacers and report back what worked for me to get it lined up. After I complete the instal and get it working I will go through and find all the little pieces I had to use to make it work and put it on my first post parts list.

I did get ahead of myself and mocked up the fan and radiator and it looks like the stock upper hose is going to work just fine and I think I will be able to cut the bottom one and use the crossover tube I got to make the bottom work. The 94 explorer fan shroud looks to be lining up perfect. Might need to get some thin aluminum to extend it out about an inch to get more the fan covered but will get to that once I get a little farther.
 

Attachments

  • IMG_0409.jpg
    IMG_0409.jpg
    76.1 KB · Views: 103
OP
OP
77broncodriver

77broncodriver

Full Member
Joined
Nov 21, 2009
Messages
344
I pretty much have everything either done or mocked up now. I updated the first post added the part number for the serpentine belt. For me, it turned out to be 87" long which is Autozone part number 870K6.

One thing that I had to do that I had to do that wasn't really mentioned in the main tech article (I might have just not noticed) was how to find TDC and mark it on the balancer.

After I got the balancer on I watched a video from Nashville early bronco on youtube that was very helpful. I made my own piston stop tool (you can order them online but I forgot and couldn't find any locally) using a spark plug defouler for 14mm spark plugs from Autozone and tapping the inside to 3/8-16 and threading a bolt through the center. You take #1 spark plug out and put in the stopper to the depth that it will stop the piston around what you think TDC is. Once you rotate the crank and it stops from hitting the bolt you mark the balancer at the pointer (I used the stock pointer just cut the back off and put it on the other side so you can see it with the reverse flow water pump). Then you rotate the crank the opposite way till it stops. I used tape so I could take it off then fold it in half at the 2 marks and the center is true TDC. Then I used msd marking tape putting 0 on the mark where TDC is. Search this one youtube if that didn't make sense.

I then put the radiator on and cut my lower hose in half and took out an inch or so out of the center and inserted the WH crossover tube, fit just fine! the top hose fits but it is stretched a little bit. I am going to run it like this for now and see if it leaks or anything but I think it will be okay.

I still have to make new heater hoses and finish tightening everything down then get to start it and see if it all works! Hopefully tomorrow I will get it all done after work and if anyone has any questions about anything feel free to ask.

-Evan
 

Attachments

  • IMG_0425.jpg
    IMG_0425.jpg
    103.1 KB · Views: 66
  • IMG_0424.jpg
    IMG_0424.jpg
    97.8 KB · Views: 72
  • IMG_0422.jpg
    IMG_0422.jpg
    97.1 KB · Views: 79
  • IMG_0419.jpg
    IMG_0419.jpg
    119.4 KB · Views: 76
  • IMG_0417.jpg
    IMG_0417.jpg
    65.3 KB · Views: 76
  • IMG_0415.jpg
    IMG_0415.jpg
    97.3 KB · Views: 79
  • IMG_0413.jpg
    IMG_0413.jpg
    131.3 KB · Views: 87
  • IMG_0411.jpg
    IMG_0411.jpg
    130.5 KB · Views: 85
Last edited:
OP
OP
77broncodriver

77broncodriver

Full Member
Joined
Nov 21, 2009
Messages
344
Since the last update I put the radiator in, fan, and connected all the hoses. To make the 94 explorer fan shroud fit nicely I got window foam from home depot and filled the gap between the shroud and the radiator.

While when I mocked everything up it seemed like the upper radiator hose would fit I noticed that fan only had about 1/4" of clearance which seemed too close if the motor or fan flexed. I cut the hose in the middle and added a small section of 1 3/4" OD exhaust tubing to rotate the hose and make it a half inch longer which gave me an extra 1/2" of clearance.

The heater hoses needed to be extended so I just got 6' of 5/8" hose from auto zone and made new ones.

Got everything buttoned up last night and took it for a drive today, so far everything seems to be working great! No more squealing when I start it up and the new fan setup vs my old electric fan is awesome. It was only 70* out today, but before with the electric fan I would always be running hot around 200-220* even when it was cooler outside, today it never got above 180*. I can tell it flows way more air even when idling. I will have to take it up to the mountains and see if how it does up the hills but I think my overheating days are finally over!
 

Attachments

  • IMG_0434.jpg
    IMG_0434.jpg
    138.4 KB · Views: 89
  • IMG_0433.jpg
    IMG_0433.jpg
    123.8 KB · Views: 70
  • IMG_0431.jpg
    IMG_0431.jpg
    128.5 KB · Views: 75
  • IMG_0428.jpg
    IMG_0428.jpg
    126.1 KB · Views: 64
  • IMG_0427.jpg
    IMG_0427.jpg
    76.4 KB · Views: 65
  • IMG_0426.jpg
    IMG_0426.jpg
    164.2 KB · Views: 60
  • IMG_0430.jpg
    IMG_0430.jpg
    89 KB · Views: 58
Top