


Rear Jump Seats
Tech article by El Jefe and filed under - Seats, InteriorRear Jump Seats from an Extended Cab 1990’s Ranger Pick Up
Tech article by Edgar Camez (El Jefe)
Let’s begin by stating that my on-going EB project is
- Done on a cheapskate budget (this justifies my perpetual Saturday morning trips to the local U-pull it)
- Done with donor upgrades with the same DNA (i.e. Ford products for the most part)
I picked up these jump seats on my second time around looking for a suitable donor for a rear seat. I refused to pay $200 for a rear seat and the few original EB rear seats do not match my 96 Probe front seats I retrofitted in the front a while back ago.
I removed the seats once I took the correct Torx socket with me on my Saturday trip. I removed them complete with seatbelts in hope of being able to use them in my retro-installation to the EB.
This write-up will be reduced to minimal text since I took a LOT of photos once the install was completed and to keep my four readers awake.
The only stock needed to fit these to the back of your EB is:
(2) 8” long segments of 3”x3”x1/8” (refer to pictures for clarity)
(4) 1” long 1”x1” angle tabs (refer to pictures for clarity)
(x) ¼” flat stock (for under floor support/nuts- again see pics)
(x) 5/16” grade 8 hardware.
You will also need a welder and drill and a bandsaw or other means of cutting the metal stock. I am sure that other means of fabricating can be used to attach the tube and seats to the truck , but these are what I used.
Estimated cost for this project:
$20 for the seats
~$15 worth of 3×3 square tube (1/8” wall thickness). I bought a longer section for another project and that’s what it cost me.
$xx cost of grade 8 hardware (bought these long time ago at Tractor Supply and can’t remember what I paid )…
Estimated time needed for this project:
Saturday and Sunday afternoons. It can be easily completed in one afternoon if you get your stock cut ahead of time.
Let the picture show begin:

Picture 1. Rear Seats Down (Top View)

Picture 2. Rear Seats Up (Top View)

Picture 3. Rear Seats With Professional Seat Test Pilot’s initial test run.
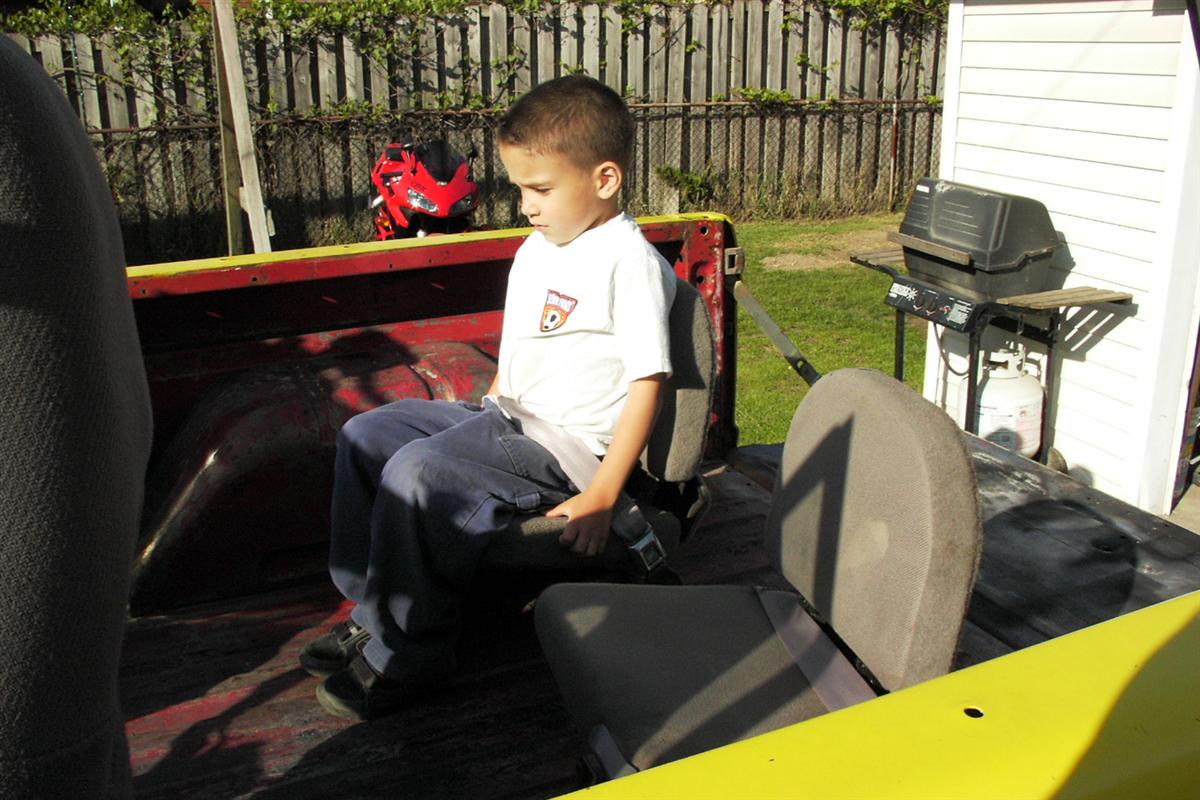
Picture 4. Rear Seats With Professional Seat Test Pilot, Age 5.

Picture 5. Rear Seats Up, view from passenger’s seat.


Picture 6. Top view detail to rear wheel wells.

Picture 7. Seat belt buckles from another Ford donor vehicle (possibly a 1980’s Crown Vic?)- These fit the Ranger’s belt buckle male end and attach to the original belt buckle seat anchor holes on the back of your EB .

Picture 8. View of rear side of LHS rear seat. This side has a hole that will line up with an existing hole in the rear bed section. It uses a 5/8” fine pitch thread bolt. I used a Grade 8 bolt.

Picture 9. View of rear side of RHS rear seat. It mirrors picture 8 and bolt hole lines up o the opposite side.

Picture 10. View of front side of RHS rear seat. Here you can see the 3”x3” tube with tabs attached to the floor. The inboard tab is welded to attach to the bottom of the floor rib whereas the outboard tab is welded to attach to the top of the floor rib and it needs a hole drilled since there is no OEM hole at this location (more on pic# 11)


Picture 11. View of front side of LHS rear seat. Here you can see the 3×3” section in its finished form. The tube is welded to the bottom of the seat’s original bracket. Then the two tabs are welded to the bottom of the 3”x3” tube. The inboard tab is aligned with an existing OEM floor hole. It uses a ½” bolt (reused the OEM grade 5 bolt) for the outer tab; I did drill a 5/16” diameter hole and used a Grade 8 bolt (hex size ½”) and used a flat section with a welded grade 8 nut, shown on the left side of the picture..

Picture 12. Closer view from rear of the truck with the jumpseats up. This way you can store whatever you haul in the small bed (at least provides more space than the OEM rigid seat, unless of course you remove it to haul stuff..)

Picture 13. Top view of front of seat. 3”x3” tube is under the original seat bracket’s front. The original bolt holes are plug welded to the top of the 3×3 and the tabs that bolt to the bed floor can also be seen to the left of the picture. (The newer bolt is outboard and the front of the truck is to the left of this picture).

Picture 14. Rear view of same side bracket. Here you can see the welds along the sides of the original bracket to the top of the 3×3.

Picture 15. The tabs are welded on the 8” long section of 3×3 at 2-1/2” and 7” (Left to Right). The RHS tube / tabs assembly is a mirror image of this detail.

Picture 16. More detail on the way the tabs are welded and their alignment with the bed ribs.

Picture 17. My purdy welds. Done with a 110V MIG welder.

Picture 18. With rear seats in the UP position, there is ~ 2’ of available space in the bed.

Picture 19. With rear seats in the DOWN position, there is ~ 6” between the seats. Perfect for my 2 ½ and 5 y.o. professional rear seat pilots. They now have matching seats on daddy’s EB as in his Ranger..

Picture 20. There are about 18” of leg room for these rear seats as installed. Enough for an adult to ride in these seats!
Tech article by Edgar Camez (El Jefe)