


Recover Bronco Seat Upholstery
Tech article by admin and filed under InteriorTech article by Bill Criss (MnkyBiz)
This Tech Article is written for those of us that just can’t part with our stock seats. If you aren’t into the stock look or don’t enjoy the supreme comfort afforded by these marvelous seats J then read no further! I will document the re-upholstery of the driver’s side front seat and the rear bench seat.To begin with you need to remove the seats from the bronco….OK I’ll get serious now! I purchased my covers from Upholsterman on Ebay. The front seats come as a set, and the rear another set. I won the auctions on the same day, so I saved on shipping. The front seats foam I purchased from www.mustangmarket.com in PA, and received the foam in one day (a benefit of living in VA)! The foam for the rear seat I purchased from a local upholstery shop, and it is two-inches thick, 60 weight, marine grade foam that comes with a lifetime guarantee! For cleaning & refinishing of all the white plastic parts (seat back panels & rear arm rests) I used the SEM products sold by Eastwood Co. (Figure A).
NOTE: I did not purchase the Hog Ring pliers and am still regretting it. If you value your finger tips, go and get the proper tool! I used a pair of adjustable pliers and needle nosed pliers and they worked fine, once my fingers go out of the way!
Front Seats:
- Begin the process by separating the top from the bottom of the seat.
- Remove the hinge covers (plastic elbows covering the seat hinge) by taking out the three Phillips head screws (two on outer edge, on inner). Set these parts aside for cleaning & reuse.
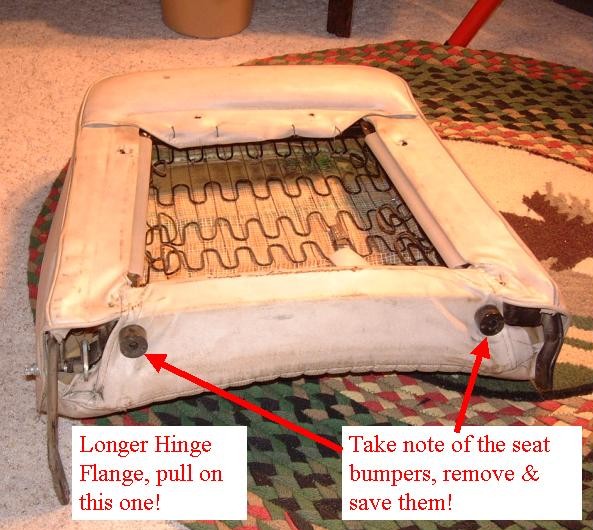
- The seat halves are hinged together with two perforated flanges (extending from the bottom of the seat back) that ride on two rods that extend outward from the bottom of the seat. The flange that faces the door is slightly longer and can be pulled on to slide over the rod on that side of the seat bottom (Figure 1).
You will need to use a lot of elbow grease, so pull hard you can’t hurt it!
- Set aside the seat bottom for now. Take note of exactly how the seat back is assembled. Remove the seat back cover (plastic cover with clips) and set aside for cleaning, SEM painting & reuse. The seat back is relatively easy compared to the seat bottom as it uses integral channels to hold the cover to the frame. Take note as to how you skin the old cover off, as you will reverse this process to install the new cover (Figure 2).

- First remove the channel that is closest to the bottom of the seat back
- Undo the Hog Rings that hold the top flap on
- Unhook the side channels.
- Skin back the seat cover from the seat

Once the seat is “skinned” save the piece of rear foam bolstering that is on the top portion of the back of the seat back. Without this, your reassembly will never get that “full” look of a stock seat cover.
- Take your wire cutters & cut out all the hog rings that are holding the old cover onto the seat, as well as the hog rings holding the foam to the seat frame. Take the old seat cover & remove the wire “U” from the cover. This wire resides in a channel sewn into the seat cover, and must be saved for the new cover install. There should also be a corresponding “U” shaped wire, between the foam and the frame, that was used to hold the seat foam to the seat frame (Figure 3).

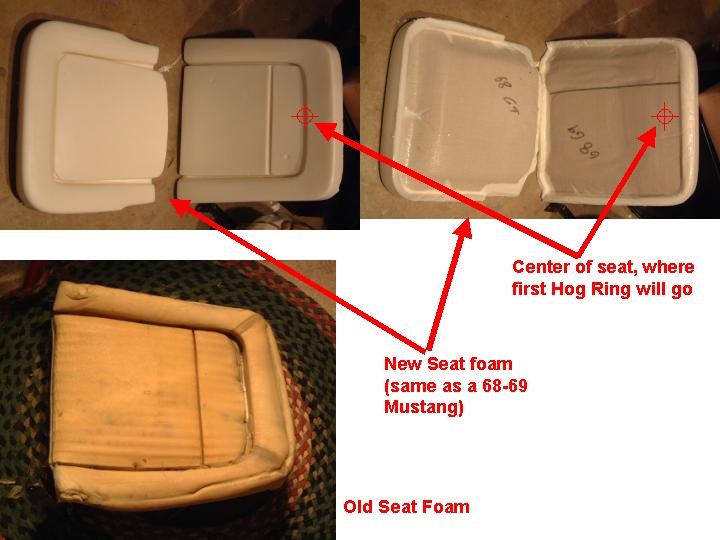
- With the old seat foam and cover off of the seat, examine the frame. If your frame springs have rusted off, or if there is any rust at all, now is the time to treat it. Examine your new foam. The foam should look exactly like the old foam, just fuller & cleaner!!!! Test fit the new seat back foam several times, to get a “feel” for how/where it should rest. Then mark the back of the seat foam at dead center (right/left) where the foam is grooved. This is where you will place your first hog ring (Figure 4)!


October 7th, 2010 at 1:44 pm
I found it useful to poke some wire through the channel in the seat foam (seat side), hooking the listing rods in the seat cover to the u-wire on the back of the foam. I then pulled the wire tight, aligning the upholstery listing rod and the u-wire while also pinning the two wires closer together than the foam to listing rod method above.
A further advantage of this method is that you can test fit the cover before installing hog rings. A disadvantage is that it takes longer.
I would also suggest trying to find hog rings that are a little longer and a little narrower than standard. Even using the wire trick, I had to take multiple shots at some areas as the listing rods and u-wire are difficult to catch with the hog ring.
October 23rd, 2010 at 5:31 pm
I find it hard to believe that the foam will hold the hog rings to the U-wire. I wanted to verify that is how you do it before I shred the foam.
November 6th, 2010 at 12:02 pm
After finally getting around to it, I see that the wire rides in the foam and is connected to the wire in the frame.
I followed DuctTape’s advice and just used baling wire to hold the wire in the foam to the wire in the frame and have only used the hog rings to attach the upholstery to the frame, which is turning out to be much more difficult that I expected. I don’t know if my seats aren’t purely stock or of Wild Horses sent me the wrong covers (though the box says their for a 68-69 Mustang) but I’ve had a hard time stretching the covers to fit the frame and I don’t think there is any way I can get them to cover the same area as the originals.
July 23rd, 2013 at 1:24 pm
I know this tech article is old, but I followed the instruction from here and everything went great. I would like to add a couple of comments from my experience. The covers I ordered didn’t have the plastic clips for the seat backs like the OEM did. I took new and old covers to a shop and had the guy sew them onto the new covers, cost my 25.00 and didn’t have to do some many hog ring clips. Also you have to install the U-wire inside the covers then attach to the foam inside the little channel. If your wire is like mine were they are rusted, they are really hard to slide through the pocket under the cover. After fighting with the first seat I used the white scotch tape and wrapped the U-wire and it pretty much slid in with no problem.