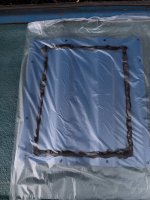
Tech article by Toddz69 (toddz69)
With the advent of electronic fuel injection and larger aftermarket fuel tanks for Early Broncos, in-tank electric fuel pumps have become a common addition to the classic’s powertrain system. While many early conversions relied on external, frame-mounted pumps, in-tank pumps have become more common in recent years with the advent of higher pressure systems and the desire to have cooler running pumps.
In the larger, aftermarket fuel tanks, the in-tank pumps are all installed through the top of the tank, requiring the tank to be dropped for any fuel pump or sending unit maintenance or replacement.
Pump replacement can be a chore in a well-equipped shop with all the right tools close at hand and nearly impossible on the trail, or any roadside, for that matter. Dealing with lowering a tank with almost any amount of fuel in it is unwieldy, messy and possibly downright dangerous.
Taking a cue from some modern cars, the addition of an access plate in the Bronco’s floor can make changing a fuel pump a much easier affair. Some vendors, notably Solo Motorsports, sell access plate kits. Solo’s kit is made for the 80-96 Broncos but can easily be adapted to the Early Bronco’s floorboards as well. If you’re more of a DIY-type, you can fairly easily create your own access plate for your truck. Now, if you have a valuable classic that you don’t want to cut up or your travels don’t take you beyond cellphone/credit card/AAA tow range, then you probably don’t want or need an access plate. However, if you travel in remote areas where trailside repairs may be needed, an access plate might be a good idea.
1980-1996 F-Series trucks are a sure bet as a donor. Some earlier years make work as well, but I can tell you from first-hand experience that 2nd generation Econoline floors will not work! The later F-Series trucks can still be found in junkyards, making them a great source for a panel.
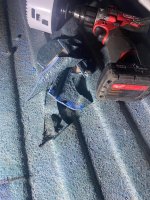
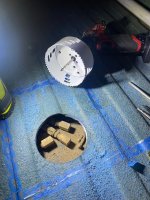
The first order of business is to determine exactly where the fuel pump module is located in the tank and where that’s located under your Bronco’s floor. Measure twice and cut once in this instance. For my installation, I determined where the module was located and then drilled a large hole using a 4” diameter hole saw. I placed a protective metal sheet between the bed and the tank to ensure I wouldn’t accidentally drill or cut through anything with the hole saw.
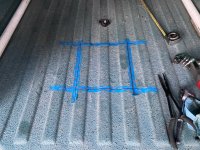
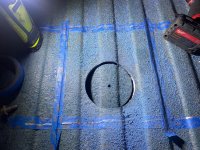
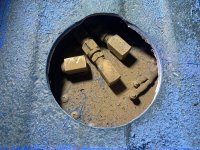
Once the 4” diameter hole was opened up, I could plot my next moves for cutting to make the hole large enough for access. Another note of caution – determine if you just need access to the fuel pump plate in the tank or whether you’ll also want access to the fuel gauge sending unit and its wiring. On my first iteration, I did the former with great access to the fuel pump. Months later when I was doing some troubleshooting for my fuel gauge, I needed access to the sending unit wiring. I ended up cutting out more of the flooring and making a larger access plate so I could easily access the sending unit wiring as well.
Once you’ve determined how big the hole in the floor needs to be and marked it out, you’ll need to decide how you’re going to cut it out. Caution is key here as you’re dealing with cutting metal in close vicinity to a fuel tank! I decided to use a cordless jigsaw/saber saw to make the majority of cuts in my floor. I kept a fire extinguisher nearby and covered the tank with a water-soaked rag. How you decide to cut your hole is up to you – I would recommend using a cutting method that makes as few sparks as possible! When opening the hole with the jigsaw, I did the same thing as when I was drilling with the holesaw and put a plate between the tank and the jigsaw to make sure the blade didn’t accidentally cut anything. Depending on how close your tank is to the floor, you may want to lower your tank slightly for this operation.
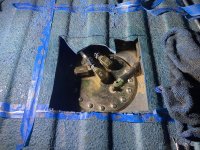
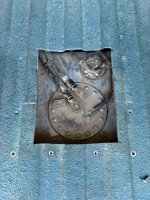
Once you have your floor cut out, you can determine the dimensions for the plate you’ll need. I’d recommend at least 1” overlap between the plate and the floorboards to allow for fasteners.
For cutting the plate in the junkyard, I usually took a cordless drill with a small holesaw bit and a jigsaw/saber saw or small power hacksaw. When you’re scoping out what section of a bed to cut out, play close attention to what’s underneath the bed. You’ll likely find crossmembers and reinforcement pieces that limit the areas that are suitable for cutting. Once you’ve determined an area to cut, mark it out with a Sharpie and use the holesaw to drill out each of the 4 corners. Then use your Sawzall or jigsaw to make the straight cuts between the 4 holes and voila – you’ve got a rough access panel.
You can use a variety of methods to trim the panel to your liking: vertical bandsaw, angle grinder with cutoff wheel, etc. You’ll probably find that getting everything squared up to your satisfaction takes longer than you thought it would.
Once the panel is prepped, place it over the hole in the floorboard and mark where you’ll drill mounting holes. Again, before you drill, make sure you’re not going to drill into the tank/hoses/wires, etc. as you punch through the floorboard. With the plate in place, match drill holes in 4 corners and in the appropriate places in the floor between the corners as you desire. I’d recommend drilling holes in the “valleys” of the ribbed floor rather on top of the ribs to keep the rivets or screws low-profile and less likely to snag or grab something in the bed.
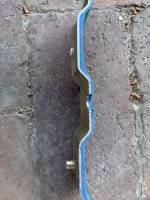
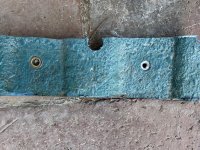
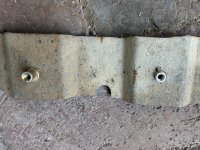
There are several schools of thought on how to attach the plate. Some say to simply pop rivet it in place. But this means that when you’re 50 miles from Nowheresville with a dead fuel pump, you’d better hope you remembered that cordless drill with a drill bit in it to drill out the rivets for access. Others may use sheet metal screws or self-tapping screws of some sort. They work better than pop rivets, but they’re still not optimum. For the nicest installation, I’d recommend using nutserts or rivet nuts. They allow you to use machine thread screws for the installation and also ensures the best fit with the least chance of the mounting holes or hardware becoming compromised with multiple removals/installs. There are different styles of threaded inserts available. I initially used the style most commonly used for thin sheet metal but after several failures, switched to a heavy-duty style with a longer grip length to account for the added thickness of my floor board due to a spray-in bedliner. You can see the differences in the two rivet styles in the photos below.
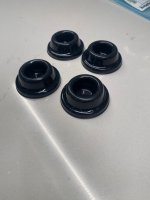
Fastener head style is also a personal preference. I chose 10-32 panhead Philips screws since they are low profile and only require that I carry a Philips screwdriver to remove them. One note of caution – depending on the construction of your fuel tank, you may need to space it away from the body to allow the nutserts/screws/rivets to come through the body and not hit the tank. For my Wild Horses M1A1 tank, I found some 3M self-adhesive spacers to put on top of the tank to space it away from the body an appropriate amount. An added bonus of these spacers is a quieter fuel pump since the tank was no longer making direct contact to the body.
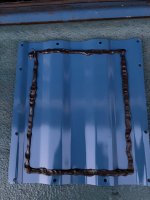
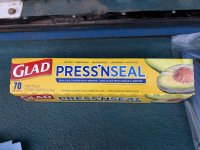
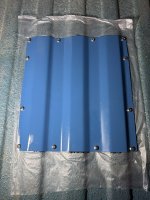
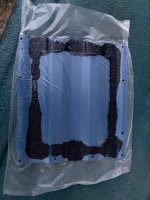
Once the plate was installed, I thought about some sort of gasketing material to seal the floor to eliminate dust and water intrusion. Some installations reference a bead of RTV or silicone sealant but again, this makes the plate removal more difficult when it needs to be removed. My good friend @lars recommended the following: apply a bead of silicone on the underside of the plate and then cover it with a sheet of sealing wrap (Glad Press‘NSeal or equivalent). Place the plate over the hole, poke holes through the sealing wrap and install and tighten all the mounting screws. Allow the silicone to cure and then remove the plate and trim the sealing wrap off everything except on the areas where it’s laying on top of the silicone. You now have a nice silicone gasket of sorts that doesn’t stick to the floorboard allows easy removal of the plate. Nearly a year’s worth of dusty road driving has proven this to be an effective sealing solution for the plate.
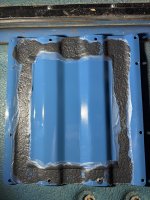
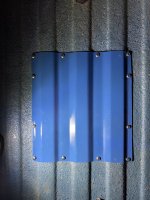
There you have it – an inexpensive, easily-fabricated solution to allow easy access to your fuel tank for that inevitable fuel pump failure.
Parts/Tools required:
Resources:
-Fuel tank access plate:
https://solomotorsports.com/shop/parts/ford-parts/interior/ford-bronco-gas-tank-access-cover/
-Rivet nuts for extended grip length:
https://boltdepot.com/Product-Detai...VZN6kSKAYwHp7vRF9Jin-BwJ4y7aGt2gaArKYEALw_wcB
-Tank Spacers:
3M Bumpon SJ5532: https://www.3m.com/3M/en_US/p/d/b5005035211/
With the advent of electronic fuel injection and larger aftermarket fuel tanks for Early Broncos, in-tank electric fuel pumps have become a common addition to the classic’s powertrain system. While many early conversions relied on external, frame-mounted pumps, in-tank pumps have become more common in recent years with the advent of higher pressure systems and the desire to have cooler running pumps.
In the larger, aftermarket fuel tanks, the in-tank pumps are all installed through the top of the tank, requiring the tank to be dropped for any fuel pump or sending unit maintenance or replacement.
Pump replacement can be a chore in a well-equipped shop with all the right tools close at hand and nearly impossible on the trail, or any roadside, for that matter. Dealing with lowering a tank with almost any amount of fuel in it is unwieldy, messy and possibly downright dangerous.
Taking a cue from some modern cars, the addition of an access plate in the Bronco’s floor can make changing a fuel pump a much easier affair. Some vendors, notably Solo Motorsports, sell access plate kits. Solo’s kit is made for the 80-96 Broncos but can easily be adapted to the Early Bronco’s floorboards as well. If you’re more of a DIY-type, you can fairly easily create your own access plate for your truck. Now, if you have a valuable classic that you don’t want to cut up or your travels don’t take you beyond cellphone/credit card/AAA tow range, then you probably don’t want or need an access plate. However, if you travel in remote areas where trailside repairs may be needed, an access plate might be a good idea.
1980-1996 F-Series trucks are a sure bet as a donor. Some earlier years make work as well, but I can tell you from first-hand experience that 2nd generation Econoline floors will not work! The later F-Series trucks can still be found in junkyards, making them a great source for a panel.
The first order of business is to determine exactly where the fuel pump module is located in the tank and where that’s located under your Bronco’s floor. Measure twice and cut once in this instance. For my installation, I determined where the module was located and then drilled a large hole using a 4” diameter hole saw. I placed a protective metal sheet between the bed and the tank to ensure I wouldn’t accidentally drill or cut through anything with the hole saw.
Once the 4” diameter hole was opened up, I could plot my next moves for cutting to make the hole large enough for access. Another note of caution – determine if you just need access to the fuel pump plate in the tank or whether you’ll also want access to the fuel gauge sending unit and its wiring. On my first iteration, I did the former with great access to the fuel pump. Months later when I was doing some troubleshooting for my fuel gauge, I needed access to the sending unit wiring. I ended up cutting out more of the flooring and making a larger access plate so I could easily access the sending unit wiring as well.
Once you’ve determined how big the hole in the floor needs to be and marked it out, you’ll need to decide how you’re going to cut it out. Caution is key here as you’re dealing with cutting metal in close vicinity to a fuel tank! I decided to use a cordless jigsaw/saber saw to make the majority of cuts in my floor. I kept a fire extinguisher nearby and covered the tank with a water-soaked rag. How you decide to cut your hole is up to you – I would recommend using a cutting method that makes as few sparks as possible! When opening the hole with the jigsaw, I did the same thing as when I was drilling with the holesaw and put a plate between the tank and the jigsaw to make sure the blade didn’t accidentally cut anything. Depending on how close your tank is to the floor, you may want to lower your tank slightly for this operation.
Once you have your floor cut out, you can determine the dimensions for the plate you’ll need. I’d recommend at least 1” overlap between the plate and the floorboards to allow for fasteners.
For cutting the plate in the junkyard, I usually took a cordless drill with a small holesaw bit and a jigsaw/saber saw or small power hacksaw. When you’re scoping out what section of a bed to cut out, play close attention to what’s underneath the bed. You’ll likely find crossmembers and reinforcement pieces that limit the areas that are suitable for cutting. Once you’ve determined an area to cut, mark it out with a Sharpie and use the holesaw to drill out each of the 4 corners. Then use your Sawzall or jigsaw to make the straight cuts between the 4 holes and voila – you’ve got a rough access panel.
You can use a variety of methods to trim the panel to your liking: vertical bandsaw, angle grinder with cutoff wheel, etc. You’ll probably find that getting everything squared up to your satisfaction takes longer than you thought it would.
Once the panel is prepped, place it over the hole in the floorboard and mark where you’ll drill mounting holes. Again, before you drill, make sure you’re not going to drill into the tank/hoses/wires, etc. as you punch through the floorboard. With the plate in place, match drill holes in 4 corners and in the appropriate places in the floor between the corners as you desire. I’d recommend drilling holes in the “valleys” of the ribbed floor rather on top of the ribs to keep the rivets or screws low-profile and less likely to snag or grab something in the bed.
There are several schools of thought on how to attach the plate. Some say to simply pop rivet it in place. But this means that when you’re 50 miles from Nowheresville with a dead fuel pump, you’d better hope you remembered that cordless drill with a drill bit in it to drill out the rivets for access. Others may use sheet metal screws or self-tapping screws of some sort. They work better than pop rivets, but they’re still not optimum. For the nicest installation, I’d recommend using nutserts or rivet nuts. They allow you to use machine thread screws for the installation and also ensures the best fit with the least chance of the mounting holes or hardware becoming compromised with multiple removals/installs. There are different styles of threaded inserts available. I initially used the style most commonly used for thin sheet metal but after several failures, switched to a heavy-duty style with a longer grip length to account for the added thickness of my floor board due to a spray-in bedliner. You can see the differences in the two rivet styles in the photos below.
Fastener head style is also a personal preference. I chose 10-32 panhead Philips screws since they are low profile and only require that I carry a Philips screwdriver to remove them. One note of caution – depending on the construction of your fuel tank, you may need to space it away from the body to allow the nutserts/screws/rivets to come through the body and not hit the tank. For my Wild Horses M1A1 tank, I found some 3M self-adhesive spacers to put on top of the tank to space it away from the body an appropriate amount. An added bonus of these spacers is a quieter fuel pump since the tank was no longer making direct contact to the body.
Once the plate was installed, I thought about some sort of gasketing material to seal the floor to eliminate dust and water intrusion. Some installations reference a bead of RTV or silicone sealant but again, this makes the plate removal more difficult when it needs to be removed. My good friend @lars recommended the following: apply a bead of silicone on the underside of the plate and then cover it with a sheet of sealing wrap (Glad Press‘NSeal or equivalent). Place the plate over the hole, poke holes through the sealing wrap and install and tighten all the mounting screws. Allow the silicone to cure and then remove the plate and trim the sealing wrap off everything except on the areas where it’s laying on top of the silicone. You now have a nice silicone gasket of sorts that doesn’t stick to the floorboard allows easy removal of the plate. Nearly a year’s worth of dusty road driving has proven this to be an effective sealing solution for the plate.
There you have it – an inexpensive, easily-fabricated solution to allow easy access to your fuel tank for that inevitable fuel pump failure.
Parts/Tools required:
- Hand drill with various size hole saw bits and drill bits
- Portable jigsaw/saber saw/reciprocating saw
- Tape Measure
- Marking tool (Sharpie or similar)
- Masking or painters tape for marking the bed surface (optional)
- Appropriately sized nutserts/rivet nuts (if choosing to use them) and nutsert/rivet nut installation tool
- Fasteners of your choice for the plate (pop rivets, self-tapping screws, machine thread screws)
- Access plate – junkyard or purchased from a vendor
- Sealing material for the plate (optional)
- Protective shields/plates to ensure the drill bits/hole saws/jigsaws do not puncture/cut through fuel lines/wires/fuel tank
Resources:
-Fuel tank access plate:
https://solomotorsports.com/shop/parts/ford-parts/interior/ford-bronco-gas-tank-access-cover/
-Rivet nuts for extended grip length:
https://boltdepot.com/Product-Detai...VZN6kSKAYwHp7vRF9Jin-BwJ4y7aGt2gaArKYEALw_wcB
-Tank Spacers:
3M Bumpon SJ5532: https://www.3m.com/3M/en_US/p/d/b5005035211/