• Just a reminder that you won't be able to start new posts or reply to existings posts in the Archive forum.

    This is where all the old posts go so they can still be used for reference and searched.
  • Welcome to ClassicBroncos! - You are currently viewing the forums as a GUEST. To take advantage of all the site features, please take a moment to register. It's fast, simple and absolutely free. So please join our community today!
    If you have problems registering or can't log into your account, please contact Admin.

My '69 Build

OP
OP
Devin

Devin

Bronco Kineticist
Joined
Apr 29, 2004
Messages
3,956
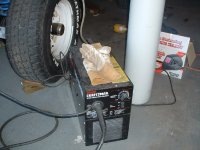
Today was the last day of my "mini" vacation that I took to work on the Bronco. I started the day by going over to my father-in-law's house and getting his portable MIG welder. I must say that I am VERY rusty in the welding department. Plus, this welder only has two settings for current. It was a challenge getting used to it. I layed some very ugly welds, but none of them were structural, so I didn't mind. ;D

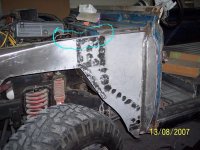
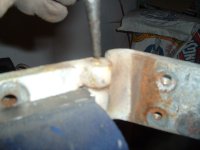
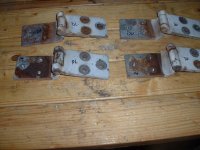
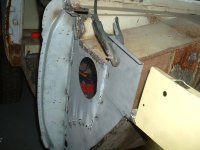
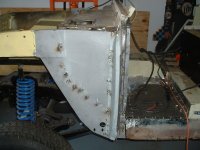
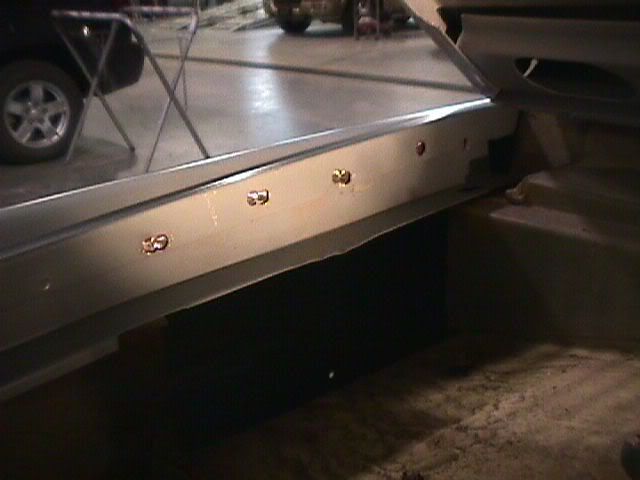
I patched the driver's front fender, spot-welded the SS hinge onto the windshield, welded my new passenger's floor support in, and repaired a hole that was in the front clip. I also finished removing most of the rear passenger's fender (before my drill bit gave up on me).

It has been a fun few days. Like always, I wish that I could have gotten more done, but that is how it usually goes. %) I've got some more time off with the coming holidays, so I hope that I can keep the momentum up.
 

Attachments

  • DSCF0026.JPG
    DSCF0026.JPG
    190 KB · Views: 164
  • DSCF0025.JPG
    DSCF0025.JPG
    145.4 KB · Views: 224
  • DSCF0027.JPG
    DSCF0027.JPG
    147.6 KB · Views: 300
  • DSCF0030.JPG
    DSCF0030.JPG
    182.5 KB · Views: 173

Scoop

Contributor
Have Bronco, Will Travel
Joined
Feb 1, 2006
Messages
10,822
Loc.
Cuchara, CO
Looks like you are doing some nice work - and doing it right. It will be worth it in the end! :)
 

firehawk

Full Member
Joined
Jun 27, 2006
Messages
614
Loc.
Clawson, Michigan
A word of advice from someone who has been there.

Be careful when putting the kick panel in, just test fit the fender before you weld it in. The cowl has a tendency to sag when not supported. When you test fit the fender the cowl should meet up with the bottom of the fender lip that extends into the engine compartment. It is the stepped down part of the cowl I am talking about, right at the drivers side end of it. I dont know about the passengers side as I did not have to replace that side.

I did not test fit the fender because I did not think it had anything to do with the correct placement on the kick panel, but on mine, the cowl that extends under the fender is about 1/2 inch lower than the fender is so when I tighten the top rear fender bolt there is a gap and the bolt bends each piece of metal to meet up. I will be using a few washers to fill the gap at final assembly. It might actually be the kick panel the fender bolts to, I am going off of my memory which seems to be slowly fading away.

Also bolt the emergency brake in place before welding and leave it in while welding. It will help located the floor panel and the firewall. Another think I thought of after the fact.

-Jay

The area circled in pic.

Actually now after looking at it in the pic I wonder if it might be the after market fender I am using on that side?
 

Attachments

  • Crap.jpg
    Crap.jpg
    140.6 KB · Views: 439
Last edited:
OP
OP
Devin

Devin

Bronco Kineticist
Joined
Apr 29, 2004
Messages
3,956
A word of advice from someone who has been there.

Be careful when putting the kick panel in, just test fit the fender before you weld it in. The cowl has a tendency to sag when not supported. When you test fit the fender the cowl should meet up with the bottom of the fender lip that extends into the engine compartment. It is the stepped down part of the cowl I am talking about, right at the drivers side end of it. I dont know about the passengers side as I did not have to replace that side.

I did not test fit the fender because I did not think it had anything to do with the correct placement on the kick panel, but on mine, the cowl that extends under the fender is about 1/2 inch lower than the fender is so when I tighten the top rear fender bolt there is a gap and the bolt bends each piece of metal to meet up. I will be using a few washers to fill the gap at final assembly. It might actually be the kick panel the fender bolts to, I am going off of my memory which seems to be slowly fading away.

Also bolt the emergency brake in place before welding and leave it in while welding. It will help located the floor panel and the firewall. Another think I thought of after the fact.

-Jay

The area circled in pic.

Actually now after looking at it in the pic I wonder if it might be the after market fender I am using on that side?

Thanks for the tips. I do have the fender out have been hanging it, checking for fit as I move along. Once I go back to working on hanging the doors, I will be checking the fenders and windshield before I do any welding. I do know that my cowl sagged considerably. I got some measurements from this board to help me get it back to proper position. To do that, I had to pull it up a good 2 inches or so.

Thanks again.
 
OP
OP
Devin

Devin

Bronco Kineticist
Joined
Apr 29, 2004
Messages
3,956
The hinge rebuild kit from BC Broncos came last Friday, so I set to work on Saturday rebuilding my door hinges. I removed them from the doors and there was an awful lot of slop in them. I went to work removing the old, rusty pins. The first two popped out pretty easily. The next two were a different story, however. Alot of heat and a 3 lb sledge swinging was involved. After quite a bit of work, they finally came out. I cleaned them up, prepped them, and applied POR 15. I let them sit for a few days and tonight, I finished the job up. I am really happy with how they came out. They rotate very smoothly, and have almost zero play. Now that the hinges are done, I can get back to trying to line everything up.

The big brown truck came by today and dropped off a couple more body pieces that I found that I needed. Passenger side striker post and passenger side rear lower quarter.
 

Attachments

  • DSCF0011.JPG
    DSCF0011.JPG
    133 KB · Views: 166
  • DSCF0010.JPG
    DSCF0010.JPG
    159.2 KB · Views: 151
  • DSCF0008.JPG
    DSCF0008.JPG
    191.4 KB · Views: 175
  • DSCF0007.JPG
    DSCF0007.JPG
    131 KB · Views: 168
  • DSCF0004.JPG
    DSCF0004.JPG
    201.7 KB · Views: 159
  • DSCF0003.JPG
    DSCF0003.JPG
    118.6 KB · Views: 149
  • DSCF0001.JPG
    DSCF0001.JPG
    179.7 KB · Views: 156

Tito

CB Fire Starter
Joined
Jan 29, 2006
Messages
10,781
Loc.
Bakersfield, CA
Looks good, I have one of the rebuild kits on my shelf, havent tried it yet, I have heard mixed reviews. Hope yours turn out well, they look good! I had missed your build, it is looking excellent with some great parts, you are going to have a real well built rig when done!
 
OP
OP
Devin

Devin

Bronco Kineticist
Joined
Apr 29, 2004
Messages
3,956
Looks good, I have one of the rebuild kits on my shelf, havent tried it yet, I have heard mixed reviews. Hope yours turn out well, they look good! I had missed your build, it is looking excellent with some great parts, you are going to have a real well built rig when done!

Thanks for the comments. You have probably missed my build because there was an extremely long couple of stretches where I couldn't work on it. Now is a good time, and I am hoping to maintain the momentum and keep busy on it.

I had heard some mixed stuff as well on the rebuild kits. There was a lot of talk about how hard it was to get the bores straight and what not. I figured that these things weren't perfect to start with (you should have seen how far off center one of the hinge holes was), so I wasn't going to screw it up too bad. Once I got the old pins out, I just put them on a drill press and went to town.

I think that if you are a perfectionist and demand that everything line up perfectly, then maybe the rebuild kit isn't the way to go if you are doing it yourself. Luckily, I am not one of those types. ;D
 
OP
OP
Devin

Devin

Bronco Kineticist
Joined
Apr 29, 2004
Messages
3,956
Well, I fought with the driver's side for quite a few hours yesterday, and finally got it lined up to where I liked it. And because I am a glutton for punishment, I re-did the passenger side to give myself a bit more gap.

Today, I welded the kick panels and door posts in place. It is pretty cool having the pieces in there in a more "permanent" fashion. I re-hung everything and it looks pretty good, except for the driver's front fender. It sits higher than the door. After looking at it for a bit, I think that I can "adjust" it to make it look better. Overall, I am very happy with the results. The top of the doors line up nicely with the windshield; the vertical gaps are all pretty straight, and the body lines look pretty straight also (with exception of the driver's front fender).

Hope you all had a good Thanksgiving. More later....
 

Attachments

  • DSCF0009.JPG
    DSCF0009.JPG
    157 KB · Views: 264
  • DSCF0008.JPG
    DSCF0008.JPG
    163.6 KB · Views: 212
  • DSCF0006.JPG
    DSCF0006.JPG
    172.8 KB · Views: 222

bax

Contributor
Old Member
Joined
Aug 22, 2005
Messages
14,498
Lots of work there. looks like you are doing well. I am so glad all that is behind me. just keep working on it, you will win. Mine has kicked my butt several times, but I keep going back in the shop for more.

Bax
 

BroncoJAK

Bronco Guru
Joined
Sep 24, 2002
Messages
2,813
I re-hung everything and it looks pretty good, except for the driver's front fender. It sits higher than the door. After looking at it for a bit, I think that I can "adjust" it to make it look better.

I have had to drill out the 5 or 6 spot welds at the back of the fender to "adjust" the height just right.
6fa0c158.jpg
 

BroncoJAK

Bronco Guru
Joined
Sep 24, 2002
Messages
2,813
They weren't to picky about the placement of the bolt on piece of the fenders. I'd bet you could see a difference comparing the left to the right. I've had fenders with as much as an inch in height difference.
 
OP
OP
Devin

Devin

Bronco Kineticist
Joined
Apr 29, 2004
Messages
3,956
Well, since my last update, I have got all of the floors, kick panels, and door posts welded in. Today, I removed the passengers side striker post. Boy, that was fun. %) %)

It was also a pretty expensive day for me. I ordered an engine rebuild kit, new pistons, new cam, and cylinder heads for my transplant motor. So, engine experts, name this motor. ;D
 

Attachments

  • DSCF0026.JPG
    DSCF0026.JPG
    202.3 KB · Views: 293
  • DSCF0019.JPG
    DSCF0019.JPG
    151.8 KB · Views: 230
  • DSCF0025.JPG
    DSCF0025.JPG
    189.6 KB · Views: 289
  • DSCF0022.JPG
    DSCF0022.JPG
    213.4 KB · Views: 279
  • DSCF0023.JPG
    DSCF0023.JPG
    240.6 KB · Views: 275
OP
OP
Devin

Devin

Bronco Kineticist
Joined
Apr 29, 2004
Messages
3,956
Not an engine expert but looks like a 400 to me.

Well, if I had a prize, I would give it to you. Nice work! ;) BTW, I like your new avatar. Your last one kind of creeped me out. ;D ;D ;D
 

ztoolman44

Jr. Member
Joined
Jan 8, 2005
Messages
304
Loc.
Farmington, Utah
Thanks for all the pics. This type of post gives me the nudge I need to keep working on my project (coincidentally a 69 frame off also). Strong work.
 

JHD

Full Member
Joined
Feb 6, 2007
Messages
587
Loc.
Colorado Springs
did you compleatly remove the fender lip that comes over the striker? do you have to make a new pice to over lap? I wanted to do strikers but that has me a little concerned
 
OP
OP
Devin

Devin

Bronco Kineticist
Joined
Apr 29, 2004
Messages
3,956
did you compleatly remove the fender lip that comes over the striker? do you have to make a new pice to over lap? I wanted to do strikers but that has me a little concerned


Yes, I did remove that (what was left of it). But, I wasn't too concerned about it as I am also replacing my quarter panel.
 
Top