






• Welcome to ClassicBroncos! - You are currently viewing the forums as a GUEST. To take advantage of all the site features, please take a moment to register. It's fast, simple and absolutely free. So please join our community today!
    If you have problems registering or can't log into your account, please contact Admin.

Captain Crunch 2.0

Bitch'nBronco

Contributor
Loose Cannon
Joined
Dec 1, 2005
Messages
3,616
Loc.
Ringwood, NJ
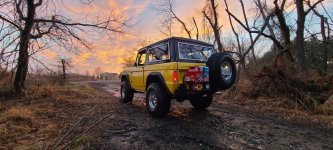
I have a build thread from around 2005 and now that I'm coming up on 20 years since I finished the build, the Bronco is ready for a refresh.

Today I started the long arm install, I got a set of Bronco Bob arms, Duff coil cups, new bushings, new hardware, and some Deaver coils to replace the old Superlift coils.

Removing the old arms sold me on powdercoat, the insides of the radius arm, radius arm caps and axle wedges still looked just as new as they did when I installed them originally. I'll post some pictures of their condition tomorrow.
 

Attachments

  • 20240106_160803.jpg
    20240106_160803.jpg
    255.5 KB · Views: 123
  • 20240102_132646.jpg
    20240102_132646.jpg
    150 KB · Views: 134
OP
OP
Bitch'nBronco

Bitch'nBronco

Contributor
Loose Cannon
Joined
Dec 1, 2005
Messages
3,616
Loc.
Ringwood, NJ
Finished up the install today, super fun doing this by myself in a frozen garage lol. Going to be sore tomorrow, but at least its back on the ground. I still need to put the drive shaft back in, and torque everything. Figured it was best to wait to torque tomorrow when I'm not tired. Nice to know every front end bushing is new and I'm excited to see how it drives.

Think I want to add shock hoops next, interested in your opinion whether or not they are worth adding. I'll upload some photos in the morning
 

bfoldy

Contributor
Sr. Member
Joined
Sep 13, 2004
Messages
796
Loc.
Torrance, CA
I’m curious what kind of shape your bushings were in after 19 years of use. I assume they were polyurethane?


Sent from my iPhone using Tapatalk
 
OP
OP
Bitch'nBronco

Bitch'nBronco

Contributor
Loose Cannon
Joined
Dec 1, 2005
Messages
3,616
Loc.
Ringwood, NJ
I’m curious what kind of shape your bushings were in after 19 years of use. I assume they were polyurethane?


Sent from my iPhone using Tapatalk
They were pretty cooked, I installed poly bushings all the way around. I had two C bushings with large cracks in them, the trac bar bushings looked ok but I replaced them anyway, and the radius arm bushings at the ends of the arms were cracked as well. The bushings going bad was the driver for me to decide to start the long arm install. I didn't take pictures of the bad bushings, but the cracks ranged from 1/8in on the end bushings to a full 1/4in c bushings
 
OP
OP
Bitch'nBronco

Bitch'nBronco

Contributor
Loose Cannon
Joined
Dec 1, 2005
Messages
3,616
Loc.
Ringwood, NJ
Here are some of the install photos, the red oxide primer is temporary until I get some color match paint so the new parts match the powder coat on the frame
 

Attachments

  • Screenshot_20240121_111814_Gallery.jpg
    Screenshot_20240121_111814_Gallery.jpg
    176.8 KB · Views: 114
  • Screenshot_20240121_111803_Gallery.jpg
    Screenshot_20240121_111803_Gallery.jpg
    240.5 KB · Views: 110
  • Screenshot_20240121_111755_Gallery.jpg
    Screenshot_20240121_111755_Gallery.jpg
    250.6 KB · Views: 108
  • Screenshot_20240121_111749_Gallery.jpg
    Screenshot_20240121_111749_Gallery.jpg
    141.2 KB · Views: 108
OP
OP
Bitch'nBronco

Bitch'nBronco

Contributor
Loose Cannon
Joined
Dec 1, 2005
Messages
3,616
Loc.
Ringwood, NJ
Got everything torqued down and finally got a chance to try it out. I should have done this years ago! It ride a lot nicer with the Deavers (Thanks for the recommendation Todd), is more controlled over bumps, steering seems a little lighter and I'm very happy overall. Can't wait. To cruise it some more
 

Attachments

  • IMG_20240126_180919_607.jpg
    IMG_20240126_180919_607.jpg
    381 KB · Views: 83
  • 20240126_172341.jpg
    20240126_172341.jpg
    205.7 KB · Views: 92

Speedrdr

Contributor
Legend in my own mind
Joined
Nov 27, 2017
Messages
2,028
Loc.
Paris, MS
Did you have the ability to do some “front bias” weight placement or was the overall size at the top of the weight? Just wondering.

Randy
 
OP
OP
Bitch'nBronco

Bitch'nBronco

Contributor
Loose Cannon
Joined
Dec 1, 2005
Messages
3,616
Loc.
Ringwood, NJ
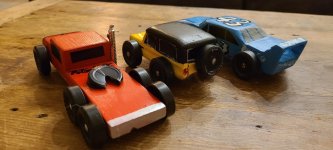
I'll post some pictures later of how I weighted them, I put 90% of the weight at the back of the cars to get that extra kick at the ramp transition. I drilled a bunch of holes and filled them with lead bird shot and epoxy. The Bronco is pretty short compared to my boys cars so the weight is just in front of the rear axle. I also got some 2.5* drill bit guides to cant the axles and polished/deburred the nails.
 
OP
OP
Bitch'nBronco

Bitch'nBronco

Contributor
Loose Cannon
Joined
Dec 1, 2005
Messages
3,616
Loc.
Ringwood, NJ
Did you have the ability to do some “front bias” weight placement or was the overall size at the top of the weight? Just wondering.

Randy
Forgot to mention the spare is also full of bird shot
 

Attachments

  • 20240130_144432.jpg
    20240130_144432.jpg
    60.4 KB · Views: 74
  • 20240130_144409.jpg
    20240130_144409.jpg
    69.7 KB · Views: 64

Speedrdr

Contributor
Legend in my own mind
Joined
Nov 27, 2017
Messages
2,028
Loc.
Paris, MS
Cool project. Are they gonna let you “make a run” with it to see how fast it will go? Helped a friend’s son do a car but didn’t think about bird shot! Doh 😖 turned out that a 158 grain 38 spl cast bullet was the perfect weight needed. Got lucky.

Randy
 
OP
OP
Bitch'nBronco

Bitch'nBronco

Contributor
Loose Cannon
Joined
Dec 1, 2005
Messages
3,616
Loc.
Ringwood, NJ
They usually have like a test and tune night, but I'm out of town for work so I guess we'll find out on race day. I've used bird shot the last 2 years with pretty good success. I learned about Tungsten paste recently and may try that out next year as it looks a little easier to work with than epoxy and bird shot. The benefit of the bird shot is if you get to weigh in and its a few tenths of an Oz off 5 Oz, I just chip a few pellets off to get the wieght down
 
OP
OP
Bitch'nBronco

Bitch'nBronco

Contributor
Loose Cannon
Joined
Dec 1, 2005
Messages
3,616
Loc.
Ringwood, NJ
Scored a used Duff Prerunner bumper that came with some cool old KC Daylighters. I restored the lights with new replacement parts from KC and then sanded/repainted the bumper
 

Attachments

  • Screenshot_20240323_130705_craigslist.jpg
    Screenshot_20240323_130705_craigslist.jpg
    123.6 KB · Views: 71
  • 20240324_180533.jpg
    20240324_180533.jpg
    220.6 KB · Views: 70
  • 20240328_170800.jpg
    20240328_170800.jpg
    94.7 KB · Views: 89
  • FunPic_20240329_134947648.jpg
    FunPic_20240329_134947648.jpg
    315.4 KB · Views: 74
  • 20240329_134352.jpg
    20240329_134352.jpg
    208.2 KB · Views: 80

LUBr LuvR

Contributor
Bronco Guru
Joined
Dec 31, 2015
Messages
2,227
Scored a used Duff Prerunner bumper that came with some cool old KC Daylighters. I restored the lights with new replacement parts from KC and then sanded/repainted the bumper

Persistence pays off, “new” bumper looks great on your rig. KCs are just old school cool!😎
 
OP
OP
Bitch'nBronco

Bitch'nBronco

Contributor
Loose Cannon
Joined
Dec 1, 2005
Messages
3,616
Loc.
Ringwood, NJ
Persistence pays off, “new” bumper looks great on your rig. KCs are just old school cool!😎
Thanks! It was definitely worth the search. I thought it was homebuilt, turns out it's got Duff stamped on both ends of the bumper. Deal of the year and couldn't be happier about it
 
Top