






• Welcome to ClassicBroncos! - You are currently viewing the forums as a GUEST. To take advantage of all the site features, please take a moment to register. It's fast, simple and absolutely free. So please join our community today!
    If you have problems registering or can't log into your account, please contact Admin.

Barn Find Restomod Build

OP
OP
AZ73

AZ73

Bronco Guru
Joined
Mar 28, 2012
Messages
3,813
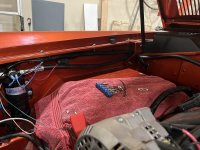
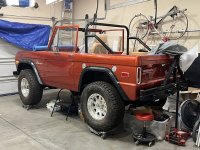
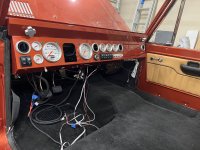
It's embarrassing how little I've worked on this over the last year and yet it's so close. The last week I've been in the garage moving it along. The biggest pain job that was left was getting the wiring somewhat organized so I could install the dash. After re-checking everything again I temporarily mounted the dash so I could see what kind of room I had to mount the massive customized painless harness I used and still have room for the A/C and defrost venting hoses. Turns out there's a ton of room so the job was easier than I thought. Most of the mess of wires on the passenger side first pix is A/C and right front engine compartment wires. I got them organized, wrapped in Powerbraid, and run through the firewall. What's left in the second picture are the seat heater, radio, ignition switch, and engine management lines (those I need to run through the center of the firewall). The flat grey cable is for the push button start computer. The 2 red buttons hanging off wires on the left are for the fuel gauges. Once fuel is in the tanks, I press them and they set the needles based on the float positions, then they get cut off. The silver knob under the speedometer is a dimmer switch for the dash lights. I also had to remove the roll bar to get access to the fuel condenser panel. I neglected to remove 2 small lines of insulation and the condenser panel wouldn't sit flush against the quarter panel preventing me from sliding in the rear side panels between the roll bar and quarter panel. They're leather over sheet metal and held in place with neodymium bar magnets for easy removal when installing or removing the top. I only need to remove them for the posts at the back. I have drilled and tapped flat bar welded under the upper quarters which the bolts for the top screw into. No need to get a wrench in there. I ended up throwing the driver's seat in so I could dream of driving it. Unfortunately I didn't anticipate how the steering wheel would interfere with a clear view of the speedometer and Tach, but there's not much I can do about that.

​

70828536274__94498BE7-70D3-4F40-BB7B-AB1892C8BC3A.jpeg IMG_7917.jpeg IMG_7916.jpeg IMG_7862.jpeg IMG_7863.jpeg IMG_7859.jpeg
 

mustanggarage

Contributor
Sr. Member
Joined
Aug 14, 2018
Messages
647
looking good, glad to see you making progress. I had a similar experience with the steering wheel and the gauges. my solution was to turn the steering wheel upside down. it doesn't look bad IMO, and I have gotten used to it pretty quickly. this is when I first test fit the dash, after paint, before I switched to the sniper. the second picture is after I added the fuel pressure gauge .

IMG_6513.jpg
nOdiiBu.jpg
 
OP
OP
AZ73

AZ73

Bronco Guru
Joined
Mar 28, 2012
Messages
3,813
Unfortunately I spent a chunk of money on a Nardi and custom adapter. Always wanted one. I even had the mounting allen screws yellow zinc coated to match all of the other bolts. I'll try flipping it like yours, and flipping the horn button, but I may have to give up the dream and go with your style. What is it? Looks VERY nice and would be a replacement consideration.


IMG_7949.jpg
 

mustanggarage

Contributor
Sr. Member
Joined
Aug 14, 2018
Messages
647
well I finally got around to installing my digital guard dawg push button start the other day. it works like it should with the sniper. I guess I was worrying for nothing. I did maintain the stock switch I just relocated it so it is hidden.
 
OP
OP
AZ73

AZ73

Bronco Guru
Joined
Mar 28, 2012
Messages
3,813
It's been a few years since I posted but working on the Bronco has improved over the last few months. There are several updated projects I'll eventually get around to adding to this thread, but I wheeled it out of the garage to clean underneath it today. Not under it's own power as I pulled the Truck Avenger and replaced it with a Sniper. Still wiring that up. Spent part of last week replacing the oil pan with one notched for the pumpkin.

6A796D33-AD1A-49CC-A91B-FA7BFF140B37_1_102_a.jpeg
IMG_1970.jpeg

IMG_1934.jpeg
 

Beresb

Contributor
New Member
Joined
Mar 9, 2020
Messages
28
Loc.
Alberta
Very impressive and inspiring build thread @AZ73 ! Is that an oil cooler you have mounted above your steering linkage?
 
OP
OP
AZ73

AZ73

Bronco Guru
Joined
Mar 28, 2012
Messages
3,813
Very impressive and inspiring build thread @AZ73 ! Is that an oil cooler you have mounted above your steering linkage?

Thanks! Power steering cooler. Came with my custom set up and was too thick to stick behind the grill and in front of the condenser. Seemed like a good spot so I fabricated the bracket.
 

Bart

Bronco Guru
Joined
Dec 12, 2001
Messages
1,695
Loc.
Buffalo Gap, Texas
To this point in the thread the disassembly has taken about 3.5 full days plus a day to build the dolly and the lift jig. I skipped the messy details like removing the wiring, radiator, dash, steering column. It all came apart pretty easily, but I wasn't dealing with a ton of rust. The only bad bolts were a couple of body to frame and bumper bolts that needed the sawzall, and the upper fender to grill which were badly rusted. The grime is coming, although it's not quite as bad as I thought. The engine is covered in oil/grease, and the bell housing through the D20 is caked in dirt, but I'm sure that's just an outer layer covering grease. Plus I haven't started disassembly of the doors, hatch, or tailgate.
I bought your rig's younger brother ('75 Ranger in same color) about 8 years ago. It also came out of Az. Prescot to be exact. Very minimal rust but a whole bunch of P.O chowing-up. I haven't done much with it in the 8 years, as I have two other Broncos. One '66 my off roader since 2001(?) and a '69 Sport I picked up in the Oakland, ca area. That one the p.o. had disassembled almost everything and it sat outside and EVERY power train part was rusted solid. Both are under construction and both have kinda been sidelined while I threw $$$$ at my MOM & DAD's '70 Chevelle Malibu Sport coupe. It's "almost" finished (LOL) so yesterday I started welding the rear inner fenders and part of the floorboards back together.
 
OP
OP
AZ73

AZ73

Bronco Guru
Joined
Mar 28, 2012
Messages
3,813
I bought your rig's younger brother ('75 Ranger in same color) about 8 years ago. It also came out of Az. Prescot to be exact. Very minimal rust but a whole bunch of P.O chowing-up. I haven't done much with it in the 8 years, as I have two other Broncos. One '66 my off roader since 2001(?) and a '69 Sport I picked up in the Oakland, ca area. That one the p.o. had disassembled almost everything and it sat outside and EVERY power train part was rusted solid. Both are under construction and both have kinda been sidelined while I threw $$$$ at my MOM & DAD's '70 Chevelle Malibu Sport coupe. It's "almost" finished (LOL) so yesterday I started welding the rear inner fenders and part of the floorboards back together.

This is the time of year I usually go out and work on it because the weather's so nice. It's SOOOOO close. Hook up the sniper wiring (my box didn't have the wiring so it took a while to get it from Holly), put in the steering column, bolt the seats and that's it for the major work. Then there's the little bleeding the brakes, filling the fluids, and some minor touch up stuff. Maybe a solid week would do it. Now I'm being called to CA for 3 weeks to help with the grandkids. No excuses. I've been lazy and go in spurts. But I can taste it now!
 

Sendero

Contributor
Sr. Jr. Member
Joined
May 12, 2022
Messages
114
This is the time of year I usually go out and work on it because the weather's so nice. It's SOOOOO close. Hook up the sniper wiring (my box didn't have the wiring so it took a while to get it from Holly), put in the steering column, bolt the seats and that's it for the major work. Then there's the little bleeding the brakes, filling the fluids, and some minor touch up stuff. Maybe a solid week would do it. Now I'm being called to CA for 3 weeks to help with the grandkids. No excuses. I've been lazy and go in spurts. But I can taste it now!
I hope you get to document the smile driving that bad boy out of the garage. Only someone who has done something like this knows how much dedication, time, money, and energy it takes to pull this off without letting the rest of life get in the way. You are so close you can do it!
 
Top