• Welcome to ClassicBroncos! - You are currently viewing the forums as a GUEST. To take advantage of all the site features, please take a moment to register. It's fast, simple and absolutely free. So please join our community today!
    If you have problems registering or can't log into your account, please contact Admin.

What have you done to your Bronco today?

Apogee

Contributor
Bronco Guru
Joined
Nov 26, 2005
Messages
6,211
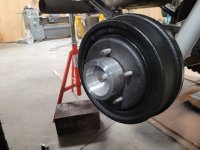
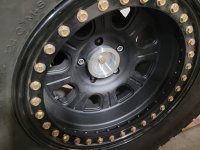
I've finally been making some headway on my F150 axle swap, but got tired of fighting the wheels and tires onto the wheel studs, so I machined some hub-centric registers for the axles that extend out past the wheel studs. Now I can slide the 100+ pound wheel/tire combo on by myself without getting a hernia every time. I was limited to the material I had on hand, but these are 2" tall and there's about 3/4" of engagement before the studs...if I were to do them again, I'd go with a 2.5" to 3" length so I can be even faster and looser with the installation process. FWIW, the registers are hub-centric with the ID of the axle register, which I cleaned up in the lathe and then tapped 1/2-20 for the retainer bolt.

I haven't decided yet, but I may scallop them (a'la desert race trucks) in the mill for cool factor...buteither way, I'll definitely get them Type-III hard anodized for wear resistance along with the next batch of parts I do for work. Now I just need to make something similar for front, cuz these rock.
 

Attachments

  • wheel_register_rear_01.JPG
    wheel_register_rear_01.JPG
    162.4 KB · Views: 46
  • wheel_register_rear_02.JPG
    wheel_register_rear_02.JPG
    141.1 KB · Views: 47

Gupster88

Contributor
Guppy
Joined
Jan 15, 2019
Messages
852
Loc.
Tillamook OR
Getting going on putting dash back together and getting some wiring going..
 

Attachments

  • 0C124B91-7EB2-432B-8C1B-AB957FA79705.png
    0C124B91-7EB2-432B-8C1B-AB957FA79705.png
    1.2 MB · Views: 65

stupidboy

My wifes porn star.
Joined
Dec 29, 2009
Messages
5,790
Loc.
Morrisdale Pa.
I worked on my dash and didn’t avoid it.
 

Attachments

  • 86BC91B1-D009-45ED-BFA8-78C654D85A67.jpeg
    86BC91B1-D009-45ED-BFA8-78C654D85A67.jpeg
    168.6 KB · Views: 44
  • 056B1D18-0688-490F-BB24-EAC3DA1331B4.jpeg
    056B1D18-0688-490F-BB24-EAC3DA1331B4.jpeg
    168.4 KB · Views: 50
  • 713305E8-6219-40DA-95DD-603FEB3000B1.jpeg
    713305E8-6219-40DA-95DD-603FEB3000B1.jpeg
    194.8 KB · Views: 49

Hinmaton

Full Member
Joined
Oct 17, 2017
Messages
592
Welded up the rear 609 plus truss and backbone, welded the 4-link brackets in, testing full bump and droop to locate the bump pads and then mount the coil over hoops.
I think I’m going to mount one side of the hoop to the leaf hanger bracket, that way it still serves it’s original purpose- supporting the rear springs.
Plus it’s a nice double shear mount.


21eaa95eb6863f3b100823a0690bf157.jpg

f266cf94f91494c01ed7ca2bf7aad8a3.jpg

1a87827498c07fde5f21eaf713636c5f.jpg

a1c5b63c5a830fa10f06a6d52e564a67.jpg

292ac5028ce9f232e97b05f6d4b30e11.jpg

be4ebf772b30f528d1c7f0da247df6e4.jpg


Sent from my iPhone using Tapatalk
 

BGBronco

Contributor
N A S H V I L L E
Joined
Jun 23, 2017
Messages
1,561
Loc.
Tennessee
I went back and forth about switching from 15" to 16" wheels and tires and decided to take the $100 plastidip layup. Not perfect, because I lack the ability to read and follow instructions, but I’m happy with it.

9C9155D8-04BE-40BD-B4EB-69529488563D.jpeg
 

Attachments

  • IMG_9791.jpg
    IMG_9791.jpg
    342.3 KB · Views: 30

bayoubronco

Newbie
Joined
Aug 1, 2019
Messages
38
We got the engine running, yesterday, after 8 years of sitting! Last month, we changed fluids, plugs, fogged cylinders, flushed lines, shorted the battery, and finally got the fuel pump and Carb installed this week. This was a Red can test, but the new gas tank is in place waiting for final hose connection. The oil pressure was around 70; which counts as an instrument cluster win, as well!
 

Attachments

  • 20220121_190141[1].jpg
    20220121_190141[1].jpg
    171.8 KB · Views: 39
  • 20220126_151959[1].jpg
    20220126_151959[1].jpg
    156.4 KB · Views: 37

Slowleak

Bronco Guru
Joined
Sep 12, 2013
Messages
3,834
Loc.
Georgia
They look 'well done' Mark! What's the recipe?

Hey…. this batch turned out perfect! Instead of my usual “sharpie ink”, I used Alumilite Translucent Red resin dye mixed with EnviroTex Resin. With a little heat, the old resin peeled right out.

Two teaspoons of mixed resin.
Two drops of dye.
Stir for two minutes.
Bake for 4 hours with just enough heat to keep them warm. Mmmmmm…….

d926e82c1518c25f202dab0fb8d75a64.jpg
 
Last edited:

Slowleak

Bronco Guru
Joined
Sep 12, 2013
Messages
3,834
Loc.
Georgia
Also curious. I am sure this is gonna get me in trouble with the girlfriend haha

Sent from my GM1917 using Tapatalk

No smell! I got the resin at Home Depot and the dye from Amazon. Cleans up with water before it cures.
 
Top