


Community
Buy / Sell


Bronco Tech
3 Arm Wiper Setup
Fix Motor Mount
Roll Cage Braces
Throttle Body 65mm
Wheel Alignment
Heat Riser Replacement
Vent Window Repair
Center Console Mount
Straighten Bumper
Ford 6R80 6 spd
More Tech...
Fix Motor Mount
Roll Cage Braces
Throttle Body 65mm
Wheel Alignment
Heat Riser Replacement
Vent Window Repair
Center Console Mount
Straighten Bumper
Ford 6R80 6 spd
More Tech...

-
Welcome to ClassicBroncos! - You are currently viewing the forums as a GUEST. To take advantage of all the site features, please take a moment to register. It's fast, simple and absolutely free. So please join our community today!If you have problems registering or can't log into your account, please contact Admin.
You are using an out of date browser. It may not display this or other websites correctly.
You should upgrade or use an alternative browser.
You should upgrade or use an alternative browser.
2 Broncos Build Now 1
- Thread starter DEEPWOODS
- Start date
My Wife flipped out on me today. Her mother past just before Xmas and most of her belonging are in the basement she went down to the basement to look for something and saw the Bronco In its stripped down shape and all Hell broke loose. She said it is a junk heap piece of **it and I will never be able to put it back together LOL or cry man she hates my Bronco
Hey Keith, send her a dozen roses and a card saying "you're sorry you upset her with the Bronco"!!!!;D;D;D
It's called "Winning thru Losing"!!!;D;D;D
- Joined
- May 12, 2012
- Messages
- 1,975
Hey Keith, send her a dozen roses and a card saying "you're sorry you upset her with the Bronco"!!!!;D;D;D
It's called "Winning thru Losing"!!!;D;D;D
x2
Wait til she rides in it...she'll want her own!
sellitall
Bronco Guru
My wife is immune to my addiction. She has tried to go to battle with me, but I've been doing this LONG before we met. She just rolls her eyes when the topic comes up anymore.
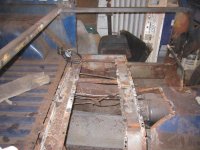
Speaking of rust, here's a pic of what I'm dealing with. That tub you got is a one in a million creampuff in my neck of the woods.
Speaking of rust, here's a pic of what I'm dealing with. That tub you got is a one in a million creampuff in my neck of the woods.
Attachments


drajj5
Jr. Member
Good Job on the progress so far...Seems like you never have any (forward motion) when doing this part of the process. For me it was hard to restrain myself from taking my time- I was ready for the end result or 'finished product'. My brother would come over and ask why I would start at one panel and skip to another, he knew that I was gonna halfa$$ it. god I wish I had listened to him.
By the way, I like your avatar. The new tags are no longer going through the stamp process. So keep that one as long as you can.
By the way, I like your avatar. The new tags are no longer going through the stamp process. So keep that one as long as you can.
OP
OP
- Joined
- Jul 29, 2007
- Messages
- 1,100
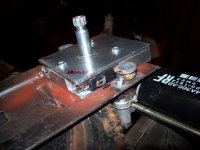
Trying to get back on my bronco build I have not worked on the bronco in several months. I had hernia surgery July 3rd and he found 3 hernias and I have not been able to do much of anything requiring lifting or standing for very long. I have some pics of power windows with lift off door hinges I am adding with the original looking window cranks. Trying to do as cheep as possible with junkyard Taurus window motors fabed up to my stock regulators as other members have done.
Attachments


OP
OP
- Joined
- Jul 29, 2007
- Messages
- 1,100
More Pics of door cut for switch ,I tack welded 4 flange nuts about 3/8 " thick to the regulator to inset the switch so it would be flush for the door panel to work. The regulator also has to be opened up at the top and re-welded for the switches to fit . you can see the flange nuts in the last pic in the last post
Attachments


Aw Keith, if you keep getting fancy on us, you may need to change your screen name to "Uptown"!!!! Great work, glad you're back up & at'em!!!;D;D;D
OP
OP
- Joined
- Jul 29, 2007
- Messages
- 1,100


OP
OP
- Joined
- Jul 29, 2007
- Messages
- 1,100
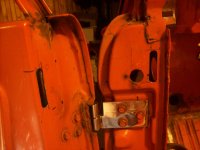
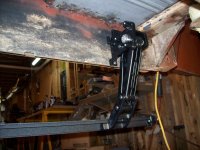
Reinforced frame ends at front bumper for mounts.The bottom holes were ripped out looks like PO hooked pull chain next to them. Added BC bronco steering reinforcement
Attachments


OP
OP
- Joined
- Jul 29, 2007
- Messages
- 1,100


OP
OP
- Joined
- Jul 29, 2007
- Messages
- 1,100
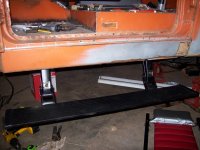
Power steps mock up. I called around and found the modified steps for 1500.00 to 1600.00 so I decided to do it myself. I got the steps on amazon for around 750.00 on sale. I am replacing my rockers because they are rusted and bent up So I will put a couple pieces steel plate in to thread into. You don't have to put any steel in they will mount up by notching the inner rocker panel for the slip in nuts at the top of the mounts just fine. some pics more to come later
Attachments

bk005
Full Member
Reinforced frame ends at front bumper for mounts.The bottom holes were ripped out looks like PO hooked pull chain next to them. Added BC bronco steering reinforcement
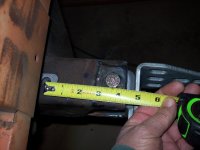
Do you happen to know what the measurement is between the two upper bolt holes on your frame bumer mount. The front of my frame is all hacked up and I only have the rear oval hole, and the front one is missing. Trying to rebuild it and your set up looks really good. Thanks,
bk005
Full Member
I sure appreciate the help, now I can rebuild mine and get it blasted. THANKS!
OP
OP
- Joined
- Jul 29, 2007
- Messages
- 1,100
My 408 Stroker engine has been sitting in the crate for about 2 years and I am not getting much done on the bronco so I decided to put it on the engine stand and start putting it together. I got a canton racing Bronco oil pan and pickup and like everything bronco related it does not fit. The pickup is hitting the bottom of the oil pan about a 1/4" before the pan flushes out with the block. So do I heat and bend the pickup pipe to fix this and how much clearance do you set this up for? See pics
Attachments


OP
OP
- Joined
- Jul 29, 2007
- Messages
- 1,100
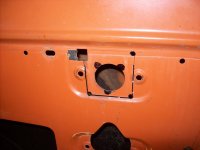
Working on driver side rocker panels replacement. I bought so call OEM Quality rocker panel and it is formed wrong at the top. The ford rockers I removed have a nice 90 bend this one has a lot less .I had a 1/4" gap between the door bottom and the rocker with the ford now it is 1/2" I am going to try to push it up some with a bottle jack See pics
Attachments


Similar threads
- Replies
- 53
- Views
- 8K
- Replies
- 5
- Views
- 272