• Welcome to ClassicBroncos! - You are currently viewing the forums as a GUEST. To take advantage of all the site features, please take a moment to register. It's fast, simple and absolutely free. So please join our community today!
    If you have problems registering or can't log into your account, please contact Admin.

418 Stroker to SEFI and EDIS

OP
OP
nvrstuk

nvrstuk

Contributor
Just a Bronco driver for over 50 yrs!
Joined
Jul 31, 2001
Messages
9,425
Loc.
PNW
Wow, Nathan, I appreciate the offer! I picked one up a couple days ago... got all my Moates software loaded up already... : )


I have left out dozens of sometimes crazy, sometimes one liners, but a lot of local banter here on our local site that I really wish I could post up but since the conversations are/were a couple years old that they just wouldn't ...
 
OP
OP
nvrstuk

nvrstuk

Contributor
Just a Bronco driver for over 50 yrs!
Joined
Jul 31, 2001
Messages
9,425
Loc.
PNW
Wiring? There's wiring to do...oh no! lol

So I installed the HB and yup everything looked good ...until I checked belt alignment on the lower pass side idler and the crank pulley (HB). Measured twice- over .030" difference btw them (yes-allowed for pulley edge thickness, etc). Will the belt be affected? well, they are only 5" or so apart. If they were a foot then I'd say WTH... so I pulled it, compared it to my old Performance HB with the Driven Parts pulley and it was off by .035"...CRAP.

So I compared the 4 balancers that I had laying around and the 2 Exploder ones were close until I started measuring things like the gap btw the inertia ring and the balancer hub itself...CRAP, there was .025" variance btw them as they don't look like they are pressed on very evenly...maybe this is overkill but nothing like your wheeling trip ruined because your serp belt flew off at 6k... and I can't believe the tolerances on stuff. You can stuff a screwdriver blade in the gap on one side and 180 degrees apart there isn't a gap at all...

So I mounted my old Driven Auto pulley HB and it was perfectly aligned with my brackets. Put my "new" one back on and yup..crap, it was off by over .035"...

Options, pull the dang thing and have the snout machined off .030" or so and call it good...or remount the new one (which I did) and hope the problem would go away... well, it didn't. stuck, NOT A MACHINIST in town... For $30 Dampner Dudes said they'd do it...

I can shim my brackets out with a .030" spacer btw each spacer on the serp bracket and head or machine the snout.

This should have been done in 2 hours and I've got an entire day in it...

I guess nobody else measures this stuff!! lol
 
Last edited:
OP
OP
nvrstuk

nvrstuk

Contributor
Just a Bronco driver for over 50 yrs!
Joined
Jul 31, 2001
Messages
9,425
Loc.
PNW
Buddy wrote...

nvrstuk, NOT A MACHINIST in town?... For $30 Dampner Dudes said they'd do it...

I still can't believe that a lathe and someone who knows how to use it is not available in your town....:confused:
My town is smaller and I know of about six........


My response: Well, there is ONE... at a hundred smackers/hour...so I don't even consider them...

Well, I pulled my p/s and OBA bracket, matched it to fit tonight, and will add .030" on the other side. Heck, all brackets have bosses or spacers on them so I'll just make the pass side custom to match the other custom one...
 
Last edited:
OP
OP
nvrstuk

nvrstuk

Contributor
Just a Bronco driver for over 50 yrs!
Joined
Jul 31, 2001
Messages
9,425
Loc.
PNW
Buddy's question: How do you go about measuring belt alignment that allows you to identify .030" of difference?

My response: When working in his shop Brian wears a micrometer on a string around his neck. :)
 
Last edited:
OP
OP
nvrstuk

nvrstuk

Contributor
Just a Bronco driver for over 50 yrs!
Joined
Jul 31, 2001
Messages
9,425
Loc.
PNW
Buddy wrote: I think Brian needs a Faro arm. We have one at work and once it's calibrated, you can touch any point you want on an object an it will pretty much tell you anything you want to know about it (lengths, perpendicularity, flatness, etc.).


My response:

HAHA!! I'm putting a Faro arm on my Christmas wish list!! ;)

Straight edge off the pulley face to the next pulley face (because all your pulleys are on square??-better be-rotate 360deg to verify), measure the difference in pulley "edge thickness" (that's what I call it) to the first rib and then you're good to go. Hardest part is getting a couple straight edges that fit in the engine compartment but hey, you can cut 8" off the end of a 2' level... just make sure they are flat...

This is why March pulley systems are so freakin' expensive, they are super high quality with extremely high tolerances on alignment between the different planes or "axis".
 
OP
OP
nvrstuk

nvrstuk

Contributor
Just a Bronco driver for over 50 yrs!
Joined
Jul 31, 2001
Messages
9,425
Loc.
PNW
Local buddy:

the effort here amazes me. My OBA pump bracket and P/S pump bracket were made by me eyeballing where it should be mounted and tack welding it. Then pulling it out, welding it up, and bolting it together. I get a little bit of a serp belt squeak, but no issues besides that. not sure if it's really even close.

Another comment from my local peanut gallery... :) Yeah-- Brian and I have leetle discussions in reference to his precision work.....

Another: Yeah, I ran a straight edge from my water pump pulley to my ps pulley when I built my bracket, once I had it lined up, I welded it. Way more precision then they used when they built these things...

Another: I don't think I even used a straightedge........I used the same tried & true eyeball method as Z when I made my PS & OBA mounts. Been working decent for years (knock on wood..)

Another: Don't you love it geeting "Feedback" from so many people :)

My response: Such helpful buddies!! HAHAHA
 
Last edited:
OP
OP
nvrstuk

nvrstuk

Contributor
Just a Bronco driver for over 50 yrs!
Joined
Jul 31, 2001
Messages
9,425
Loc.
PNW
Sept 12, 2015

10 days since I've done ANYTHING in the shop...grrrr... be at least Thursday till I get a chance...so I took this pic j u s t for a glimpse of what the next look will be!
 

Attachments

  • 20180116_212533.jpg
    20180116_212533.jpg
    123.5 KB · Views: 37
OP
OP
nvrstuk

nvrstuk

Contributor
Just a Bronco driver for over 50 yrs!
Joined
Jul 31, 2001
Messages
9,425
Loc.
PNW
Bunch of local chatter here...not much Bronco talk...

Quote Originally Posted by nvrstuk View Post
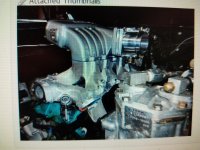
Buddy wrote- "10 days since I've done ANYTHING in the shop...grrrr... be at least Thursday till I get a chance...so I took this pic j u s t for a glimpse of what the next look will be!
Well, if you wouldn't fly off every chance you get, you might get something done........"


Another buddy- Quote Originally Posted by 65Corvette View Post
Well, if you wouldn't fly off every chance you get, you might get something done........
That guy takes as many vacations as a government worker! Oh wait.....

Another- Originally Posted by carter2772 View Post
That guy takes as many vacations as a government worker! Oh wait.....
HA!!!

Dang, everybody's on a roll here... poor old nvrstuk, it's so easy...so many opportunities... : )

I'm an upaid gov't worker now... although I haven't had a paid vacation in 25 yrs!


Another: (this one an ex-student)- Taking your class to the drag races? I bet you got paid. :)


My response:
I was talking about "paid vacation" buddy! : ) Those were fun trips tho... pay was over before we got there each afternoon...

I did get some nice perks like HS Drags at SIR, Victoria BC trips...but... those days I was with students for 18 hours, I only got paid for 8... most teachers would be taking home about 1/2 again their normal pay if they got OT! I enjoyed the gig, but glad I had another one...
I would never recommend teaching to anyone anymore and this is from a guy who did career counseling work with HS students for 10 yrs...


Last comment from a buddy- I would never recommend teaching to anyone anymore and this is from a guy who did career counseling work with HS students for 10 yrs...
That is the same exact sentiment all of my (still alive) prior shop teachers have now a days too.

My response- Yeah, it's getting pretty bad... kids are allowed to retake tests as many times as they want-usually they ask you when the retake is when you hand out the first one...using it as a study guide since NO homework or daily work counts towards their grade anymore!! No homework, no more A,B,C,D, F grades as too many students have the opportunity to fail when you give an F grade representing 59% or lower, honor rolls are now the equivalent of a "B" grade...

Everyone gets a trophy in today's "State" run schools... till they get out and find out the hard way that you don't get a dozen re-do's at work, or re-do's for job interviews, or ... ok, stepping off this soap box.

I won't get started on the poor starting teacher wage ... when compared to the proposed $15/hour minimum wage which is already implemented in some areas, a FT teacher earns appr $16-17/hr. Not sure raising the minimum wage so someone working a job requiring minimum skills should earn within a dollar an hour of a teacher who is required to have a 4year degree then required to have 2 more years equivalent after that. IF the teacher doesn't take these required graduate level type classes, they get fired. hmmmmmm.... oh, did I mention that the teacher has to pay the $6,000.00 out of pocket for these "classes"? How many fireman or police have to pay for their own training or they get fired? Just an example-none that I know of. Rant officially over... wow, got all worked up after that Seahawk loss!!

Have good day, go wheeling!!
 

Attachments

  • 20180116_215638.jpg
    20180116_215638.jpg
    142.5 KB · Views: 10
OP
OP
nvrstuk

nvrstuk

Contributor
Just a Bronco driver for over 50 yrs!
Joined
Jul 31, 2001
Messages
9,425
Loc.
PNW
We lost a LOT of photos due to lack of access due to Photobucket issues...
 
OP
OP
nvrstuk

nvrstuk

Contributor
Just a Bronco driver for over 50 yrs!
Joined
Jul 31, 2001
Messages
9,425
Loc.
PNW
Sept 19, 2015

Wiring...finally back on it for a bit...

Got a chance to put a couple hrs in this afternoon....what happened?
 

Attachments

  • 20180116_220234.jpg
    20180116_220234.jpg
    149.9 KB · Views: 32
OP
OP
nvrstuk

nvrstuk

Contributor
Just a Bronco driver for over 50 yrs!
Joined
Jul 31, 2001
Messages
9,425
Loc.
PNW
Oct 1, 2015

I figured it was about time for a short update... 98% of the wiring is done and below is a picture showing the cam and crank sensor wiring...any connections you make or splices you make should be wrapped in foil and that's what I'm doing here. The cam sensor wiring in the crank sensor wiring have to be protected from RF. They come this way from the factory but if you're not factory you need to do it also.

I got shielded wire from Lowes as that was the only shielded wire I can find without buying a 500 foot roll.

Any splices or connections you make should be wrapped in foil to help protect from RF too and that's what I am doing here. I also made sure that these wires stayed a foot away from the coils or spark plug wires just for insurance.
 

Attachments

  • 20180116_220501.jpg
    20180116_220501.jpg
    130.4 KB · Views: 30
OP
OP
nvrstuk

nvrstuk

Contributor
Just a Bronco driver for over 50 yrs!
Joined
Jul 31, 2001
Messages
9,425
Loc.
PNW
Next step is to make sure I've got all the fuel line fittings both for the tank and for the modified 5.8 fuel rails. thankfully my NWMP tank circa1981 has a pipe fitting on the bottom corner so I can drain it I don't wanna have to lower the tank at all or modify my skid plate.. I'll double-check the space between the floor boards and the top of my existing tank to make sure I have room to weld in the 1998 Explorer fuel vent/pump assembly. I don't want to have to lower the tank at all and preliminary measurements say I'm okay.
 

Attachments

  • 20180116_220726.jpg
    20180116_220726.jpg
    141.6 KB · Views: 31
OP
OP
nvrstuk

nvrstuk

Contributor
Just a Bronco driver for over 50 yrs!
Joined
Jul 31, 2001
Messages
9,425
Loc.
PNW
I have two narrow band sensors and this wide band meter will be used for data logging.
 

Attachments

  • 20180116_220942.jpg
    20180116_220942.jpg
    106.8 KB · Views: 16
OP
OP
nvrstuk

nvrstuk

Contributor
Just a Bronco driver for over 50 yrs!
Joined
Jul 31, 2001
Messages
9,425
Loc.
PNW
3, only THREE bare wires left :) (TPS), everything else has ends on it and just needs plugging in... gas tank pickups for each corner of the tank should be in tomorrow so I can plumb the internals of the tank and then re-install it. I'm installing a Walbro in-line pump inside the tank as per the head tech guru's at Walbro's recommendation. This gets me threads on the supply end so I can hard plumb it. All in tank pumps have a slip on connection for the filter sock. The Walbro pick-ups come with 70mm screen so that's my initial filter. Still looking for a post pump filter that is 10 micron...

Update...of course no one in my town has any AN to metric fittings so another d e l a y... my pump came as a pump...nothing else, got all my pickup screens and flex hose -rated for submersible use.

See post two posts down
 
OP
OP
nvrstuk

nvrstuk

Contributor
Just a Bronco driver for over 50 yrs!
Joined
Jul 31, 2001
Messages
9,425
Loc.
PNW
Throttle linkage is fabbed up...very tight fit.

Notice the back side of the throttle bracket is cut off for much needed clearance.
I might lengthen the arm side of the pivot so I have longer pedal travel and therefore less "touch-e-ness" on the travel... :)
 

Attachments

  • 20180116_221245.jpg
    20180116_221245.jpg
    126.6 KB · Views: 21
OP
OP
nvrstuk

nvrstuk

Contributor
Just a Bronco driver for over 50 yrs!
Joined
Jul 31, 2001
Messages
9,425
Loc.
PNW
Pickup screens with one in each corner of the tank
 

Attachments

  • 20180116_221530.jpg
    20180116_221530.jpg
    103.7 KB · Views: 19
OP
OP
nvrstuk

nvrstuk

Contributor
Just a Bronco driver for over 50 yrs!
Joined
Jul 31, 2001
Messages
9,425
Loc.
PNW
Not sure I ever posted any pics of my York OBA and PSC pump mounting bracket... simple but I like the mounting location of the pump and reservoir soooo much better than having it almost sticking thru the hood similar to the Exploder reservoir location. After fighting the reservoir location and overflow for 4 years it's nice to finally have it all dialed in. No oil loss at 5+ thousand rpm, no cooling issues, and sano look without the reservoir cap sticking up so high and barely touching the hood.
 

Attachments

  • 20180116_221756.jpg
    20180116_221756.jpg
    123.6 KB · Views: 25
OP
OP
nvrstuk

nvrstuk

Contributor
Just a Bronco driver for over 50 yrs!
Joined
Jul 31, 2001
Messages
9,425
Loc.
PNW
Ported 5.8Victor efi lower...finally get to bolt the upper on! Notice the fuel rails and how they don't wrap around the front of the manifold...
 

Attachments

  • 20180116_222329.jpg
    20180116_222329.jpg
    134 KB · Views: 24
OP
OP
nvrstuk

nvrstuk

Contributor
Just a Bronco driver for over 50 yrs!
Joined
Jul 31, 2001
Messages
9,425
Loc.
PNW
Clearance issues...again... got it with a 1/4" to spare... if I moved it towards the headlight one inch it hits the hood. One inch towards the drivers fender and it hits the hood... grease globs on the tape to indicate whether I've got clearance or not...
 

Attachments

  • 20180116_222454.jpg
    20180116_222454.jpg
    117.5 KB · Views: 25
OP
OP
nvrstuk

nvrstuk

Contributor
Just a Bronco driver for over 50 yrs!
Joined
Jul 31, 2001
Messages
9,425
Loc.
PNW
THIS may just look like a list to all of you. :) To me it has been my daily to "do-list" since I started this project. Some days the list is the same length. Most days it is longer but it has never been shorter. I have carried items over from day to day...

Hopefully I will not have a "to-do" list titled trouble shooting...


IF you've followed any of my other "build threads" you'll know that I live by the list! lol Everything I need to do on a project is written down...
 

Attachments

  • 20180116_222641.jpg
    20180116_222641.jpg
    163.8 KB · Views: 13
Last edited:
Top