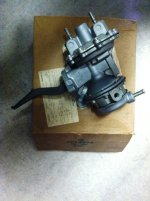
• Just a reminder that you won't be able to start new posts or reply to existings posts in the Archive forum.

    This is where all the old posts go so they can still be used for reference and searched.
  • Welcome to ClassicBroncos! - You are currently viewing the forums as a GUEST. To take advantage of all the site features, please take a moment to register. It's fast, simple and absolutely free. So please join our community today!
    If you have problems registering or can't log into your account, please contact Admin.

67 V8 Roadster

OP
OP
rmiller747

rmiller747

Bronco Guru
Joined
May 11, 2009
Messages
1,102
Loc.
Highland, Mi
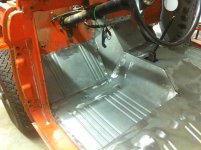
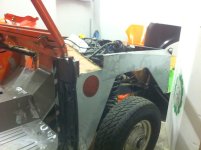
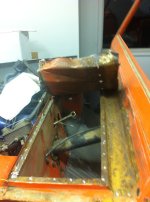
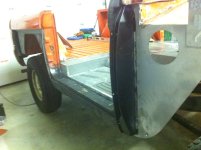
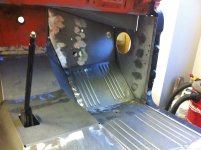
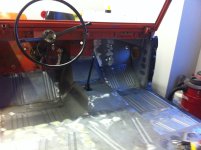
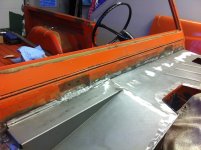
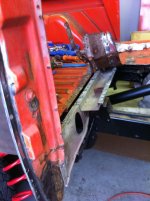
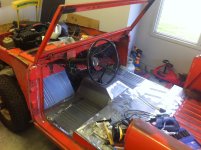
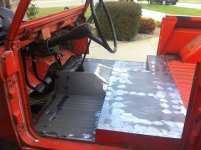
Not much progress this week. I was sick as a dog most of the week. I have never done this type of work before (floor replacements) and it pretty much sucks. Tough work. I'm finding more stuff wrong as I go (door post, etc) and spending more cash on the way. Thats normal..I know I know.

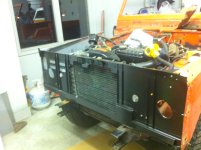
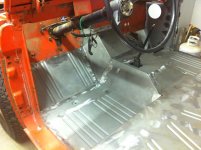
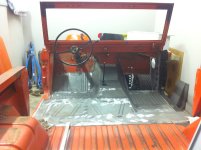
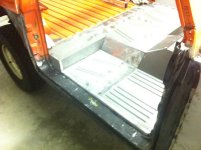
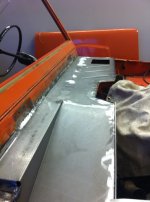
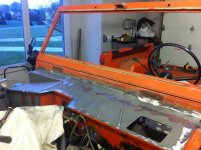
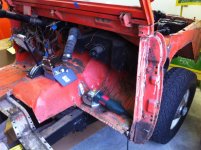
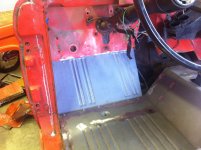
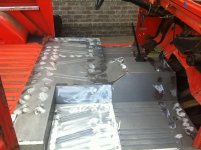
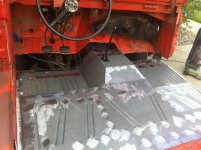
Getting closer...putting it back together has to be easier..
 

Attachments

  • IMG_00406.jpg
    IMG_00406.jpg
    132.3 KB · Views: 207
  • IMG_00407.jpg
    IMG_00407.jpg
    98.4 KB · Views: 189
  • IMG_00408.jpg
    IMG_00408.jpg
    113.7 KB · Views: 195
  • IMG_00409.jpg
    IMG_00409.jpg
    92.3 KB · Views: 205

thesnake

Bronco Guru
Joined
Jun 20, 2001
Messages
3,503
Great pics and progress!!! Were the dynacon rear quarters from the Graveyard?

Thanks,

John
 

TheBroncoRanch

Bronco Guru
Joined
Jul 11, 2006
Messages
1,960
Looking good Rich, Next year broncorama is coming faster than you think;D


Snake, yes the Dynacorn rear quarter was from the graveyard.
 

BajaBronco

Contributor
Bronco Guru
Joined
Apr 30, 2003
Messages
3,934
Looking really good guys. This is the treatment she needed and I'm so glad it's happening and no longer parked on the street in Palo Alto bored to death.
 
OP
OP
rmiller747

rmiller747

Bronco Guru
Joined
May 11, 2009
Messages
1,102
Loc.
Highland, Mi
Floor almost Done

Off work this week. Getting some more done and learning tons as I go.

Door post 101 comes Wednesday.
 

Attachments

  • IMG_00490.jpg
    IMG_00490.jpg
    107.9 KB · Views: 194
  • IMG_00487.jpg
    IMG_00487.jpg
    106.1 KB · Views: 200
  • IMG_00473.jpg
    IMG_00473.jpg
    98.5 KB · Views: 207
  • IMG_00471 (1).jpg
    IMG_00471 (1).jpg
    99.6 KB · Views: 211
  • IMG_00469.jpg
    IMG_00469.jpg
    108.8 KB · Views: 219

DuctTape

Bronco Guru
Joined
Jun 20, 2008
Messages
1,148
Loc.
Bozeman, MT
Off work this week. Getting some more done and learning tons as I go.

Door post 101 comes Wednesday.

Have fun with that. I had to do pans, support channels, rockers, door pillars, kick panels and inner/outer fenders. Got everything dry fitted up to pillars, got the full drivers side dialed in perfect and welded pillar in, then went to pass side and everything was off.

It was at that point I realized that bodywork is an art and decided to call in a pro.

What I learned is dry fit everything first before welding it up and don't be too proud to bring in someone that knows what they are doing.
 
OP
OP
rmiller747

rmiller747

Bronco Guru
Joined
May 11, 2009
Messages
1,102
Loc.
Highland, Mi
Looks like some good progress! Don't get mad but JBG just started offering the center section already welded together. Would have saved you lots of fitting & welding - But you wouldn't have learned as much. :)

http://www.youtube.com/watch?feature=player_embedded&v=QNEmcrrrzLY&list=PLCF4E1B45FCA84600


That is just my luck. Also the front section. Would have saved me a ton of time. :( Oh well I thought about just swapping the body too as this one has so many issues. Like you said I have learned much. DONT DO THIS AGAIN.
 

House

Minutia Militia
Joined
Aug 12, 2004
Messages
2,396
Sweet rig. Is it a DSO 72?
I find it odd that your smog pump is blue. The one on my '67 has no evidence of paint at all, just raw aluminum...
Are you still running the fuel pump with the vacuum pump on the 289?
 
OP
OP
rmiller747

rmiller747

Bronco Guru
Joined
May 11, 2009
Messages
1,102
Loc.
Highland, Mi
Sweet rig. Is it a DSO 72?
I find it odd that your smog pump is blue. The one on my '67 has no evidence of paint at all, just raw aluminum...
Are you still running the fuel pump with the vacuum pump on the 289?

DSO 72 - Yes sir. Thank you.

Pump was blue when I got it. Not sure?

No, fuel pump was swapped as well as the wipers swapped to electric. I have the vacuum wipers all cleaned up and restored (found some) so will install those after paint but still have not found a vacuum fuel pump. Anyone have one let me know. I probably never use the wipers but still would be nice to go back to original.
 

House

Minutia Militia
Joined
Aug 12, 2004
Messages
2,396
If that doesn't work out for you the Bosch units are usually readily available
on eBay. Or you can look for an NOS one. They can still be found also. ;D
 

Attachments

  • pump.JPG
    pump.JPG
    214.9 KB · Views: 58
OP
OP
rmiller747

rmiller747

Bronco Guru
Joined
May 11, 2009
Messages
1,102
Loc.
Highland, Mi
Gotta a bit done the past couple days. Door post 101 complete thanks to my friend Tom. Driver side and center floor welded in and cleaned up. NOS passenger rocker (Thanks Tom) installed and fit perfect. Passenger door post installed (aftermarket crap but it works with some mods). Passenger inner rocker and core support installed. Started to tear apart the cowl. Also test fit fenders and door inserts and everything appears to fit very well. Measured about 100 times before welding down.

Hoping to finish passenger floor, both sides of the cowl and finish all the small misc items (heater supports, battery supports, rad supports, etc.) by the end of the weekend.

Gotta get this out of my wifes side of the garage by the time the snow hits (get it off to Paint). If not i will be sleeping in the garage with the Broncos...well that might not be that bad...I do have heat and beer out there ;D
 

Attachments

  • IMG_00522.jpg
    IMG_00522.jpg
    109.4 KB · Views: 127
  • IMG_00521 (1).jpg
    IMG_00521 (1).jpg
    128.8 KB · Views: 133
  • IMG_00519.jpg
    IMG_00519.jpg
    94.6 KB · Views: 134
  • IMG_00518.jpg
    IMG_00518.jpg
    96.1 KB · Views: 151
  • IMG_00517.jpg
    IMG_00517.jpg
    68.7 KB · Views: 150
  • IMG_00515.jpg
    IMG_00515.jpg
    123.6 KB · Views: 144
  • IMG_00514.jpg
    IMG_00514.jpg
    118.4 KB · Views: 146
  • IMG_00520.jpg
    IMG_00520.jpg
    91.3 KB · Views: 129
  • IMG_00523.jpg
    IMG_00523.jpg
    103.7 KB · Views: 125

TheBroncoRanch

Bronco Guru
Joined
Jul 11, 2006
Messages
1,960
It's going to be awesome, hard part is over for the most part. From here on out it just gets better. Happy to help anytime.
 

77Bronco636

Sr. Member
Joined
May 9, 2006
Messages
847
Hey Rich, if you got heat and beer in your garage, I might be moving in!!! Great job guys, its looking awesome!!! Cant wait to see it this spring!!!
Paul
 
OP
OP
rmiller747

rmiller747

Bronco Guru
Joined
May 11, 2009
Messages
1,102
Loc.
Highland, Mi
Slow progress. But at least making progress. I screwed up my wrist last week. Must be getting old.

Anyway got the floors done.
Old cowl removed and cleaned and welded in new panels.
These aftermarket cowl pieces fit but are definitely different than original. No lip to fit the 2 pieces together and the passenger side doesn't have the ledge from high to low (1" lip) to weld to the horizontal windshield support. :mad: Oh well, I am happy with how it turned out.

Gotta to get the wheel well and then just the small bits (rad support, battery tray supports, driver side brake, etc).

Then finesse work and seam sealing....:-[
 

Attachments

  • IMG_00538.jpg
    IMG_00538.jpg
    58.4 KB · Views: 118
  • IMG_00537.jpg
    IMG_00537.jpg
    111.5 KB · Views: 119
  • IMG_00534.jpg
    IMG_00534.jpg
    100.4 KB · Views: 114
  • IMG_00530.jpg
    IMG_00530.jpg
    85.9 KB · Views: 105
  • IMG_00540.jpg
    IMG_00540.jpg
    99.6 KB · Views: 117

TheBroncoRanch

Bronco Guru
Joined
Jul 11, 2006
Messages
1,960
Looks Great Rich, Yea some of the aftermarket stuff is not quite factory, but better than it was several years back. Your work looks really good!!! Will be pulling the body from the frame before you know it.
 
Top