• Just a reminder that you won't be able to start new posts or reply to existings posts in the Archive forum.

    This is where all the old posts go so they can still be used for reference and searched.
  • Welcome to ClassicBroncos! - You are currently viewing the forums as a GUEST. To take advantage of all the site features, please take a moment to register. It's fast, simple and absolutely free. So please join our community today!
    If you have problems registering or can't log into your account, please contact Admin.

68 custom in NM: Build Thread *** Lot's O' Photos***

nrramse

Sr. Member
Joined
Apr 20, 2008
Messages
522
Thanks for having me over Adam - I had fun. Its nice to see the vision taking form.

So I was thinking about some things:
* I have a 3" lift, yours is 3.5"
* I have 31" tires, yours are 33"
* I have a 302, yours is stroked out.

You may not want to hang around me anymore LOL. I had the shortest truck at the Rio Puerco run too.

Newell
 

22213evl

Bronco Guru
Joined
Mar 14, 2007
Messages
2,369
Loc.
Rio Rancho N.M.
Thanks for having me over Adam - I had fun. Its nice to see the vision taking form.

So I was thinking about some things:
* I have a 3" lift, yours is 3.5"
* I have 31" tires, yours are 33"
* I have a 302, yours is stroked out.

You may not want to hang around me anymore LOL. I had the shortest truck at the Rio Puerco run too.

Newell

but Newell, you are an animal, beating that thing like a red headed stepchild

( I'm talking about his bronco you degenarates :p
Grafico your truck is looking sweet
[/COLOR]
 
OP
OP
GraficO

GraficO

Bronco Guru
Joined
Oct 2, 2007
Messages
1,381
Loc.
Albuquerque, NM
got the liftgate all assembled... handles, panels, shocks, gaskets. Those shock lifters are really slick... nice upgrade from the original rattle-monsters. It was cold as hell today... so it was nice to be able to work indoors a bit. It was cramped but warmer than being outside in the wind and cold.

I'm such a wuss. ;)
 
OP
OP
GraficO

GraficO

Bronco Guru
Joined
Oct 2, 2007
Messages
1,381
Loc.
Albuquerque, NM
Ok... going to build these so I have map lights. They will be inserted in the wiper cover. Unless you look directly up into them you won't know they are there... other than a slight red glow that you could put a map under for night driving.

I plan on putting them on the same circuit as the variable dash light dimmer from the headlight switch so I can adjust the intensity...

Just toys and plans ;)
 

Attachments

  • eye_map_design.jpg
    eye_map_design.jpg
    77.7 KB · Views: 231

phred

Contributor
Bronco Guru
Joined
Aug 25, 2006
Messages
3,477
Loc.
Earth
slick, I've often thought of putting those LED's around the inside of the truck in different locations to light the floor at night so I can see all the junk that is rolling around.
 
OP
OP
GraficO

GraficO

Bronco Guru
Joined
Oct 2, 2007
Messages
1,381
Loc.
Albuquerque, NM
I bought 6 of these 3 LED assemblies in chrome to go in various places in the truck for courtesy lights.

I figure that they draw so little amperage.... I can run them all off the dash light dimmer.

One would go in each rear corner of the hard-top facing towards the rear center of the back seat. 2 more would be built into the rear inside quarter panels near the floor pointed across the floor... somewhere between the seats and the roll bar. Two more mounted to the bottom of the dash as foot lights.

I have a Big Bronco chrome courtesy light with spotlights to go on the bow above the front seats.

Should work well.;D And it keeps the vintage feel of the chrome... with modern advantages.
 

Attachments

  • blacknonlitled.jpg
    blacknonlitled.jpg
    4.6 KB · Views: 92
  • domelight.JPG
    domelight.JPG
    17.7 KB · Views: 75

phred

Contributor
Bronco Guru
Joined
Aug 25, 2006
Messages
3,477
Loc.
Earth
where did you get the LED's? Can you run them on 12vDC w/o an inline diode?
 
OP
OP
GraficO

GraficO

Bronco Guru
Joined
Oct 2, 2007
Messages
1,381
Loc.
Albuquerque, NM
thanX Fish... can't put our secret squirrel on for permanent yet... too many on offs with the dash to go... as well as the hood... so I'll have to wait a bit on that one (grrr)
 

BroncoMP

New Member
Joined
Sep 28, 2008
Messages
23
Loc.
Des Moines, IA
Nice looking rig! I stumbled onto the thread looking for different custom dash set-ups for my new project, and couldn't stop reading/looking! When I was younger I was a MECP cert installer for a few different audio shops and have to say your set up is looking good! That one showing the Sub pointing up won't work as well if the top is off tho...especially is it's raining! Are you running fans in the console for the amps?
 
OP
OP
GraficO

GraficO

Bronco Guru
Joined
Oct 2, 2007
Messages
1,381
Loc.
Albuquerque, NM
This is a "top-on-all-the-time" rig... so the subs are safe ;) at least until a good dose of Zepplin is pumped through them ;)

The top will come off the next one... I'm already contemplating a half-cab.

yes on the fans... there are 4 80mm fans (two push in the front and 2 pull in the back) to keep the air moving in the console. I'm re-routing the heater vents for the front floor outlets a bit and insulating them between the inner console so there isn't additional heat being pumped in there in addition to the floor and the amps heat output.

I'll post photos later tonight... I put the heater elements in the seats, dyna-matted the hardtop, installed the wiring and aux wiring/lighting and the liner hardtop with the custom brackets and vinyl covered liner. I can really tell the difference already in the sound-deadening after putting the dyna-mat in... that stuff really eats noise and it should help a bit with the heat/cool as well.

Thanks for reading my thread... be sure to post photos of yours as well.. always looking for great eye-candy to ponder and plot ;)
 

trailnut

BANNED
Joined
Dec 19, 2008
Messages
138
Loc.
Rio Rancho
this is the greatest...just fond this sight ....next day ...I got a Bronco its a 1969 good year lol lot to learn.. will ask for help
 
Last edited:
OP
OP
GraficO

GraficO

Bronco Guru
Joined
Oct 2, 2007
Messages
1,381
Loc.
Albuquerque, NM
photo upload of the latest additions...
 

Attachments

  • IMG_7380_WR.jpg
    IMG_7380_WR.jpg
    192.6 KB · Views: 224
  • IMG_7415_WR.jpg
    IMG_7415_WR.jpg
    120.5 KB · Views: 120
  • IMG_7410_WR.jpg
    IMG_7410_WR.jpg
    196.2 KB · Views: 123
  • IMG_7408_WR.jpg
    IMG_7408_WR.jpg
    208.3 KB · Views: 146
  • IMG_7389_WR.jpg
    IMG_7389_WR.jpg
    178.8 KB · Views: 89
  • IMG_7384_WR.jpg
    IMG_7384_WR.jpg
    70.1 KB · Views: 99
  • IMG_7382_WR.jpg
    IMG_7382_WR.jpg
    91.1 KB · Views: 98
  • IMG_7378_WR.jpg
    IMG_7378_WR.jpg
    179.1 KB · Views: 86
OP
OP
GraficO

GraficO

Bronco Guru
Joined
Oct 2, 2007
Messages
1,381
Loc.
Albuquerque, NM
more... ;)
 

Attachments

  • IMG_7397_WR.jpg
    IMG_7397_WR.jpg
    121 KB · Views: 176
  • IMG_7394_WR.jpg
    IMG_7394_WR.jpg
    122.4 KB · Views: 166
  • IMG_7392_WR.jpg
    IMG_7392_WR.jpg
    83.7 KB · Views: 166
  • IMG_7391WR.jpg
    IMG_7391WR.jpg
    146.1 KB · Views: 135
  • IMG_7373_WR.jpg
    IMG_7373_WR.jpg
    167.1 KB · Views: 176
  • IMG_7385_WR.jpg
    IMG_7385_WR.jpg
    157.7 KB · Views: 219
  • IMG_7396_WR.jpg
    IMG_7396_WR.jpg
    177.3 KB · Views: 152
  • IMG_7403_WR.jpg
    IMG_7403_WR.jpg
    106.8 KB · Views: 228
  • IMG_7419_WR.jpg
    IMG_7419_WR.jpg
    110.8 KB · Views: 210
  • IMG_7420_WR.jpg
    IMG_7420_WR.jpg
    101.6 KB · Views: 180
OP
OP
GraficO

GraficO

Bronco Guru
Joined
Oct 2, 2007
Messages
1,381
Loc.
Albuquerque, NM
So here's the story on the above photos:
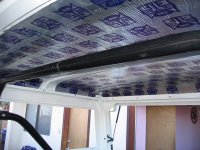
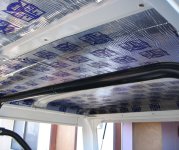
- I cut three 'L' pieces of aluminum tp make finishing strips along the edges of where the headliner attaches to the hardtop (sides and rear).
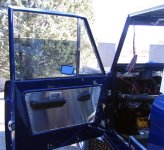
the cardboard headliner pieces were covered in gray leather-esque vinyl.
- Each was bolted with stainless hex bolts to the interior rails with nutserts.
- The entire underside of the top was lined with sound deadening Dyna-Mat.
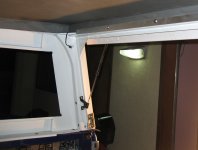
- Two 3LED lights were wired into the rear corners. These will be hooked to the courtesy lights.
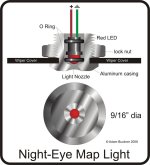
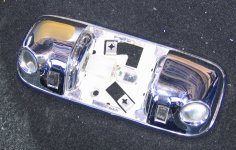
- The 79 XLT Bronco map light courtesy light will be mounted at the bow over the front seats. I though it still matched the retro/nostalgic/EB look... heck it's still a Bronco part ;)
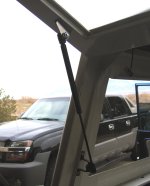
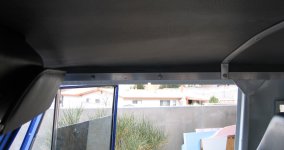
- I strung the windshield post with all of the wiring for the lights and the wipers. I also ran 2 pairs of additional wiring for anything I'd like to add later.
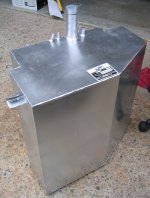
- I got the fuel tanks ready to install but I am waiting on a couple custom connectors/reducers that are being made before the install.
- The front seats are now setup and have dual temp controls in each. These heated seat inserts are carbon fiber mesh so they won't break down like the typical wired seat heaters.
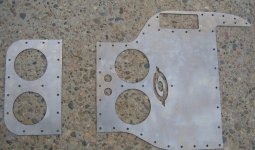
- The panels for the console are coming... shown are two of the panels in cold steel that I got for fitment.
- The new wiper cover was installed with the stainless polished rods and new black visors.

I will order the A/C - heater from BC Bronco this week. Once that's in I will get the dash assembled. I should see the stainless console pieces Monday... so that will get assembled and installed before the dash gets put in. When those are in and ready... the new 302 (RV crank, bored 30 over with 600CFM Holley carb, Edelbrock Performer intake, big Alternator, power steering will be dropped into the truck. While the other engine is out I'll dress out the engine compartment and get in there and put in the new fuel line system (stainless lines, electric switch, pump) and the fuel tanks. I will also be installing my t-case shifter/cable assembly. I have an extra D20 and tranny in the backyard that has been used to prototype the bracket for the shifter system.

I have made some neat trim pieces that will make removable covers for the wiring and the tubing in the engine compartment. I found some really neat servos to power concealed hood locks... more of my tricks are still to come though ;)

How's that for an update?:eek:
 
OP
OP
GraficO

GraficO

Bronco Guru
Joined
Oct 2, 2007
Messages
1,381
Loc.
Albuquerque, NM
just as a reminder. This is the first restore... build... project like this that I have ever tackled. This summer will be 2 years since I picked the thing up... no matter what you think you can or can't do... ANYTHING is possible.:)
 
Top