• Welcome to ClassicBroncos! - You are currently viewing the forums as a GUEST. To take advantage of all the site features, please take a moment to register. It's fast, simple and absolutely free. So please join our community today!
    If you have problems registering or can't log into your account, please contact Admin.

'71/'76 Badass Bronco Bronco Build

DirtDonk

Contributor
Bronco Guru
Joined
Nov 3, 2003
Messages
48,743
Here 'ya go... Open up the "scoops" add a plenum and filter underneath, and voila! No more twists and turns.
WH Buckaroo "BXR adapter" Cover
It's the super custom BXR solution! Buckaroo style...

Then again, did you already say you had some kind of a hood, or hood modification to work with all this? Or were you able to fit all that under a stock hood?
If you had not gotten to that aspect yet, maybe the old Cowl Induction concept was not so far off after all.
Just another angle...

Paul
 
OP
OP
ba123

ba123

Contributor
Bronco Guru
Joined
Oct 29, 2022
Messages
1,888
Loc.
CA
Here 'ya go... Open up the "scoops" add a plenum and filter underneath, and voila! No more twists and turns.
WH Buckaroo "BXR adapter" Cover
It's the super custom BXR solution! Buckaroo style...

Then again, did you already say you had some kind of a hood, or hood modification to work with all this? Or were you able to fit all that under a stock hood?
If you had not gotten to that aspect yet, maybe the old Cowl Induction concept was not so far off after all.
Just another angle...

Paul
That might’ve been the way to go but I really like the Highlander and got that and it’s all painted. I took it off, so really not sure until I put it back on. I could modify it if there is room, but with either of those hoods, that throttle body is just so far forward that it probably won’t be ideal so at least at the start, I’m gonna stay with the angle down to the drivers side and can decide for sure after I put the hood on. I really like the look of the highlander though. It looks great.

IMG_69B3CE54D385-1.jpeg
 
OP
OP
ba123

ba123

Contributor
Bronco Guru
Joined
Oct 29, 2022
Messages
1,888
Loc.
CA
I’ve worked a ton on electrical this weekend. Push button start/Remite Start/alarm/4g GPS tracking/starter disable/keyless proximity; Dakota Digital dash; AC and Dakota Digital AC Controls; Bronco Ron Francis Fuse panel, Mesgasquirt Stinger PiMPxs (MS3); and Ron Francis Telorvek panel.

Any one of those systems is a bit of work but trying to allow them to all work together with one shared sensor per need and not having any wires show has been the challenge.also getting things to work exactly how I want them is t easy either (I’m picky and stubborn).

Anyway, I did not turn the engine over, but the push button start does all it should. One push turns on accessories, another push turns on ignition circuit and everything I wired there, push and brake pedal (or clutch) turns engine over to start.

IMG_6067.jpeg
Ford Raptor Start Button 😎
I needed a spot for the security stuff and also a spot for the GPS receivers. That WH “tool box” doesn’t need to be a tool box.

IMG_6074.jpeg

IMG_6075.jpeg
I did add holes to screw it down as well as holes on the drivers side and pass side for wires to run each direction.

I could not decide how I wanted to run my Straight to battery” connections but this buss bar seemed like my best option and decided this is the best spot for it. Original plan was inside the boxes but no way.
IMG_6077.jpeg

This will likely be impossible to get to once I put the dash on but should be ok. I ran two extra wires to it just in case. I finished that up and maybe put the AC Evaporator in for good but will see.
 
OP
OP
ba123

ba123

Contributor
Bronco Guru
Joined
Oct 29, 2022
Messages
1,888
Loc.
CA
While the wiring and vintage air are on hold, trying to make my way through some things, like finish up the brakes and power steering stuff.

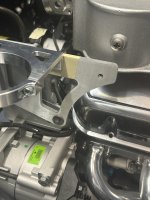
I went with the Lee Power Steering reservoir which is nice but the bracket isn’t ideal. They used to have it too high and I think people complained so they put it lower and back, which I thought totally sucked. So my solution was to move it into the right spot by using the stock front mounting hole, making another one, and slicing half of the bracket off.

IMG_6107.jpeg IMG_6108.jpeg IMG_6148.jpeg IMG_6153.jpeg


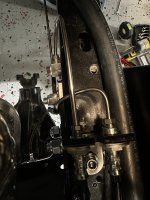
Next up was my WH Hydroboost/Wilwood Master Cylinder. Was putting this off because I had to figure out the Fran mount for the front hose as the Duff shock hoop backing plate covers it up (I drilled and tapped a new one) and then didn’t like the wonky WH from hard line from the hose to the proportioning valve hose/bracket and wouldn’t work anyway since I moved my mount and so made a nice new one.

IMG_6159.jpeg IMG_6160.jpeg

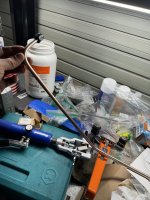
The bench bleed process for the Wilwood sucked rear ends. I tried the red plastic fittings first and they leaked and let air in so had to start over and the orange ones worked great. Messy but definitely better with synthetic brake fluid.

My AMP Power Steps and Tom’s brackets were finally delivered today as well so lots to do. Amazing how the longer this takes me, the longer my list gets. What else can I add?
 
OP
OP
ba123

ba123

Contributor
Bronco Guru
Joined
Oct 29, 2022
Messages
1,888
Loc.
CA
So I filled and pressure bled the brakes. Was a piece of cake with my custom cover for pressure bleeding.
IMG_6169.jpeg
It was a piece of cake, BUT… too bad my Napa Tbird caliper was crap. Bleed screw wasn’t metric, nor standard, might have been one at some point but only thing that worked was vice grips now and then even after bleeding it, the caliper leaked. So, I got another one from them today and popped that on and pressure bled again.

Honestly, I am not quite sure how anyone does this the old school way. Especially when you have to replace the drivers front caliper that will let air into your entire system, no way around it. Would take hours of someone pumping the brakes for you or trying to vacuum out, which doesn’t really work anyway.

Get a Motive bleeder, get an extra Master Cylinder cap, and do it right. I used an air hose nipple on the cap and added a quick release to my motive hose and it worked flawlessly. No drips, nothing but perfect. Maybe wasted a little fluid but seriously takes less than 5 minutes to bleed then entire system. Oh, and if Wilwood, you have to cut up the extra gasket and also plug the air hole in the extra lid or you can’t pressurize it.

Anyway, not going for a drive anytime soon and still finishing the hydroboost hoses, but I have brakes!

Finishing up my power steering cooler and extra tranny cooler and will button it all up.
 
OP
OP
ba123

ba123

Contributor
Bronco Guru
Joined
Oct 29, 2022
Messages
1,888
Loc.
CA
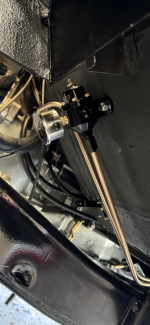
A couple shots of all the brakes and Hydroboost done. Only the line from the box to cooler and cooler to inline filter and to reservoir remaining. Need a couple more fittings.

IMG_6176.jpeg IMG_6177.jpeg
 
OP
OP
ba123

ba123

Contributor
Bronco Guru
Joined
Oct 29, 2022
Messages
1,888
Loc.
CA
And here are the coolers. Primary power steering cooler (overkill but looks nice) and secondary transmission cooler:

IMG_6187.jpeg

Hydroboost lines are all done except for the last return line from the cooler to the reservoir.
 
OP
OP
ba123

ba123

Contributor
Bronco Guru
Joined
Oct 29, 2022
Messages
1,888
Loc.
CA
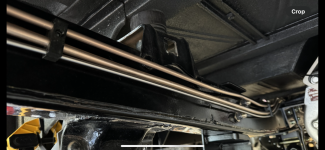
Worked on getting the fuel lines in and secured today.

IMG_6266.jpeg
What a mess, btw! Every time I clean up it’s like minutes later it looks like that.

Regulator is mounted under the drivers floorboard. Got some ultra low profile bolts you can’t even tell they are there. Gauge is there for now and will either protect or remove before driving.
IMG_6273.png
Went through this idea on another thread. Couldn’t find brake and fuel line brackets that would work for me how I wanted them so I 3d printed these. Did these quickly, and they’re perfect so might take more time and make them a little nicer but they work great.
IMG_6274.png
 
OP
OP
ba123

ba123

Contributor
Bronco Guru
Joined
Oct 29, 2022
Messages
1,888
Loc.
CA
What brand is the orange handled tube bender, and are you happy with it's results?
I’ve learned to do things how you want them, you can’t depend on one tube bender.

The orange one is from Vevor. Got it from Home Depot but I think it’s less on Amazon. I just had some HD credit.
https://www.homedepot.com/p/VEVOR-R...4a77dba5a5ac524cb38385fdc135e0711da2de04909df

It works amazingly well fo resort materials that the generics benders put kinks in. The downside is that the turns are much more gradual. It cannot quite so 180°, it’s close although they tell you it’s just for 90° but you can do the rest by hand and still have good result. Works great on Nicop.

I have the generic and held small one as well which is pretty handy for everything you need a tight turn on.

I also have the spring hand benders that are great on Nicop once it’s half mounted.

The way I look at all this crap is that I may be spending a lot on the tools but I’m still paying less than someone else doing it wrong and then me fixing it later.
 
Last edited:
OP
OP
ba123

ba123

Contributor
Bronco Guru
Joined
Oct 29, 2022
Messages
1,888
Loc.
CA
Tested coils today, all 8 checked out. ✅

I got some wide radiator brackets from eBay. While they don’t look great (Kind of original looking and black, if you want that) they are functional and I’ll prob use the lowers since they’re better for my rad and cut up the tops to fit right.

Finalized some wiring, installed my AMP Power steps and bracket from Tom’s. I completely dismantled the amp wiring hardness so it would be cleaner and fit how I wanted to run it. Put the control box in the pass inner-fenderwell since that’ll be covered with other wiring as well. The brackets were really nice and built perfectly but I have to say the tolerances are TIGHT. Pass side got in there fine. I had to confirm with their tech about the drivers side cause it didn’t want to fit and I was confident it was too big. It took a good amount of massaging but once in, it really was perfect. Step lights in, door sensors in, all done except for the step part so I can run my wiring to the rear without the step in the way.

Got the headlights I wanted and tested the headlights to use the Halos as turn signal and DRL. Finished that wiring.

I was planning on using the Dakota Digital water temp Sensor for my trans temp and I thought I could find an adapter to fit it in, but I had no luck, so ended up getting the Dakota Digital inline trans temp block and shorter sensor, I can cut the wiring I already had done for the water temp sensor and works perfectly (tested).

Vintage Air system 90% done (can’t do the ducts until the dash is in, but it does work).

Fuel tank all repainted, fuel pump and wiring done and installed, fuel lever sender installed as well.
 
OP
OP
ba123

ba123

Contributor
Bronco Guru
Joined
Oct 29, 2022
Messages
1,888
Loc.
CA
Was out of town but made some progress again.

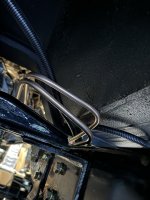
I only wanted hard lines for my AOD cooling and I wish I’d thought of that before mounting my secondary cooler. Those darn nicop lines just don’t like tight bends, but with a change of fittings here and there I was able to finish how I wanted it.
IMG_6558.jpeg IMG_6559.jpeg IMG_6560.jpeg IMG_6561.jpeg

The line comes out and goes to a temp sender block, then to the rear and around above the crossmember, then into the top of the rad.

Line out comes down to the secondary cooler, then back the same way.

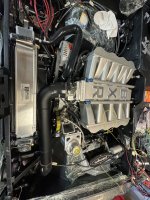
Radiator is all in and mounted and once again test fitting my cold air intake stuff.

IMG_6564.jpeg

Still need to figure out my throttle cable bracket and will have to be somewhat custom but I cut the cable holder part of the bracket and have some ideas and will work on it.

Working in my one piece window install as mentioned on another thread and ran into plenty of issues and working that out.

Also decided to stick with stock type mirrors as I think they look best despite their minimal functionality.
IMG_6439.jpeg
 
OP
OP
ba123

ba123

Contributor
Bronco Guru
Joined
Oct 29, 2022
Messages
1,888
Loc.
CA
As I wrote elsewhere I got enough done to give it a shot starting the engine. I did get it but only ran it for a short bit since I needed to finish up some stuff before running it for longer and it was really just a test.

fuel lines good
trans cooling lines good
ps and Hydroboost lines good
throttle cable bracket is good enough for now
exhaust done
fuel fill hose done
custom plug wires done
fluids all filled except axles

just put the wheels on tonight so I can roll it out tomorrow and run a bit longer if all continues to go well.

IMG_6632.jpeg
 

DirtDonk

Contributor
Bronco Guru
Joined
Nov 3, 2003
Messages
48,743
Nice. Is this the first time we’ve seen the whole thing assembled? Or have there been other pictures of the body and I just don’t remember?
Have you got a decent fan or two that you can put inside the garage to blow exhaust outward?
Or at least some of it?
 
OP
OP
ba123

ba123

Contributor
Bronco Guru
Joined
Oct 29, 2022
Messages
1,888
Loc.
CA
definitely the first pic with the right wheels on it.

I have a medium fan...might be able to find or get another one. I'm a bit torn on what to do. If anything ends up leaking, I'd rather it be on my garage epoxied floor than my brick driveway. Maybe in the garage with the wheels on is fine and I can roll it out if anything terrible happens.

I need to run it long enough to verify the fixed timing I set in the computer matches what the engine is doing. It was close when I crank tested but needs to be perfect. Then I need to get it to temp on a normal timing curve.
 
OP
OP
ba123

ba123

Contributor
Bronco Guru
Joined
Oct 29, 2022
Messages
1,888
Loc.
CA
It is AMAZING the high level of thought to diagnose something as stupid as this one...

I have a VERY old school timing light. Never needed anything higher tech. Not conductive--just goes on the end of your plug wire and then attaches to the plug. I put a hose over it to make sure no sparks jumped anywhere I didn't want them and figured it was all good. I just wanted to verify timing at idle. I got it dialed on crank, so good to move on.

Except now it won't start! What.the.living.hell?

Anyway, I did a log and saw there were lost rpm syncs again and though, what the hell could cause that?

Answer: my timing light pickup. It there interferes with the crank trigger signal and makes it not start.

no shit.

I got the engine somewhat warmed up. I found a couple leaks on trans cooling fittings I didn't think needed to be that tight and now kind of a pain to tighten but think I got them. Got a few water drips out of an old new freeze plug in my block, not sure why that would happen--no way I put that in wrong but maybe there was something there when I did it years ago. Will have to keep an eye on that but glad I just used water, thanks again for that!

Also glad I found another fan and just ran it partway in the garage so that trans fluid didn't leak on my driveway.

Last bad issue is that cyl 5&6 aren't running. Computer is sending spark and fuel, I tested spark, I can hear the injectors go when I test but they might be clogged. Not sure what else it would be. Injectors are new but if something got in my fuel line it had to go somewhere if after the filter.

A few steps forward, a couple steps back is still progress, btu maybe I should change my title from 2023 Bronco to 2024, or maybe the "Never-ending Bronco Project 2.0"
 
OP
OP
ba123

ba123

Contributor
Bronco Guru
Joined
Oct 29, 2022
Messages
1,888
Loc.
CA
I was trying to take a video of the engine running when I heard something not right.

Effing belt was about to come off. Glad it didn't in my face!!!

This stupid AC Compressor I got has the pulley just slightly more outward and it's pulling the belt away and off. I put it back on and tried again and started coming off again right away. Trying to contact Summit now.
IMG_6647.jpeg

Actually, now I'm not so sure about that. Couple be this junkyard PS pump. Should it move in and out...it's not much, but it's some. I put a laser to all the pulleys to try to see if they were all in line and I'm no longer sure of anything other than the belt was coming off on the PS pump and AC compressor, but more PS pump (but could be because of the compressor).
 
Last edited:

jamesroney

Sr. Member
Joined
Sep 11, 2007
Messages
1,914
Loc.
Fremont, CA
I was trying to take a video of the engine running when I heard something not right.

Effing belt was about to come off. Glad it didn't in my face!!!

This stupid AC Compressor I got has the pulley just slightly more outward and it's pulling the belt away and off. I put it back on and tried again and started coming off again right away. Trying to contact Summit now.
View attachment 913591

Actually, now I'm not so sure about that. Couple be this junkyard PS pump. Should it move in and out...it's not much, but it's some. I put a laser to all the pulleys to try to see if they were all in line and I'm no longer sure of anything other than the belt was coming off on the PS pump and AC compressor, but more PS pump (but could be because of the compressor).
Who gives a hoot about belts? IT RUNS!!!! That's a minor miracle. CONGRATULATIONS!
 
OP
OP
ba123

ba123

Contributor
Bronco Guru
Joined
Oct 29, 2022
Messages
1,888
Loc.
CA
Belt issue fixed, bracket had to be moved forward slightly.

Somehow my engine was running on only 3 cylinders...1,2, & 8. I figured out that those are the only injectors firing even though the computer thought it was firing them all. Also figured out the reason--I was sent the wrong ecu. Was sent the batch fire PiMPx instead of the PiMPxs sequential MS3. That's frustrating but good to know it wasn't anything I did!
 
Top