Community
Message Forum
Photo Gallery
Event Calendar
Book Reviews
Bronco Wallpaper
Bronco FAQ
Link Back to CB!
Photo Gallery
Event Calendar
Book Reviews
Bronco Wallpaper
Bronco FAQ
Link Back to CB!

Buy / Sell


Bronco Tech
3 Arm Wiper Setup
Fix Motor Mount
Roll Cage Braces
Throttle Body 65mm
Wheel Alignment
Heat Riser Replacement
Vent Window Repair
Center Console Mount
Straighten Bumper
Ford 6R80 6 spd
More Tech...
Fix Motor Mount
Roll Cage Braces
Throttle Body 65mm
Wheel Alignment
Heat Riser Replacement
Vent Window Repair
Center Console Mount
Straighten Bumper
Ford 6R80 6 spd
More Tech...

Install the app
-
Welcome to ClassicBroncos! - You are currently viewing the forums as a GUEST. To take advantage of all the site features, please take a moment to register. It's fast, simple and absolutely free. So please join our community today!If you have problems registering or can't log into your account, please contact Admin.
You are using an out of date browser. It may not display this or other websites correctly.
You should upgrade or use an alternative browser.
You should upgrade or use an alternative browser.
'71/'76 Badass Bronco Bronco Build
- Thread starter ba123
- Start date
jamesroney
Sr. Member
How did you pressure reference this regulator? I don't see the manifold reference line?Regulator is mounted under the drivers floorboard. Got some ultra low profile bolts you can’t even tell they are there. Gauge is there for now and will either protect or remove before driving.
View attachment 910703
I hadn't yet installed the vacuum hose in that pic but it's there now. Another thing I liked about this regulator is the ability to rotate the top to point the vacuum fitting where I wanted it.How did you pressure reference this regulator? I don't see the manifold reference line?
- Joined
- Nov 3, 2003
- Messages
- 48,743
Well, it was you that decided to only install three cylinders after all.That's frustrating but good to know it wasn't anything I did!
Leaving the other five somewhere else in the garage, waiting to be installed.
So, at least from your wife’s standpoint, it’s all your fault…
Knowhatimean?
ok, so the latest was that I was sent the wrong computer...one that was incompatible with a sequential fire harness so it's not like I could even tell it to batch fire my system, it just will only run 3 cylinders (1,2,&8). Kinda makes me feel pretty good that my engine will run on 3 of 8 cylinders though, I must've done something at least partially right.
Stinger asked for pictures of the circuit board and confirmed it was a mistake. Mistakes happen, nobody's perfect (I'm sure not, as confident as I am even), and they were great in expediting the exchange process, which I'm thankful for. I was worried it would take longer than it did. I'm not sure how they got the replacement out to me so quickly, esp since they sent it usps, but I'm thrilled.
I had to set up the jumpers on the board for how I need it and then update the firmware (using a beta firmware, so up to me), and then transfer my tune and all my settings, which took a couple attempts due to the extreme number of settings I've messed with.
Even though it was night time, I had to at least fire the bad boy up (or naughty girl) and holy crap I shook the neighborhood. Baby girl was itching to fire up all cylinders and I got the chills it seemed so good.
I'll have to actually let it run for a few more minutes and take a video tomorrow and post.
Thank you, Bronco gods, that was an experience of testing my patience (which my wife'll be the first to say I have none).
Timing set, and I take that "not loud" comment back...it's a little loud when you rev it. Oh well. I'll have to post another when I can rev the engine but my dumb heater fitting off the intake is leaking...a lot so will have to address that.
I'm relieved cause my first thought was that the weld underneath the intake where I had to cut to fit my cam sync failed.
I'm relieved cause my first thought was that the weld underneath the intake where I had to cut to fit my cam sync failed.
- Joined
- Nov 3, 2003
- Messages
- 48,743
Don’t even think that! Perish the thought! Thank goodness for water though.I'm relieved cause my first thought was that the weld underneath the intake where I had to cut to fit my cam sync failed.
I just watched another episode of “Let’s See how much anti-freeze Derek Bieri can dump on the pristine ground” while getting his latest field find up and running.
Found this write up on fixing the heater fitting if anyone else ever has this problem. I have to have one that swivels with my intake and the only one that's made that way is Earl's, which is a $70 rip off! I'd buy it if I had to, but if it's only orings in there then why not replace the 33 year old orings and use the fitting I designed my system for.
Easy to do, the write-up I found on stangnet.com said it was a size 111 o-ring, and that might be right for a 94-95, but I found mine to be a size 014.


And yes, btw, that is the fitting from the original hard tubes cut and flared as it works better than a crappy aftermarket one. Good as new, will test tomorrow.
Easy to do, the write-up I found on stangnet.com said it was a size 111 o-ring, and that might be right for a 94-95, but I found mine to be a size 014.


And yes, btw, that is the fitting from the original hard tubes cut and flared as it works better than a crappy aftermarket one. Good as new, will test tomorrow.
Yeah, not sure if it's the fitting or my intake threads but now I cannot for the life of me get it to seal on the threads! I'm pretty sure it was the o-rings before and the threads now but either way, I give up and ordered the overpriced Earl's fitting. $70 for a little NPT heater hose fitting it stupid dumb, but I don't see any others like it. And i guess I could return it if it doesn't fix the problem, but I prob wouldn't.
I also don't like my furl rail connector line setup either and it's in the way of putting this fitting in so addressing that at the same time. Parts ordered.
Was really looking forward to marking the engine stuff off my list, but the good news is it starts so easily now. Press the button and done. I guess I'll wrap up some other stuff while I wait.
My key fobs from Digital Guard Dog came with a recessed spot for a sticker and well, I couldn’t leave that blank.

A buddy of mine came up with the name a while back and I liked it. Tough to read so small but looks good.
A buddy of mine came up with the name a while back and I liked it. Tough to read so small but looks good.
Finished up my headlight install (except the rings so I can aim them) --just holding it there obviously. These billet headlight bezels from Fat Fender are really nice, but man are they pricey! They even have additional screws around them to make them even (I'm prob not holding them the right way...just holding them to see how my rings look. And why doesn't anyone make nice black retaining rings? I had to paint my original chrome ones that someone might've wanted but oh well. Prob not worth much.

I wired in my LED license plate light, it was fun fishing the wire through. I tried the vacuum trick that works in the windshield but it didn't work. A cut coat hanger and then string was the easiest. I had to redo the line from my radiator to secondary trans cooler as it was leaking a little and it just wasn't right. It's a really short line and it's gotta line up perfectly for those compression fittings to work. Hope it's good now. If this one doesn't work, I'll have to go with a braided hose.
Edit: I LOVE how you can see the reflected mess behind me. I sear I spend as much time cleaning and looking for parts/tools as I do actually doing work. I wonder what I'd have to pay my little girl to be my little tool girl.
- Joined
- Nov 28, 2001
- Messages
- 10,425
Missed this until I saw your reply in the other thread tonight. When you have a moment, can you get a rough measurement for me from the top of the stock bracket to the centerline of your -10 feed line to the pump?While the wiring and vintage air are on hold, trying to make my way through some things, like finish up the brakes and power steering stuff.
I went with the Lee Power Steering reservoir which is nice but the bracket isn’t ideal. They used to have it too high and I think people complained so they put it lower and back, which I thought totally sucked. So my solution was to move it into the right spot by using the stock front mounting hole, making another one, and slicing half of the bracket off.
View attachment 910191 View attachment 910192 View attachment 910194 View attachment 910193
Thanks,
Todd Z.
I can measure tomorrow for you. You can move it however you want it though as the bottle is just clamped. Can go up, slightly down, could turn the bottle holder upside down and lower it a little more if needed as well (I thought about doing that but don’t need to).Missed this until I saw your reply in the other thread tonight. When you have a moment, can you get a rough measurement for me from the top of the stock bracket to the centerline of your -10 feed line to the pump?
Thanks,
Todd Z.
Originally, they made this bracket move it up too high for most and then the current revision moved it back towards the firewall, and I thought this variation was best.
- Joined
- Nov 28, 2001
- Messages
- 10,425
Thanks! I wanted to check it and compare it to the location on my existing Lee reservoir.
Todd Z.
Looks like your Contributor status expired. You can see current and past payments for that here:@admin what happened to attachments?
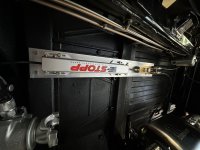
Not sure why there are zero posts about the E-Stopp. Maybe cause it’s expensive and people don’t wanna post about how they do it, I dunno. I do think it’s pricey and I took a while to decide that’s what I wanted and looked at everything else available and seems like the best for what it is.
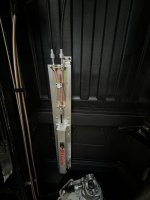
I really struggled with where to put this thing. It’s huge. A perfect spot might’ve been where the steps are on the drivers side if I didn’t have steps. This spot seemed to be the best choice for me.
I used a 4” wide aluminum stock to spread across the channels and mounted with stainless #14 screws into the channels. It’s plenty. My first version of the bracket, I forgot about the additional cable bracket and so had to make another that’s longer to support that.


There is no channel there so I had to make it find a bracket and I found a great one. Attached, not perfectly cause I had already drilled my holes for the bracket mount so it’s off center but it works.

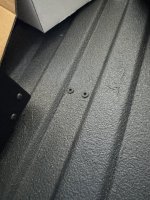
Going through to the bed, I found these fantastic bolts that I used to mount my fuel pressure regulator in the drivers front. They are so low profile (yet still strong) that you don’t even see them there and you’d prob not notice these when done either.

My console will be shifter slightly and will be right at them.
Tested and works great. Need to decide how I want to wire it though. It’ll be active only when accessories are on, but there is a safety wire to connect if you want to not let it engage when the car is running and that seems kinda dumb. If I start it up I’d have to shut it off to disengage the brake? Maybe I can find something. I could probably wire up something from the ecu that gives power while in motion, like speed over X and that’s prob what I should do, although what if your brakes go out…don’t you want this to work? It would lock up the rears though so maybe I wouldn’t.
These are the bolts:
https://www.mcmaster.com/product/90357A015
This is the support:
https://www.mcmaster.com/product/1030A39
I really struggled with where to put this thing. It’s huge. A perfect spot might’ve been where the steps are on the drivers side if I didn’t have steps. This spot seemed to be the best choice for me.
I used a 4” wide aluminum stock to spread across the channels and mounted with stainless #14 screws into the channels. It’s plenty. My first version of the bracket, I forgot about the additional cable bracket and so had to make another that’s longer to support that.


There is no channel there so I had to make it find a bracket and I found a great one. Attached, not perfectly cause I had already drilled my holes for the bracket mount so it’s off center but it works.

Going through to the bed, I found these fantastic bolts that I used to mount my fuel pressure regulator in the drivers front. They are so low profile (yet still strong) that you don’t even see them there and you’d prob not notice these when done either.

My console will be shifter slightly and will be right at them.
Tested and works great. Need to decide how I want to wire it though. It’ll be active only when accessories are on, but there is a safety wire to connect if you want to not let it engage when the car is running and that seems kinda dumb. If I start it up I’d have to shut it off to disengage the brake? Maybe I can find something. I could probably wire up something from the ecu that gives power while in motion, like speed over X and that’s prob what I should do, although what if your brakes go out…don’t you want this to work? It would lock up the rears though so maybe I wouldn’t.
These are the bolts:
https://www.mcmaster.com/product/90357A015
This is the support:
https://www.mcmaster.com/product/1030A39
Wild horse 75
Sr. Member
I like the powerstopp. It’s a nice piece of kit. But it does take up a lot of space. Now that Wilwood has EPB rear brakes I’ll be running those where I can. But for the time being that’s only for 9” applications.
Similar threads
- Locked
- Replies
- 10
- Views
- 5K
- Replies
- 15
- Views
- 6K
- Replies
- 4
- Views
- 901
- Replies
- 6
- Views
- 1K


