• Welcome to ClassicBroncos! - You are currently viewing the forums as a GUEST. To take advantage of all the site features, please take a moment to register. It's fast, simple and absolutely free. So please join our community today!
    If you have problems registering or can't log into your account, please contact Admin.

AX15 Swap

904Bronco

Contributor
Bronco Guru
Joined
Sep 28, 2004
Messages
6,694
Loc.
San Martin, CA
So I am doing an AX15 swap for a member here, this has been an interesting journey so far in trying to find the little bits of information that is needed when AA instructions are rather... Vague. But when I am done, I will be an expert... Right?
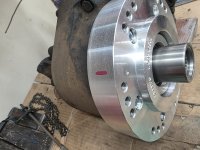
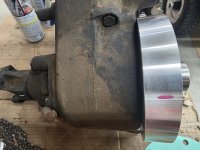
I have called WH's and AA which has been helpful, but not always satisfying... The first question I had was attaching the clocking ring to the T-case. The mark that is placed on the ring needs to be placed/mounted so that it is near the floorboard. The WH's video talks about it, but what would be nice would be a picture of it in position. AA finally said place the T-case on the PTO cover and mount the clocking ring so that it is in the 11'ish o'clock position. Done.
Yesterday I called AA and asked: of the three clocking holes on the adapter, which set is used to bolt the T-case to the transmission? Let me state that the AX15 is on back order, so I don't have something in front of me to play with. AA could not definitively say which one, so they sent me a few pictures, which unfortunately did not help. (It is hard to get a Tech or a Sales person who has touched every application in the catalog...

So of the three sets of holes on the clocking ring, to anyone who has done this swap, can you say which set?

So the kit comes with two different pilot bushings, so until the transmission becomes available (and in my hands) there are certain parts of the upgrade I cannot complete. But I want to have all the answers in hand went it does become available, so I can move forward.

I'll say thanks in advance, Doug.
 

Attachments

  • 20261023_143821.jpg
    20261023_143821.jpg
    180.8 KB · Views: 62
OP
OP
904Bronco

904Bronco

Contributor
Bronco Guru
Joined
Sep 28, 2004
Messages
6,694
Loc.
San Martin, CA
Just get an Atlas <ducks for cover...>
🤣

This is a very clean , 2 owner bronco. I would say it is one of the most unmolested Broncos I have had the pleasure of working on. 61K original miles and I just pulled a FOMOCO pilot bushing out of it! The current owner wishes not to deviate from it's originality, so no Atlas Lars.
Moving from 3 on the tree to 5 on the floor will make it more enjoyable for the Family to drive.
 

1969miller

Contributor
Sr. Member
Joined
Jan 18, 2022
Messages
358
Loc.
Elk Grove
I have this photo just for this reason, the sharpie points at the top center of the case when installed. Line this up with the dimple on the clocking ring.

20260611_103446 (1) (1).jpg
 

JB Fab

Sponsor/Vendor
Bronco Guru
Joined
Mar 21, 2004
Messages
1,516
The two that I have done I have set the transfer case so that the tag on the back of the transfer case is perfectly level with the ground. That is the stock clocking position.

Clocking higher can cause driveline angle issues (pinion end u-joint binding before full droop) with low pinion front axles. Clocking higher will cause binding issues if you have a J type Dana 20. FYI, our shifters are engineered for the stock clocking.
 
OP
OP
904Bronco

904Bronco

Contributor
Bronco Guru
Joined
Sep 28, 2004
Messages
6,694
Loc.
San Martin, CA
This is where I am at...

The end of the tape measure is touching the bolt head that holds the ball/spring on the shift rail.
 

Attachments

  • 20261027_155057.jpg
    20261027_155057.jpg
    190.4 KB · Views: 55
  • 20261027_155109.jpg
    20261027_155109.jpg
    257 KB · Views: 51
  • 20261027_155130.jpg
    20261027_155130.jpg
    205.5 KB · Views: 51
OP
OP
904Bronco

904Bronco

Contributor
Bronco Guru
Joined
Sep 28, 2004
Messages
6,694
Loc.
San Martin, CA
I have this photo just for this reason, the sharpie points at the top center of the case when installed. Line this up with the dimple on the clocking ring.
I would say I believe I am close to what you stated here ^^
The test will be when I test fit the Trans and T-case together I want the tag to be level and my mark to line up with the casting mark on the trans...if it is there.
 

BOBS 2 68S

Full Member
Joined
Jul 26, 2015
Messages
280
Loc.
Hudson, CO
At one time WH had a video on AX-15 install that was very helpful. I can't find it now. I set mine in the bench fully assembled with transfer case twin stick just make sure everything functioned, before bolting it in. I installed the trans first then the transfer case. I also used a small chain fall hoist off the front hoop of the rollcage to hold things in place while bolting it in.
 
OP
OP
904Bronco

904Bronco

Contributor
Bronco Guru
Joined
Sep 28, 2004
Messages
6,694
Loc.
San Martin, CA
At one time WH had a video on AX-15 install that was very helpful.

The video is still on their site, it, along with the PDF Instruction pages from AA, is with the customize the AX-15 purchase option.
There were no directions that came with the parts in the AA box, just a sales flyer and a AA sticker. Not necessarily a bad thing as what used to come with their parts was a black and white copy that, at times, looked like it was a copy, of a copy, of a copy...
If you go to the AA website, they have the updated version of page #1.
 

bax

Contributor
Old Member
Joined
Aug 22, 2005
Messages
14,549
The hole that clocks it the furthest down is the stock location. I used the middle hole on my last build, but I also built a high pinion with 3.5'' of lift. It all worked great. I did have to get in touch with Jon at JB fab to make me the parts to let the shifter fit in the same hole in the floor. Worked great. Again, thanks Jon. The AX 15 is a great trans for a bronco.
 

DirtDonk

Contributor
Bronco Guru
Joined
Nov 3, 2003
Messages
51,616
What’s the difference between the two pilot bearings Doug?
 

DirtDonk

Contributor
Bronco Guru
Joined
Nov 3, 2003
Messages
51,616
Thanks. Thought it was something like that, but didn’t know the specifics. Appreciate it.
 

steelworker77

Contributor
Full Member
Joined
Feb 29, 2024
Messages
175
So I am doing an AX15 swap for a member here, this has been an interesting journey so far in trying to find the little bits of information that is needed when AA instructions are rather... Vague. But when I am done, I will be an expert... Right?
I have called WH's and AA which has been helpful, but not always satisfying... The first question I had was attaching the clocking ring to the T-case. The mark that is placed on the ring needs to be placed/mounted so that it is near the floorboard. The WH's video talks about it, but what would be nice would be a picture of it in position. AA finally said place the T-case on the PTO cover and mount the clocking ring so that it is in the 11'ish o'clock position. Done.
Yesterday I called AA and asked: of the three clocking holes on the adapter, which set is used to bolt the T-case to the transmission? Let me state that the AX15 is on back order, so I don't have something in front of me to play with. AA could not definitively say which one, so they sent me a few pictures, which unfortunately did not help. (It is hard to get a Tech or a Sales person who has touched every application in the catalog...

So of the three sets of holes on the clocking ring, to anyone who has done this swap, can you say which set?

So the kit comes with two different pilot bushings, so until the transmission becomes available (and in my hands) there are certain parts of the upgrade I cannot complete. But I want to have all the answers in hand went it does become available, so I can move forward.

I'll say thanks in advance, Doug.
Now I am alittle worried after I just reinstalled mine from being clocked up to high and was causing a bind at full extension. I have it clocked so the ID tag is level with the ground but I am pretty sure my dimple is pointing at 12 oclock ( 1 position clockwise from where you have it ). Question is does it matter as it looks from your picture no matter where you put the dimple it wouldnt affect the 3 mounting holes above it? Speaking with advanced adapters awhile back I was under the understanding that the dimple was for the NV3550 not the ax15.

Nevermind. After zooming in it does appear they are slightly different depending on where you stick that dimple.
 
Last edited:
OP
OP
904Bronco

904Bronco

Contributor
Bronco Guru
Joined
Sep 28, 2004
Messages
6,694
Loc.
San Martin, CA
Well in conversation with @1969miller yesterday It was confirmed that the AX15 backorder delivery date has been extended another 30 days, to late November...

So I tackled another project the Owner of the Bronco wanted, replace the steering column shift collar with a solid unit. (no shift arm hole). Hey guess what, there are no directions available and I have never taken apart a manual column before... And you have to remove the turn signal switch. Anyone tried to remove molex connector pins from an older Ford 8 pin connector in a while? (It was a slow process) My molex tool and the borrowed tool didn't seem to want to work. I had to manually release the pins, which did take some time.

I can say nothing but praise about @1969miller, who decided to disassemble a manual column at WH's and rebuild it so he could answer my newbie questions. I also spoke with @jamesroney on the phone and he walked me through the procedure to swap things out. And then there was @DirtDonk who admitted in conversation that it was time consuming, but that he hadn't taken one apart in a number of years... So maybe he wasn't the one to chat with.
Thank you Guys, your sharing of knowledge was Greatly appreciated! Jim Creel, if you read this you need to buy Morgan lunch! ;) (And to Matt at WH's, who always seemed to answer the phone when I called to ask questions, I appreciated your honesty when you said I am not certain... Let me ask/find Morgan.)

Sharing another point, I put the Batt back in the Bronco to test that I reinstalled the wires correctly for the turn signal switch. No Batt power inside?? Power in the engine compartment, power to the Alt, but diminished voltage at the fuse block ?? Then it dawned on me, the 1" body lift must have disturbed the ground path to the body. I ran a jumper lead from the (-) Batt cable to one of the studs for the heater box and everything came back to life. So I added a ground wire from the rear of the passenger cylinder head to the body. Another tidbit that needs added to the installation instructions, maybe?
 
Top