• Welcome to ClassicBroncos! - You are currently viewing the forums as a GUEST. To take advantage of all the site features, please take a moment to register. It's fast, simple and absolutely free. So please join our community today!
    If you have problems registering or can't log into your account, please contact Admin.

Brake bleeding / dummy light update

DirtDonk

Contributor
Bronco Guru
Joined
Nov 3, 2003
Messages
47,499
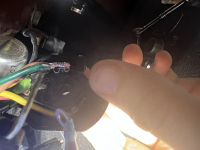
No, when you grounded the purple wire you were basically mimicking what it would do when it’s working correctly and you turn it to start.

And no, normal use the light is off and only lights up when you have an imbalance between the front and rear brakes which indicates something wrong.
The only other time it lights up is when you turn the key to start. It does not flash, it stays lit as long as the key is in the start position.
 

DirtDonk

Contributor
Bronco Guru
Joined
Nov 3, 2003
Messages
47,499
You still need to check the ignition switch to make sure that the terminal is grounding when you turn the key to start. The dash may be clean and the ignition switch is not working. Or the dash is clean, the ignition switch is working, but the dash is not sufficiently grounded to the body.
All three are common scenarios.
 

DirtDonk

Contributor
Bronco Guru
Joined
Nov 3, 2003
Messages
47,499
And in case I forget, sorry that all these suggestions mean that you would have to spend more time pretending to be a pretzel and hanging out under the dash.
I know exactly what that can be like because I spent most of the day today under my dash tracing wires and looking for where the voltage stops.
Among other things…

And my tired old body is none too happy about it!
 
OP
OP
C

CopperBronco

Jr. Member
Joined
Aug 13, 2021
Messages
379
You still need to check the ignition switch to make sure that the terminal is grounding when you turn the key to start. The dash may be clean and the ignition switch is not working. Or the dash is clean, the ignition switch is working, but the dash is not sufficiently grounded to the body.
All three are common scenarios.
Got it… Still not clear how I test if terminal is grounding when I turn key to start…. Test ohms with multimeter? One end to the terminal and one end to a ground?

I have grounded the warning light to my dash with a test light, and the purple terminal wire/spade to my dash ground bolts and warning light lamp turns on in both scenarios, this leads me to believe dash to body ground is okay, right?

I can clean up ignition switch grounding area around the dash, but how do I know if ignition switch isn’t working? It is new BTW, but I hear that doesn’t always mean much. My other one busted when I was removing it a while back. Sorry for the 20 questions. Appreciate all the help! Where do I send the beer? 😀

Is there a cheat here where I can connect a ground wire into ignition switch somehow? For example I have dedicated ground wires running from my instrument cluster screw holes to my cowl, that way when cluster is removed from dash I can still test it any fixes like the aux dash lights(finally fixed!).
 

DirtDonk

Contributor
Bronco Guru
Joined
Nov 3, 2003
Messages
47,499
Got it… Still not clear how I test if terminal is grounding when I turn key to start…. Test ohms with multimeter? One end to the terminal and one end to a ground?
Correct. It won’t tell you the current capacity of the ground, leading to discrepancies in some situations, but as you say next since the lamp lights up there’s a good chance the dash is grounded well enough.

I have grounded the warning light to my dash with a test light, and the purple terminal wire/spade to my dash ground bolts and warning light lamp turns on in both scenarios, this leads me to believe dash to body ground is okay, right?
Seems legit to me. But then I thought the lamp housing was not grounded to the bulb. Guess I could be wrong on that score, like so many things.

I can clean up ignition switch grounding area around the dash, but how do I know if ignition switch isn’t working? It is new BTW, but I hear that doesn’t always mean much. My other one busted when I was removing it a while back. Sorry for the 20 questions. Appreciate all the help! Where do I send the beer? 😀
Haha! Yeah, the lamp discussion has basically earned it’s own thread. Or better yet someone should do an in depth Tech Article about those pesky things.
Correct on the “new“ not guaranteeing something is working anymore these days.

Test to switch with your own meter. One probe to the side terminal and one probe to a ground. Turn the key to start and the resistance should go to zero.

And speaking of resistance… How does that voltage reading that you got earlier compared to The battery directly? If you have 12.6 V at the battery and only 11.6 for example at the ignition switch, that’s a pretty healthy voltage drop just to the switch.
Might be worth looking at your wire condition and connections.

Is there a cheat here where I can connect a ground wire into ignition switch somehow? For example I have dedicated ground wires running from my instrument cluster screw holes to my cowl, that way when cluster is removed from dash I can still test it any fixes like the aux dash lights(finally fixed!).
You could probably, but at this point I don’t think it’s necessary. If you already have a dedicated ground to the dash, even if only to the cluster, then your dash is probably pretty well connected to the system. So for my money then you only need to make that last resistance test to the prove-out terminal on the side of the ignition switch to a ground.

I have seen that terminal and function variously called “Proof-Out” or “Prove-Out” or “Test” but most old ignition switches had one. Long before the days of computer controlled dashboard diagnostics.
 

m_m70

Contributor
Sr. Member
Joined
Jun 14, 2001
Messages
1,474
Loc.
Pacifica, CA
The only other time it lights up is when you turn the key to start. It does not flash, it stays lit as long as the key is in the start position.
want to make sure that you guys are on the same page with key position........meaning the difference between start and run. You probably are but the light should only come on while "cranking" the motor (start position). I've read so many different threads where these positions have been confused. The start and run are two very separate positions. Just a thought......
 
OP
OP
C

CopperBronco

Jr. Member
Joined
Aug 13, 2021
Messages
379
want to make sure that you guys are on the same page with key position........meaning the difference between start and run. You probably are but the light should only come on while "cranking" the motor (start position). I've read so many different threads where these positions have been confused. The start and run are two very separate positions. Just a thought......
Yep, that's how I understood it, thanks for checking though. Easy to confuse over the internet like this.
 
OP
OP
C

CopperBronco

Jr. Member
Joined
Aug 13, 2021
Messages
379
Okay, I just saw your post Paul, need to go try some stuff. I called a shop about this and got some advice, and I probably misheard, because I ended up with smoke coming out of my dash somewhat to which I immediately cut off all power and battery connections, yikes! I'm new to Broncos, but I had some alligator clips, one on the 12v green/red Y terminal going to ignition, and one on the purple side brake switch terminal I believe, guy told me I should try that. I saw it getting hot, so yanked it off immediately, then hooked up to a ground as well thinking maybe I heard wrong... then I got the smoke, or maybe it was the reverse order. Regardless, not good.

Regardless... I'm wondering if something got reversed power under the dash somehow or something odd, or something just got too hot against the blower vent tubes maybe... how long do I let Bronco sit before reconnecting and starting it up. Don't want an electrical fire please... anyone done this before and been okay? Starting to think I need to expedite the brand new wiring harness that is in the long term plan. Will report back on brake switch wiring soon. Going to make sure anything hot cools down first. Have the fire extinguisher ready, but I'd like to avoid that mess please.
 
OP
OP
C

CopperBronco

Jr. Member
Joined
Aug 13, 2021
Messages
379
So I fried my ignition wire by accidentally short circuiting it... feel like an idiot. Regardless, maybe should move to different thread. Curious if I can buy parts to connect into this old style connector, or if I need to buy a new pigtail and rewire ignition? The research begins. Any help much appreciated.
 

Attachments

  • tempImageLT4hR5.png
    tempImageLT4hR5.png
    1.7 MB · Views: 13

DirtDonk

Contributor
Bronco Guru
Joined
Nov 3, 2003
Messages
47,499
Yikes is right! Yes when you connected the alligator clips from 12 V power to a ground, you created exactly by definition a short circuit. That is positive to negative with no load or resistance in the middle to keep it from melting.

At least when you went from the power wire to the ground that’s what happened, but when you connected the power wire to the side terminal it should have only smoked when you turn the key to start. Because that side terminal is a ground during start.
But if it’s smoked without turning the key then either the alligator clips were a little floppy and touched the ground, or something else. But that seems the most likely, since alligator clips are notoriously fickle.

Sorry you went through this. But yes that original style connector with the correct wires coming out of it is available for a reasonable price still I believe. We carry them as well as others, and you may be able to find it at a local auto parts store. Probably not in stock, but readily available.
 

DirtDonk

Contributor
Bronco Guru
Joined
Nov 3, 2003
Messages
47,499
By the way, that puke brown wire just above the green with red stripe wire, is your resistor wire.
It’s listed as 016 pink in the old diagrams but can vary by year as to where the pink actually starts. Some start off red with green like I mentioned, whereas it appears yours starts right off as the weird color resistor
After a few years of use and the heat that it builds up the pink turns to puke brown in most cases. I’ve seen them all sorts of ugly colors, but you get the idea.

Not sure if something changed or if I’m imagining it, but I thought you posted a link to the Seabiscuit Diagrams. I can’t view them on my phone and I can’t use my computer right now, so can’t compare. But the old Chilton Diagrams are pretty much the same as Seabiscuit except that he added color a few years ago.
 
OP
OP
C

CopperBronco

Jr. Member
Joined
Aug 13, 2021
Messages
379
Got it... yeah, that resistor wire was double crimped with the ignition wire that got fried. I think the good news is that the short circuit only ran from the Y connector to the ignition to my alligator clips, so it looks like I only fried a few inches of wire, hopefully the rest is okay. It was only shorted for a matter of seconds. Fingers crossed... had to re-order a new 90 degree female spade terminal, I'll replace the fried wire, and re-crimp and stick back into the ignition. So might be some time before I report back on brake switch if I can't finish before Friday as we have family coming into town. But once all hooked back up I'll re-test ignition switch properly. I'm assuming even though I had a short circuit, that I didn't fry everything else...
 

m_m70

Contributor
Sr. Member
Joined
Jun 14, 2001
Messages
1,474
Loc.
Pacifica, CA
OK so after re-reading all this I'm pretty sure you had it wired right in this diagram.
If and only if you have ~12 volts in both run and start and your ground going to ignition is connected to the "P" terminal.
tempImage4Bg2tt.png

Do not use the stud on the back of ignition switch for power. It does not supply power while in start position.

bronco ignition.png

I think I read that when you had it wired this way you said the light came on in the "run" position. This could only happen if the switch on your proportioning valve has been "activated" showing an imbalance or its bad.

And you said it "flashed" when the key was put in start position. So was it "flashing" or just come come on briefly then went out?

I'm no electronics guru so my nomenclature may be off and I apologize for that but I will try my best to describe how this works. Very simple.

Light bulb:
The housing does not get grounded. That's why the original dash housing is made from plastic.
Your light bulb has (needs) a constant 12v going to it in both start and run through the red wire. Easy to check this with a test light.

Proportioning valve switch:
The switch at the proportioning valve controls the ground. When the proportioning valve is in balance it is in "no ground" mode so the light will not come on in the run position. If there is an imbalance, the switch completes the ground, completes the circuit and the light comes on.

Ignition switch "P" terminal
This terminal is not grounded until the key is put in "start" position. Circuit completes when you turn the key to Start and bulb should light.

Not sure what you fried with the alligator clips and hope it didn't do too much damage.
Hope this helps!
 
OP
OP
C

CopperBronco

Jr. Member
Joined
Aug 13, 2021
Messages
379
Thanks Paul, I actually found a new right angle female spade terminal like the old one and just replaced. They're a bugger to crimp.... my goodness, not my best crimping job but seems tight now. Attached is a photo of the wire I fried, photo 3. Just to check myself here. Could I have damaged anything else? See my diagram in photo 4 of what I was doing when I short circuited it. I look at the diagram now and realize how dumb I was being, but I had misunderstood someone else's instructions.... In my limited electron knowledge, I think I only fried the part between the Y connector splice (red & green/red wires near ignition switch) because the sets of alligator clips were attached between the Y terminal splice, the dual brake warning connector on the back of ignition and then a ground bolt on the dash. The short circuit would have taken the shortest path to ground, right? Also see attached fried wire... I can't see any other signs of fried wires anywhere else but it's a mess under my dash and some of it's loomed/taped. I just want to make sure once I hook everything back up to the battery and turn that ignition switch I'm not smoking again. I'll keep extinguisher ready 🤞. Am I thinking through this clearly? We're way off topic from brake switches now... apologies for the Frankenstein thread.
 

Attachments

  • tempImage4QTU8o.png
    tempImage4QTU8o.png
    1.1 MB · Views: 19
  • tempImage7FkmDD.png
    tempImage7FkmDD.png
    948.9 KB · Views: 18
  • tempImageLXnJdO.png
    tempImageLXnJdO.png
    2.4 MB · Views: 20
  • tempImage1glUMs.png
    tempImage1glUMs.png
    1.2 MB · Views: 20

DirtDonk

Contributor
Bronco Guru
Joined
Nov 3, 2003
Messages
47,499
Actually that’s a very credible crimp. I hate those things!
I’ve only tried them a few times and I realized there’s probably a special machine or crimper to get the job done correctly.

As I’m sure you realize, that three-way splice is not factory. Or did you install that yourself?

There is always the possibility of some damage elsewhere in the harness, but it sure looks like yours is limited to that one short section. In this case the short path to ground was your jumper, but it does appear that the weak link was at first section at the switch. It can literally melt anywhere along the wire where it might overheat.
Would’ve been nice if the part melted was your jumper, but in this case it does look like just a small section of the original wire.

Maybe for future reference, since using alligator clips is not a bad idea in some situation‘s, use a very small gauge wire between the alligator clips and use it as the weak link so that instead of melting one of the other wires, the first one to go would be your alligator clip wire.
It would then literally become what is known as a “fusible link“ and become the sacrificial piece.
 
OP
OP
C

CopperBronco

Jr. Member
Joined
Aug 13, 2021
Messages
379
Actually that’s a very credible crimp. I hate those things!
I’ve only tried them a few times and I realized there’s probably a special machine or crimper to get the job done correctly.

As I’m sure you realize, that three-way splice is not factory. Or did you install that yourself?

There is always the possibility of some damage elsewhere in the harness, but it sure looks like yours is limited to that one short section. In this case the short path to ground was your jumper, but it does appear that the weak link was at first section at the switch. It can literally melt anywhere along the wire where it might overheat.
Would’ve been nice if the part melted was your jumper, but in this case it does look like just a small section of the original wire.

Maybe for future reference, since using alligator clips is not a bad idea in some situation‘s, use a very small gauge wire between the alligator clips and use it as the weak link so that instead of melting one of the other wires, the first one to go would be your alligator clip wire.
It would then literally become what is known as a “fusible link“ and become the sacrificial piece.
Thanks! Yes I added a Y connector and I’ll take all the credibility I can get. I think this thread proves otherwise 😂
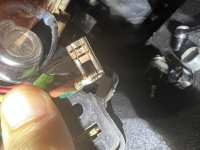
. Gonna fire it up today and retest that brake switch 🤞
 
OP
OP
C

CopperBronco

Jr. Member
Joined
Aug 13, 2021
Messages
379
So long story short, the problem with my dual brake warning light is the ignition switch itself, it’s faulty and does not ground in the start position. I took my multimeter and did 3 tests with the battery disconnected so I could hold key in start position to test continuity.

1. Tested metal housing of ignition switch to the dash, got 2.4 ohms. My understanding is less than 5 ohms is a good ground.

2. Tested negative of battery to prop valve housing and got 0.2 ohms. Prop valve is grounded to body of Bronco.

3. Dual brake terminal on back of ignition to ignition metal housing with key held to start position, got an open loop on the ohms. This means it’s not grounding in the start position.

Toms is sending me a new one. :) hopefully this next one works.
 
OP
OP
C

CopperBronco

Jr. Member
Joined
Aug 13, 2021
Messages
379
So long story short, the problem with my dual brake warning light is the ignition switch itself, it’s faulty and does not ground in the start position. I took my multimeter and did 3 tests with the battery disconnected so I could hold key in start position to test continuity.

1. Tested metal housing of ignition switch to the dash, got 2.4 ohms. My understanding is less than 5 ohms is a good ground.

2. Tested negative of battery to prop valve housing and got 0.2 ohms. Prop valve is grounded to body of Bronco.

3. Dual brake terminal on back of ignition to ignition metal housing with key held to start position, got an open loop on the ohms. This means it’s not grounding in the start position.

Toms is sending me a new one. :) hopefully this next one works.
Alright, so new switch is in and light turns on when on start position! So all working, my brake warning light does come on if I press on my brake pedal as hard as I can… I’m assuming this means the following:

1. I have air in my lines and need to bleed again… this is allowing my pedal to be pressed down further than it should be and causing the brake warning switch to make contact with the metal piston inside the combo prop valve. I have a power booster as well BTW. I did pressure bleed my brakes recently and thought it went well. The front reservoir in my master cylinder that goes to rear brake lines does bubble/shoot’s up some when brake pedal is pressed.

2. I have a brake leak(which I haven’t seen any upon inspection. I can double check.

3. The combo prop valve gaskets inside the valve don’t hold pressure adequately with brakes pressed as hard as I can. Causing false positive with a ton of brake pressure. Rumor has it these new aftermarket GM combo valves are not super well made.

4. The piston in the valve is slightly off center. It’s worth noting I did use the plastic insert for the prop valve while I bled the brakes.

It’s worth noting I can drive around town and not see the light come on. But I would see it come on if I had to slam on them. Let me know if you folks know of any other potential reasons my warning light could come on only when I press super hard on the brakes. Anyone with experience here want to suggest which problem is most likely? Or add any I’m not thinking of?
 
Last edited:

bayoubronco

Newbie
Joined
Aug 1, 2019
Messages
38
Adding a Question...The PV does Proportioning, Limiting and Metering; so when hard braking and the PV functions/activates, would that trigger the light?!

I have other symptoms; but found this thread on a loose search..(I'm having rear brake low pressure (not much comes out when bleeding
and 3/4 peddle travel issues. Light is not setup)
 
Top