• Welcome to ClassicBroncos! - You are currently viewing the forums as a GUEST. To take advantage of all the site features, please take a moment to register. It's fast, simple and absolutely free. So please join our community today!
    If you have problems registering or can't log into your account, please contact Admin.

Bump Steer, Tie-Rod Over and Trac Bar Riser

OP
OP
R

RonJones

Contributor
Full Member
Joined
Jun 30, 2001
Messages
332
I see that when the upper eye is inserted into the mount, it will be roughly equal in height to the draglink end? Does that sound about right?
Then, installing a riser will raise the lower trackbar eye/pivot point to about the level of the lower draglink end?

That’s my read on it, too. I will endeavor to undertake that task this weekend.
 
OP
OP
R

RonJones

Contributor
Full Member
Joined
Jun 30, 2001
Messages
332
Oh, oh, trouble. I fit the WH riser, and a nice, light straight-edge shows a good parallel with the drag link using the lower hole. Unfortunately, there’s a large, thick square washer which is supposed to be welded under the new bolt head, and there is room for neither washer or bolt head using the lowest hole owing to the bumper/trac bar support mount welded onto the front axle. Using the next higher hole makes the trac bar nearly horizontal and no longer parallel.

The only thing I can think of is to notch the bumper/trac bar support mount.

Any suggestions?
 

Attachments

  • 2A587769-FC69-4ED5-B164-3C8D9DB65E07.jpeg
    2A587769-FC69-4ED5-B164-3C8D9DB65E07.jpeg
    115.3 KB · Views: 64
  • F15A2FF2-7349-4383-B454-71F0F0656756.jpeg
    F15A2FF2-7349-4383-B454-71F0F0656756.jpeg
    117.7 KB · Views: 60
  • 20293415-C61D-4748-9AE2-7FCBFC1F9278.jpeg
    20293415-C61D-4748-9AE2-7FCBFC1F9278.jpeg
    100.1 KB · Views: 63
  • 29768B5B-8C15-4597-A103-2AC23C7CEEA7.jpeg
    29768B5B-8C15-4597-A103-2AC23C7CEEA7.jpeg
    117.4 KB · Views: 65
  • 48BCC7BB-04B1-4A11-8650-C489D023866D.jpeg
    48BCC7BB-04B1-4A11-8650-C489D023866D.jpeg
    105.3 KB · Views: 62

rguest3

Bronco Guru
Joined
Dec 13, 2012
Messages
3,780
Ron - Has all of your drivetrain been installed?

Looks like a Drop Trac Bar Bracket is needed.
 
OP
OP
R

RonJones

Contributor
Full Member
Joined
Jun 30, 2001
Messages
332
Ron - Has all of your drivetrain been installed?

Looks like a Drop Trac Bar Bracket is needed.

Still missing driveshafts, but engine, trans, XFR case in. The coil springs are compressed to 9.5”, appropriate for a loaded 2.5” suspension lift, per WH.

The trac bar drop bracket is installed, short of welding as seen below:
 

Attachments

  • 32546DA8-E4B8-4702-B720-9674903E3AF5.jpeg
    32546DA8-E4B8-4702-B720-9674903E3AF5.jpeg
    126.1 KB · Views: 42
OP
OP
R

RonJones

Contributor
Full Member
Joined
Jun 30, 2001
Messages
332
Another solution I’ve thought of, and kind of like, is to grind the bolt head to fit the oblong lower hole with beveled edges, and weld it front and back.
 

Attachments

  • 52FE403A-4560-42A9-BF85-0BCB47126251.jpeg
    52FE403A-4560-42A9-BF85-0BCB47126251.jpeg
    100.6 KB · Views: 46
Last edited:

DirtDonk

Contributor
Bronco Guru
Joined
Nov 3, 2003
Messages
49,428
Too bad the innie type trackbar drop does not allow for more leeway in drilling another hole higher up.
This way you could just use the middle hole on the riser and add a hole to the drop in a custom location to be determined by the angles.
I happen to like the inside-the-bracket design myself, but it would make that additional hole awkward.

I suppose you could add two side plates to the outside of the upper mount, giving you more flat surface to mount the upper eye wherever you want.

Another option for modifying angles is to put the tie-rod back in the under position.
This is actually going in the wrong direction as far as the overall angle is concerned (shallower angles are better), but it's not a ton and might just give you the matching angles you need to work with the trackbar.

Just throwing stuff out there to remind us that all the components being custom, all components are potential "tweaks and adjustments" that can work together.

Paul
 
OP
OP
R

RonJones

Contributor
Full Member
Joined
Jun 30, 2001
Messages
332
Just throwing stuff out there to remind us that all the components being custom, all components are potential "tweaks and adjustments" that can work together

More cowbell, er, I mean tweaks.

There wasn’t quite enough bend on the long plate dimension, raising the riser plate 1/4” off the axle, not so good for welding, so I tweaked a little more bend with the press.

I cut the upper half of the riser off, since I don’t plan to use it. I used my celebrity Enco bandsaw (used in making the props for Kurt Russel’s Stargate movie, back in the day) rather than the plasma cutter since I didn’t feel like sweeping the shed, there being a 1/2” of sawdust everywhere following a wood project.

I ground down the bolt to fit in the oblong hole. Next, bevel the riser plate edges and weld it in.
 

Attachments

  • A5EE2A14-9A4B-406B-9425-410F9D8696E9.jpeg
    A5EE2A14-9A4B-406B-9425-410F9D8696E9.jpeg
    103.2 KB · Views: 51
  • 526988A1-B103-480C-B63C-9F0A7134FF05.jpeg
    526988A1-B103-480C-B63C-9F0A7134FF05.jpeg
    112 KB · Views: 49
  • 6F119FF2-9E5A-47D5-9FDC-E7FE2C455329.jpeg
    6F119FF2-9E5A-47D5-9FDC-E7FE2C455329.jpeg
    121.9 KB · Views: 49
Last edited:

DirtDonk

Contributor
Bronco Guru
Joined
Nov 3, 2003
Messages
49,428
Wow! Can you say "moving forward with assertiveness" today?;D

I know it had to be cut down, but I hate to lose that next hole so soon in the game. Well, to paraphrase Gregory Peck... "You're committed now!"

Paul
 
OP
OP
R

RonJones

Contributor
Full Member
Joined
Jun 30, 2001
Messages
332
"You're committed now!"

My thinking is, keep dithering and I’ll never get done.

I beveled and welded, using the square “biscuit” washer to keep the bolt perpendicular while tack welding. Next step is wire wheel the future weld areas, and if fit is adequate, cut the original bolt to a 1/4” stub, as described in the Riser instructions. That’s the main point if no return; I’m guessing. Up until then, I can toss the riser and just hook the trac bar up to the original mount.
 

Attachments

  • 49D9760B-E311-4ED6-9C36-B5F2F1ED140F.jpeg
    49D9760B-E311-4ED6-9C36-B5F2F1ED140F.jpeg
    139.4 KB · Views: 39
  • 7471C8C6-8191-4747-BA42-BCDE32716E9E.jpeg
    7471C8C6-8191-4747-BA42-BCDE32716E9E.jpeg
    124.3 KB · Views: 30
  • 5E315F5C-E27C-47F2-B1BA-1834394D408D.jpeg
    5E315F5C-E27C-47F2-B1BA-1834394D408D.jpeg
    95.1 KB · Views: 33
  • B1C6B650-7C05-4C05-86B6-8E4E6BE87712.jpeg
    B1C6B650-7C05-4C05-86B6-8E4E6BE87712.jpeg
    114.6 KB · Views: 34
  • 02FD6BB2-B7D4-4BEE-91AA-726D5A89E9BC.jpeg
    02FD6BB2-B7D4-4BEE-91AA-726D5A89E9BC.jpeg
    112.7 KB · Views: 34
OP
OP
R

RonJones

Contributor
Full Member
Joined
Jun 30, 2001
Messages
332
The new bolt stuck out too far, and wouldn’t let me slip the passenger-side tie rod end on, so I shortened it to 3 threads past the castle nut when the trac bar/big washer was cinched down. I drilled the bolt on the bench while I was at it. I cut the old bolt, and tacked the Riser. Enough for today!
 

Attachments

  • 3FBE36BE-1DCA-4D92-A8BC-BB650A639C6B.jpeg
    3FBE36BE-1DCA-4D92-A8BC-BB650A639C6B.jpeg
    114.9 KB · Views: 47
  • DB55265A-72F4-43E1-AA42-50008A72A50D.jpeg
    DB55265A-72F4-43E1-AA42-50008A72A50D.jpeg
    88.6 KB · Views: 50
  • D171342B-AF44-49A4-AF7B-B1956E55FDFD.jpeg
    D171342B-AF44-49A4-AF7B-B1956E55FDFD.jpeg
    102.2 KB · Views: 50
  • 717D603E-4DB0-438F-995D-7B977B0BA01D.jpeg
    717D603E-4DB0-438F-995D-7B977B0BA01D.jpeg
    114.4 KB · Views: 52
Last edited:

DirtDonk

Contributor
Bronco Guru
Joined
Nov 3, 2003
Messages
49,428
You might also consider rotating the tie-rod so that the draglink mounting bracket faces further forward. Seems like this would not only aid in clearance in most conditions, but would also put it in more of a natural alignment with the pitman arm.
This alignment might also serve to reduce "tie-rod roll" as you steer back and forth.

You can test this theory quickly with a little help from someone turning the steering wheel back and forth (tires on the ground) to see how much it rotates now, vs how much it rotates after you move it outward.

Paul
 
OP
OP
R

RonJones

Contributor
Full Member
Joined
Jun 30, 2001
Messages
332
You might also consider rotating the tie-rod so that the draglink mounting bracket faces further forward. Seems like this would not only aid in clearance in most conditions, but would also put it in more of a natural alignment with the pitman arm.

Will do, thanks.
 
OP
OP
R

RonJones

Contributor
Full Member
Joined
Jun 30, 2001
Messages
332
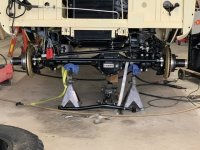
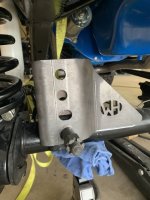
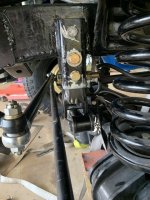
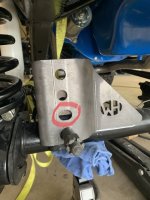
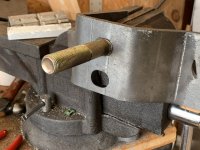
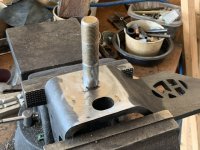
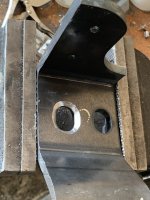
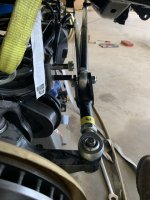
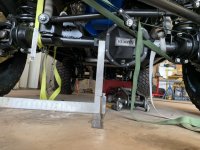
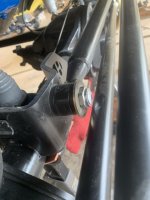
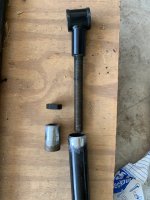
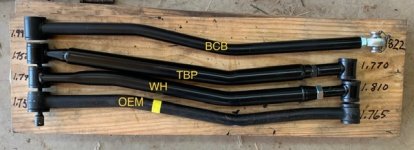
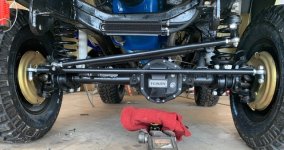
Finally, got it done, but not without considerable further tweaking. It turns out the trac bar length needed was in the ballpark of the OEM bar (about 1/4” shorter), which of course isn’t adjustable. I had a few adjustable trac bars to choose from, and ultimately went with the Tom’s Bronco Parts one, which was the easiest to disassemble, shorten 2”, and reassemble. In addition, the axle trac bar bolt impinged on the tie rod with a full right turn. I ended up going to a 2” diameter 3/4” washer, narrowing the trac bar eye/bushing/neoprene 0.44”, shortening the bolt, and using a thin high vibration locknut, reaming the right knuckle an additional 3/32” to lower the tie rod stud, and I now have 1/4” clearance minimum.
 

Attachments

  • CA5B27E0-2DF1-4F66-A670-D325E1D1513B.jpeg
    CA5B27E0-2DF1-4F66-A670-D325E1D1513B.jpeg
    122.4 KB · Views: 69
  • 3EDF12FF-E500-4D06-BC55-8D39D1F0B62F.jpeg
    3EDF12FF-E500-4D06-BC55-8D39D1F0B62F.jpeg
    86.6 KB · Views: 66
  • 46CA8F22-295A-4A5A-989A-707E7091F247.jpeg
    46CA8F22-295A-4A5A-989A-707E7091F247.jpeg
    88.9 KB · Views: 58
  • 6EC18918-0B66-4CC3-94D5-B15763EC30D5.jpeg
    6EC18918-0B66-4CC3-94D5-B15763EC30D5.jpeg
    114.1 KB · Views: 56
  • C53F2364-61D6-47AA-A311-ED8C0A5986A9.jpeg
    C53F2364-61D6-47AA-A311-ED8C0A5986A9.jpeg
    62.2 KB · Views: 65
  • E8C552A7-CF7F-4840-A87E-4B5E362A7967.jpeg
    E8C552A7-CF7F-4840-A87E-4B5E362A7967.jpeg
    101.8 KB · Views: 87

DirtDonk

Contributor
Bronco Guru
Joined
Nov 3, 2003
Messages
49,428
Wow, lot of extra work there Ron. But wow too, nice job!
Looks fantastic right now. Have you had a chance to drive it yet? And is that a nut missing on the passenger side tie-rod end?

I hadn't realized just how long the draglink is on that setup. What year steering gearbox is it? And didn't you say already that you verified the steering box was in it's centered position when the tires were pointed straight?
If so, that's good. I was just noting that the pitman arm is off to the driver's side (not a problem in itself) and that made me wonder about the box.

Nice going.

Paul
 
OP
OP
R

RonJones

Contributor
Full Member
Joined
Jun 30, 2001
Messages
332
What year steering gearbox is it?

It’s a F150 4x4x2, ‘79 - I think.

And didn't you say already that you verified the steering box was in it's centered position when the tires were pointed straight?

I originally set it up so the steering wheel had the logo upright, wheels as straight ahead as I could tell, steering box midway through its 4 turn cycle, and clocked the pitman arm so it was pointing straight aft. Coincidently that hooked easily to the drag link without shortening and a few threads for shortening adjustment. I don’t think it’s completely lined up any longer; changing the tilt of the drag link altered the geometry, although I have a full 4 turns at the box.

Not running yet - next step is finish AC, reinstall radiators, finish interior, driveshafts, windows, doors, top, grille, bumper, etc. Somewhere along that way I’ll fire it up, make sure it’s going straight ahead, and reclock it.

The nut was missing on the tie rod just to make paint touch-ups easier - it’s all torqued and pinned now!

Thx again!
 
Last edited:

DirtDonk

Contributor
Bronco Guru
Joined
Nov 3, 2003
Messages
49,428
Sounds good. Just be sure that the box is centered when going straight down the road. Base all other settings on that.
And just in case it works out this way, it's not a real issue to have the pitman arm pointed what looks basically like one full spline (10 degrees) off to the driver's side. That's how Ford did the early models with manual steering in fact, and the first year or so of the power steering boxes too.
But straight back must have some advantage or another because Ford changed it to straight back at some point.

Paul
 
Top