• Just a reminder that you won't be able to start new posts or reply to existings posts in the Archive forum.

    This is where all the old posts go so they can still be used for reference and searched.
  • Welcome to ClassicBroncos! - You are currently viewing the forums as a GUEST. To take advantage of all the site features, please take a moment to register. It's fast, simple and absolutely free. So please join our community today!
    If you have problems registering or can't log into your account, please contact Admin.

cage progress - updates

malcolmzilla

Bronco Guru
Joined
Mar 18, 2003
Messages
1,522
Loc.
Calgary, AB, Canada
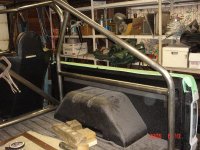
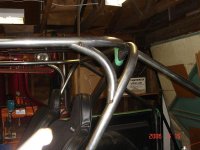
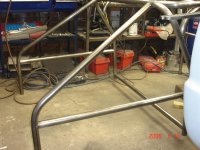
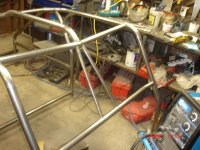
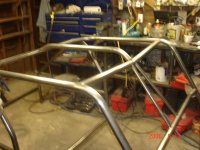
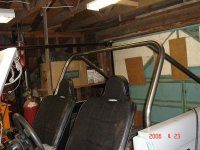
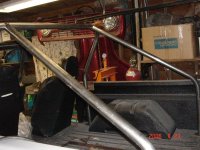
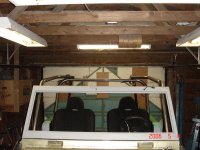
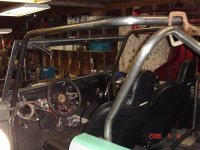
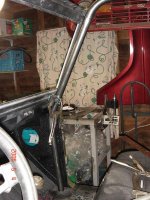
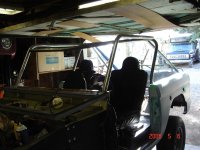
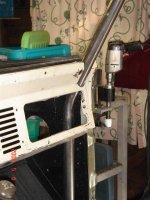
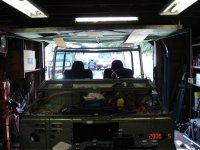
All i got done yesterday, we had to build a side mount the bender as my rafters were EXACTLY the same height as the width of my cage and interfered:mad: so to bend the B hoop back I had to side mount the thing...:-X Keep that in mind building your bender stands folks!

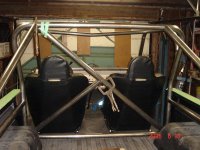
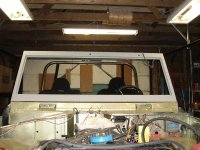
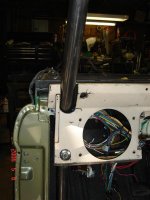
I am blatantly knocking off Crab's prerunner style... And Dusty's through the dash. More to come as I get time on it.
 

Attachments

  • DSC00398 (Medium).JPG
    DSC00398 (Medium).JPG
    91 KB · Views: 376
  • DSC00399 (Medium).JPG
    DSC00399 (Medium).JPG
    97.2 KB · Views: 347
  • DSC00400 (Medium).JPG
    DSC00400 (Medium).JPG
    96.1 KB · Views: 272
  • DSC00401 (Medium).JPG
    DSC00401 (Medium).JPG
    95.6 KB · Views: 481
Last edited:
H

Heinz_67

Guest
Nice!!! I'm doing the same thing! Looks like you're using 2" HREW? I'm using 1 3/4 myself. Please keep us posted.

Jim
 
OP
OP
malcolmzilla

malcolmzilla

Bronco Guru
Joined
Mar 18, 2003
Messages
1,522
Loc.
Calgary, AB, Canada
Material is 1.75" .120 wall cold rolled ERW. Bender is a ProTools 105HD, I also purchased their whiz bang notcher too.

Plans call for:
a spreader at the bottom on the B hoop for the lap belt mounting point, and shoulder belt mounts up on top of B (4 pt RCI harnesses)
an "X" brace across the B
spreaders from the B to kickers just under the bed rails
perhaps a bolt in spreader between the kickers just below tailgate height
A pillars from B over head through the dash and down just inside the kick panels, following the windshield real tight
spreaders between the A's up top and at dash height
overhead spreaders between A and B in a Y shape
frame tie-ins at the bottom of the A, B and C tubes

Basically a hybrid of Crab (prerunner, bent B hoop) and Dusty's designs (thru dash)

Hopefully when the A tubes are in it the B hoop will look less swoopy... the A's scare me, from a bending perspective, I did the B and kickers with just math, the A's I will draw out on the floor al la Pirate4x4 "bending 101"...

Still a lot of math and bending to do, but so far no real wasted tube other than about 15" extra for the down radius' (2x 7.25") on the B hoop that I didn't figure into my calculations, but I did accoutn for across the top :p.... This is my 3rd cage...
 
Last edited:
OP
OP
malcolmzilla

malcolmzilla

Bronco Guru
Joined
Mar 18, 2003
Messages
1,522
Loc.
Calgary, AB, Canada
Got the 8000lb steel hardtop on to ensure it cleared the cage, I will be running a fastback soft top but might add the hardtop later... looks like I could have had it up a bit higher like another 1" or so but my measurements were OK. I have about 4" from my head to the bottom of the B hoop, and I can add a bit of a bend into the overhead spreaders, giving me another inch or so right over my noggin.

DSC00402%20(Medium).JPG

DSC00403%20(Medium).JPG


Now, the plan is for the A pillars to go BEHIND the dash, like this:

DSCN1122.JPG


This leaves a lot better clearance for your legs, entry etc. but is a super tight fit - glovebox, dash mounts, windshield locks are all in there only about 2.25" of room to work with and I'm using 1.75" tube.

First attempt was close but we decided to bend the A tube from the B hoop forward and down, in hindsight we should have gone from the floorpan up... We had the angle nailed (to match the windshield and B hoop) but started the bend too early by about 2" and it protruded up too high and I would not have been able to trim the dash that much. had we started from the floor I could have chopsawed a bit off the leg and continued on to the 2nd bend.

DSC00407%20(Medium).JPG

DSC00408%20(Medium).JPG

DSC00409%20(Medium).JPG

DSC00410%20(Medium).JPG


So, last night got version 2 of the A hoop started, fits good and square, and looks like the bend ends below the dash... need to get the second bend in tonight, I know the angle so I'll just use my test 90 against the angle guide to mark the start of the bend a la Pirate4x4 bending 101 except I'll do it on the truck instead of drawing it the floor. The Pirate method is good, but you have to get exact measurements and trace that out and I'm having problems with that given I'm one guy and on these A tubes not exactly bending to bedrails (solid points to measure), etc...
Here's hoping... :D
 
OP
OP
malcolmzilla

malcolmzilla

Bronco Guru
Joined
Mar 18, 2003
Messages
1,522
Loc.
Calgary, AB, Canada
Thanks, one concern is the angle of the windsheild when bolted back...Right now my windshield is at about 26, I have one bolt in (the other needs a bit clearancing to go in and I'm too lazy to unbolt it all...), and the seal, but it will need to come back a bit more...

With the A tube at 30 degreees it looks good relative to the B hoop and there is a bit more room to suck the w/s back - I figure it is about 30 degrees back max, got that off the door vent window frame on my 77... I could bend the A more for more room but then there will be a gap and I'm trying to keep it as tight as possible, and to match the B angle at about 30 as well.
 
OP
OP
malcolmzilla

malcolmzilla

Bronco Guru
Joined
Mar 18, 2003
Messages
1,522
Loc.
Calgary, AB, Canada
Took the afternoon off and got a bit more done...

Bent the rest of the A's, Pirate style, cut out the 58 degree from the previous failed A and bent it to 60, and used it as a guide for the A to B tie in right at the kickers (node?) - not even an inch to spare... :p Had to reverse bend the drivers side - now the @#$! bender stand is too close to floor to bend it from in inside then out... :mad:

Was thinking of doing a 45 for the A to B tie in but was A) scared it wouldn't reach... and B) was too long of a run for my plan for a funky gusset down from the A to B (stay tuned...)

However, don't think my notcher will do the A to B copes - wont grab on a bend and the angle is quite severe, likely do 'em by hand. That will be arduous.

Yes, those are kitties on the curtains! ;D
 

Attachments

  • DSC00418 (Medium).JPG
    DSC00418 (Medium).JPG
    88.2 KB · Views: 132
  • DSC00417 (Medium).JPG
    DSC00417 (Medium).JPG
    36.9 KB · Views: 74
  • DSC00416 (Medium).JPG
    DSC00416 (Medium).JPG
    42 KB · Views: 128
  • DSC00415 (Medium).JPG
    DSC00415 (Medium).JPG
    88.9 KB · Views: 117
  • DSC00413 (Medium).JPG
    DSC00413 (Medium).JPG
    90.6 KB · Views: 276
  • DSC00414 (Medium).JPG
    DSC00414 (Medium).JPG
    110.4 KB · Views: 254
OP
OP
malcolmzilla

malcolmzilla

Bronco Guru
Joined
Mar 18, 2003
Messages
1,522
Loc.
Calgary, AB, Canada
Some more progress. Might have to renotch the A to B copes a bit (didn't trust the notcher as I was expecting a straighter cut, so I trimmed them by hand... but in hindsight the radius of the tubes throws the sight lines off at steeper angle notches). Also the top A spreader will interfere with the wiper arms, so gotta rethink that one - really like the slight "V" bend though...;D
 

Attachments

  • DSC00425 (Medium).JPG
    DSC00425 (Medium).JPG
    80.9 KB · Views: 204
  • DSC00424 (Medium).JPG
    DSC00424 (Medium).JPG
    82 KB · Views: 253
  • DSC00423 (Medium).JPG
    DSC00423 (Medium).JPG
    72.8 KB · Views: 205
  • DSC00422 (Medium).JPG
    DSC00422 (Medium).JPG
    80.1 KB · Views: 184
  • DSC00421 (Medium).JPG
    DSC00421 (Medium).JPG
    89.7 KB · Views: 233
  • DSC00420 (Medium).JPG
    DSC00420 (Medium).JPG
    81.2 KB · Views: 79
Last edited:
OP
OP
malcolmzilla

malcolmzilla

Bronco Guru
Joined
Mar 18, 2003
Messages
1,522
Loc.
Calgary, AB, Canada
A bit more progress.

Redid the notches on the A tubes to get the B legs to parallel and better cope - trusted the notcher this time! ;D The drivers kicker also needs a nibble.

Redid the A overhead spreader, moved it back, kept the V bend but still @#$!% too close to wiper motor, but moving it a 1/2 inch back will provide enough clearance, might also do a drop bracket and run a Jeep bikini top...

Got the old dash cut and in, will need to replace the L brackets cut out where the A tubes pass through. Glovebox I welded up will need yet another tuck - sure is tight in there... but think I can get the foot E-brake back in with a few minor mods and the heater with no mods.

Did the dash spreader, needs about another 1/8" inch nibble out to get the A tubes where I want them, tack it then move the top spreader.

Playing around with tape for the center spreaders... I have 1" and 1.25"...

DSC00427%20(Medium).JPG


DSC00428%20(Medium).JPG


DSC00429%20(Medium).JPG


DSC00430%20(Medium).JPG


DSC00431%20(Medium).JPG


DSC00432%20(Medium).JPG


DSC00434%20(Medium).JPG


DSC00435%20(Medium).JPG


DSC00436%20(Medium).JPG


DSC00437%20(Medium).JPG
 
Last edited:
OP
OP
malcolmzilla

malcolmzilla

Bronco Guru
Joined
Mar 18, 2003
Messages
1,522
Loc.
Calgary, AB, Canada
Trimmed and tacked the dash spreader in, moved the windshield spreader back 1/2", then the neighbor came over and wanted some bearings pressed on / off a carrier...

OK folks, triangulate me! Access to the back from the front doesn't matter... fastback and spare carrier, etc.

DSC00438%20(Medium).JPG


DSC00439%20(Medium).JPG


DSC00440%20(Medium).JPG


I like the "X"... but should I tie it into the Kicker / B / A node, or right in the middle of the B 90? To go full "node" the A and kickers will need to be finished welded in 1st.

For belt bounts the plan is to sleeve thru the cage...

DSC00441%20(Medium).JPG
 

trailpsycho

Bronco Guru
Joined
Dec 11, 2003
Messages
4,856
Why not the V with the two horizontal bars coming out from the sides, but stopping at the V. This provides access to the front/back, provides for harnesses at the appropriate height and gussetts the V. I think it is what I will/would do if I go from 3 point to harnesses. Lookin' really good 'Zilla. Keep the progress coming.

John
 
OP
OP
malcolmzilla

malcolmzilla

Bronco Guru
Joined
Mar 18, 2003
Messages
1,522
Loc.
Calgary, AB, Canada
Back on the cage after being out of town for work, and other issues (house repairs), and replacing holed rad with BC Broncos triple pass. Start solenoid when on me today too just jockeying it...

Went with 'X", working on it, and bent gussets, got rear kicker spreaders in. Hopefully a full day tomorrow will get it ready for finish welding...
 

Attachments

  • DSC00449 (Medium).JPG
    DSC00449 (Medium).JPG
    113.1 KB · Views: 140
  • DSC00448 (Medium).JPG
    DSC00448 (Medium).JPG
    92.9 KB · Views: 136
  • DSC00442 (Medium).JPG
    DSC00442 (Medium).JPG
    78.6 KB · Views: 146
OP
OP
malcolmzilla

malcolmzilla

Bronco Guru
Joined
Mar 18, 2003
Messages
1,522
Loc.
Calgary, AB, Canada
Teaser pics, garage is too full for wide angle... After initial joint welding, "X" brace goes in across "B" hoop, "Y" brace overhead, "A"'s thru dash, and plans for a nifty swing out spare carrier that fits under the fast back top and swings up and back over tailgate, and adds triangulation to kickers... Frame tie ins at "A" and "B" feet.
 

Attachments

  • DSC00456 (Medium).JPG
    DSC00456 (Medium).JPG
    69.5 KB · Views: 104
  • DSC00457 (Medium).JPG
    DSC00457 (Medium).JPG
    91.8 KB · Views: 75
  • DSC00458 (Medium).JPG
    DSC00458 (Medium).JPG
    98.2 KB · Views: 114
  • DSC00459 (Medium).JPG
    DSC00459 (Medium).JPG
    87.8 KB · Views: 109

BoltBuster

Bronco Guru
Joined
Jun 5, 2002
Messages
2,051
Man Ive got to learn how to do that, are you satisfied with what you have done so far?
 
Top