• Just a reminder that you won't be able to start new posts or reply to existings posts in the Archive forum.

    This is where all the old posts go so they can still be used for reference and searched.
  • Welcome to ClassicBroncos! - You are currently viewing the forums as a GUEST. To take advantage of all the site features, please take a moment to register. It's fast, simple and absolutely free. So please join our community today!
    If you have problems registering or can't log into your account, please contact Admin.

cage progress - updates

OP
OP
malcolmzilla

malcolmzilla

Bronco Guru
Joined
Mar 18, 2003
Messages
1,522
Loc.
Calgary, AB, Canada
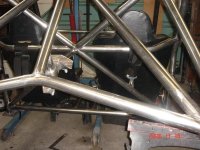
Thanks. I will try a few things out tonight and decide on an approach. TIG is just so purty, but we have had to MIG the shallow copes and some gaps.

Problem with Summit / Jegs / even the Bronco vendors... Is getting anything up to Canada for a reasonable price and time frame.

And I have to have this done by Sunday AM for my bro to TIG it - time is getting tight and theres like 50+ more to do.

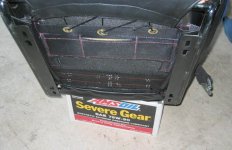
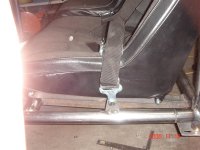
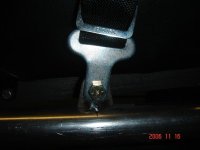
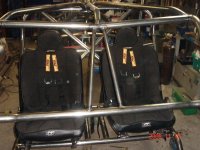
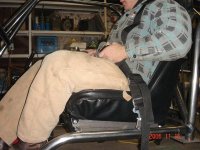
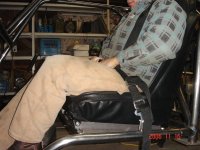
So I weasel pissed the heck outta the stock ones, and they slide great now ;D and both sides lock... And most importantly I have them in my greasy hands.
 

sstlaure

Bronco Slacker
Joined
Jun 7, 2004
Messages
1,881
I rotated my seat tabs around the tube so that the mounts on the seats are maybe 1/2" off of the floor of the truck. I can still get my hands/tools in to attach/remove the seat if necessary.

With 1/4" thick tabs, they are plenty strong to support the loading.
 
OP
OP
malcolmzilla

malcolmzilla

Bronco Guru
Joined
Mar 18, 2003
Messages
1,522
Loc.
Calgary, AB, Canada
Yeah Scott lookin at your picsa thats the plan - I have enough extra belt tabs to do that on the passenger side... On the drivers I will need a sturdy frame for the sliders to bolt to. Unless I make the drivers seat fixed, which I think isn't a great plan.
 
OP
OP
malcolmzilla

malcolmzilla

Bronco Guru
Joined
Mar 18, 2003
Messages
1,522
Loc.
Calgary, AB, Canada
Drivers seat mounted. Not quite as low as I'd like but not bad, completely reworking it all would only gain maybe an inch.
 

Attachments

  • DSC06838 (Medium).JPG
    DSC06838 (Medium).JPG
    64.2 KB · Views: 61
  • DSC06839 (Medium).JPG
    DSC06839 (Medium).JPG
    67.3 KB · Views: 50
  • DSC06840 (Medium).JPG
    DSC06840 (Medium).JPG
    108.4 KB · Views: 171

TJK74

Bronco Guru
Joined
Feb 21, 2003
Messages
3,154
Loc.
Newark CA
That looks good and looks like if you ever need to slide the seat back you could just drill another set of holes. Good job!
Wish my Mastercraft seats had tabs on them like that vs. the flat bar with holes they come with. It would have made things alot easier, especially mounting them up
 

Attachments

  • IMG_6043.jpg
    IMG_6043.jpg
    81 KB · Views: 50
OP
OP
malcolmzilla

malcolmzilla

Bronco Guru
Joined
Mar 18, 2003
Messages
1,522
Loc.
Calgary, AB, Canada
I will take some more pics, as the factory sliders are under there! Extended all the way back the seat just touches the X brace.

You know, I intitally made this big assed adaptor to fit the PRP's transverse tabs to the sliders (lots of time and fitting), and then a new one to drop the seat with it mounted to the rollcage... and now I see the Mastercrafts come with EXACTLY what I needed. :mad:

With everything laced up I can't just cut and reposition and weld the tabs.
The freakin PRP's better be @#$! durable and comfortable!
 

TJK74

Bronco Guru
Joined
Feb 21, 2003
Messages
3,154
Loc.
Newark CA
malcolmzilla said:
I will take some more pics, as the factory sliders are under there! Extended all the way back the seat just touches the X brace.

You know, I intitally made this big assed adaptor to fit the PRP's transverse tabs to the sliders (lots of time and fitting), and then a new one to drop the seat with it mounted to the rollcage... and now I see the Mastercrafts come with EXACTLY what I needed. :mad:

With everything laced up I can't just cut and reposition and weld the tabs.
The freakin PRP's better be @#$! durable and comfortable!

LOL well i'm sure you'll have no problems with the PRP's I have sat and ridden in quite a few rigs with them and they are very comfy as well and hold up great. The only thing I have noticed is their colr fabrics seem to fad quite a bit. I'm sure you'll be more than happy with them;)
 
OP
OP
malcolmzilla

malcolmzilla

Bronco Guru
Joined
Mar 18, 2003
Messages
1,522
Loc.
Calgary, AB, Canada
Got the shoulder belt bars in last night. Started finish welding today. Not much TIG'ing going on due to time constraints and gaps in fitment.

Not sure how I'm anchoring the belts yet, not much belt length if I use the tabs on top of the tube, is looping belt directily over the tube acceptable?
How to you keep the belt located on the tube?

TIA

LOL- some power wagon pics for my dad. Oops. Cool truck though!
 

Attachments

  • DSC06859 (Medium).JPG
    DSC06859 (Medium).JPG
    86.9 KB · Views: 24
  • DSC06860 (Medium).JPG
    DSC06860 (Medium).JPG
    79.3 KB · Views: 21
  • DSC06861 (Medium).JPG
    DSC06861 (Medium).JPG
    92 KB · Views: 44
  • DSC06862 (Medium).JPG
    DSC06862 (Medium).JPG
    79.6 KB · Views: 45
OP
OP
malcolmzilla

malcolmzilla

Bronco Guru
Joined
Mar 18, 2003
Messages
1,522
Loc.
Calgary, AB, Canada
Got some more tube tacked in, seats back in, drivers belts mocked up.
Laps are 90 degrees to tube with seat all the way back... Shoulders might run em over the cross bar and anchor on "X"... Feedback?
 

Attachments

  • DSC06864 (Medium).JPG
    DSC06864 (Medium).JPG
    101.3 KB · Views: 21
  • DSC06865 (Medium).JPG
    DSC06865 (Medium).JPG
    95.7 KB · Views: 22
  • DSC06863 (Medium).JPG
    DSC06863 (Medium).JPG
    74.2 KB · Views: 30

TJK74

Bronco Guru
Joined
Feb 21, 2003
Messages
3,154
Loc.
Newark CA
malcolmzilla said:
Got some more tube tacked in, seats back in, drivers belts mocked up.
Laps are 90 degrees to tube with seat all the way back... Shoulders might run em over the cross bar and anchor on "X"... Feedback?

Looking good!
I think I too would run the shoulders down to the X to give some room for belt adjustment. Not too sure on the lap belt placement. i think I would mount the tabs about 4-6 inches back from where they are to try and hold you back in the seat and also would be really tempted to cut belt slits in the bolsters.
 
OP
OP
malcolmzilla

malcolmzilla

Bronco Guru
Joined
Mar 18, 2003
Messages
1,522
Loc.
Calgary, AB, Canada
Thanks again for the advice... I was worried about the bolsters, but the belt does get snug on my hips and thighs over the seat... I think a more slender person will be ok but a small child might have issues... I'm gonna cut the tabs down about 3/4" inch to get more belt travel.

The angle doesn't doesn't intuitively look correct, esp. compared to a conventional automotive 3 point, but the lap belt at 90 degrees is ideal according to the RCI harness instructions, 80 degrees max, which is where it might end up with the sliders all the way forward.

I've mulled this over, and, from that earlier article, think the reasoning is two part:
1. you want the belt to snug you down as your body moves forward in a collision
2. at 90 degrees it also is at max tension given the up forces it will face from the shoulder belts yarding up on it as the torso moves forward - the lap belt needs stay put to prevent submarining, and along a similar line also locate you in event of rollover

Thoughts?
 
OP
OP
malcolmzilla

malcolmzilla

Bronco Guru
Joined
Mar 18, 2003
Messages
1,522
Loc.
Calgary, AB, Canada
Got it all tacked in. Couldn't figure out how to adjust the camera timer, but some pics of belts w/ me in 'em. Comments?
 

Attachments

  • DSC06874 (Medium).JPG
    DSC06874 (Medium).JPG
    45 KB · Views: 17
  • DSC06873 (Medium).JPG
    DSC06873 (Medium).JPG
    101.7 KB · Views: 26
  • DSC06872 (Medium).JPG
    DSC06872 (Medium).JPG
    91.1 KB · Views: 22
  • DSC06871 (Medium).JPG
    DSC06871 (Medium).JPG
    95.1 KB · Views: 15
  • DSC06870 (Medium).JPG
    DSC06870 (Medium).JPG
    76.5 KB · Views: 35
  • DSC06869 (Medium).JPG
    DSC06869 (Medium).JPG
    89.8 KB · Views: 18
  • DSC06867 (Medium).JPG
    DSC06867 (Medium).JPG
    82.8 KB · Views: 27
  • DSC06866 (Medium).JPG
    DSC06866 (Medium).JPG
    102.7 KB · Views: 22
  • DSC06875 (Medium).JPG
    DSC06875 (Medium).JPG
    107.4 KB · Views: 33
  • DSC06876 (Medium).JPG
    DSC06876 (Medium).JPG
    85.9 KB · Views: 29
  • DSC06878 (Medium).JPG
    DSC06878 (Medium).JPG
    81.4 KB · Views: 20

stlkikn

Sr. Member
Joined
Sep 14, 2005
Messages
402
It's either cold in your shop, (and you're wearing layers) or you've been storing up for a long cold winter...

How's that for a comment??

Looking good Malcolm.
From the side views, it almost appears that you could use the horizontal cross bar to anchor the shoulder harness. Use the sliding clips on them to wrap around the bar and snug to a point that is adjustable when you're seated.
p.s. For the many of you that don't know... Malcolms garage is unheated, and winter has kind of settled in this side of the border...
 
OP
OP
malcolmzilla

malcolmzilla

Bronco Guru
Joined
Mar 18, 2003
Messages
1,522
Loc.
Calgary, AB, Canada
Already with the fat jokes Drew? ;D Naw this weather ain't bad... But what should I expect from a dude that shows up in shorts at-20!

I considered loopin' the straps over the cross bar, simpler for sure, but how do you keep 'em located, I suppose passing them through the seat helps.

What about the angle of the laps?

I need to hoist it back into the truck to cut the dash, fab dash mounts and the ebrake assembly supports - these all get cut out when the A pillars pass through.

Also gonna cut and TIG the passenger grab bar to extend further, all the way to the center. Hopefully get it all finished welded out early next week.
 
OP
OP
malcolmzilla

malcolmzilla

Bronco Guru
Joined
Mar 18, 2003
Messages
1,522
Loc.
Calgary, AB, Canada
Finish welded it and got it in the truck...

Worked on the dash today, and e-brake, managed to fab new brackets for the ones that were in the way of the A pillars, and get it all trimmed and mocked up. Dash is quite solid, no rattles hopefully.

Ebrake should work using the stock cable and floorpan holes, angled it in a bit to clear the A pillar, that was way easier than chopping it and the release up and refabbing it all... Straightened the arm, boxed it and made a new pedal.

Gotta pull it out again, gonnna weld on some cargo tie down points, finish weld the e-brake / dash tabs and then clean it up, and paint it and bolt it in. Frame tie-ins will come after I get the 1" body lift in.
 

Attachments

  • DSC06924 (Medium).JPG
    DSC06924 (Medium).JPG
    92 KB · Views: 119
  • DSC06923 (Medium).JPG
    DSC06923 (Medium).JPG
    90.5 KB · Views: 117
  • DSC06944 (Medium).JPG
    DSC06944 (Medium).JPG
    106.4 KB · Views: 260
  • DSC06945 (Medium).JPG
    DSC06945 (Medium).JPG
    101.6 KB · Views: 107
  • DSC06946 (Medium).JPG
    DSC06946 (Medium).JPG
    79.8 KB · Views: 132
  • DSC06947 (Medium).JPG
    DSC06947 (Medium).JPG
    121.9 KB · Views: 132
  • DSC06948 (Medium).JPG
    DSC06948 (Medium).JPG
    48 KB · Views: 111
  • DSC06949 (Medium).JPG
    DSC06949 (Medium).JPG
    63.3 KB · Views: 139

trailpsycho

Bronco Guru
Joined
Dec 11, 2003
Messages
4,856
Looks good Malcolm! What color is that; that also looks great. Looks like you will be on the road soon. Keep up the great progress!
 
OP
OP
malcolmzilla

malcolmzilla

Bronco Guru
Joined
Mar 18, 2003
Messages
1,522
Loc.
Calgary, AB, Canada
Thanks guys, tryin' to get this back on track for spring...

What are my options for a 1" body lift? I am calling around locally, but seems only 2" plastic are in stock... Who does those nice aluminum pucks? I suppose I could buy some aluminum bar stock and fab my own... But it'd be chop saw and hand drilled booty fab! LOL

Since the column is out I thought I might as well try to jam the body lift in right now. What to consider? No shroud yet.. I should have enough length in the steering slip joint and MC lines... The auto shifter linkage I can weld up an extension. Fuel tank is not plumbed yet either and I could use the extra room ther for sure - anything else I need consider?

Edit: Trail, the color is 05 Ford Mustang Lime Green Metallic... My painter recommended stayin' with a late model factory color. I seen it on Stangs and its kinda retro cool but not gawdy. I will be blacking out the grill, dechromed the doors, and doing the black vinyl reproduction sport stripes, the fastback top is black and the flares / bumpers will be black too.
 

70EB

Bronco Guru
Joined
Aug 31, 2003
Messages
1,621
Loc.
Gig Harbor
malcolmzilla said:
What are my options for a 1" body lift? I am calling around locally, but seems only 2" plastic are in stock... Who does those nice aluminum pucks? I suppose I could buy some aluminum bar stock and fab my own... But it'd be chop saw and hand drilled booty fab! LOL
.

I went with the WH new body mounts with the 1" BL built in. No separate blocks.
 
Top