• Just a reminder that you won't be able to start new posts or reply to existings posts in the Archive forum.

    This is where all the old posts go so they can still be used for reference and searched.
  • Welcome to ClassicBroncos! - You are currently viewing the forums as a GUEST. To take advantage of all the site features, please take a moment to register. It's fast, simple and absolutely free. So please join our community today!
    If you have problems registering or can't log into your account, please contact Admin.

cage progress - updates

OP
OP
malcolmzilla

malcolmzilla

Bronco Guru
Joined
Mar 18, 2003
Messages
1,522
Loc.
Calgary, AB, Canada
Yes and no.

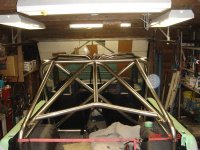
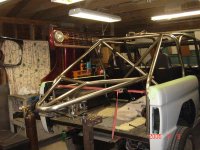
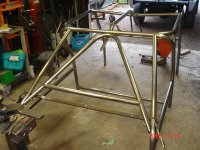
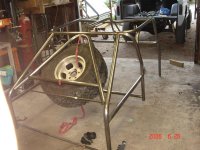
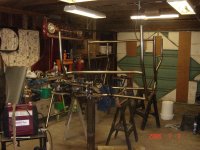
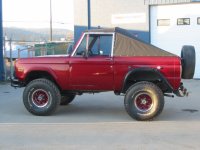
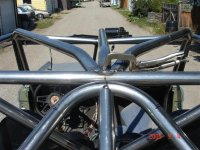
I haven't bent anything from the wrong end or in the wrong plane this time, so thats good, even did a couple reverse bends. This is my 3rd cage, well 2 and 1/2 really...

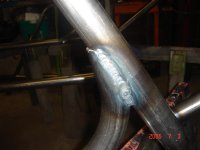
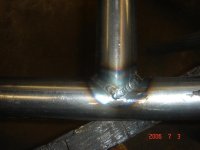
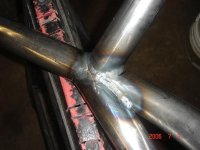
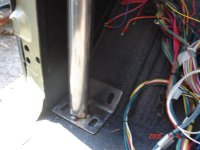
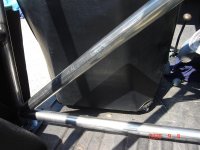
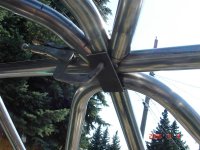
Despite all my math and measuring, there was some trial and error and wasted tube, esp. on the A's thru the dash. and eyeball work the overhead spreaders. Notching by hand for the nodes take a long time.

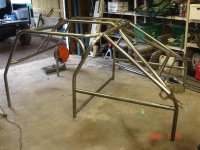
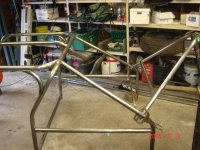
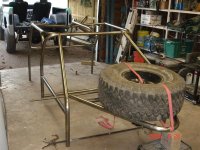
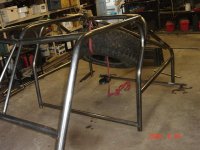
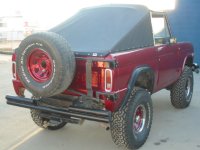
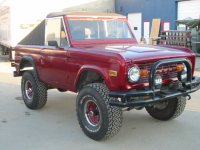
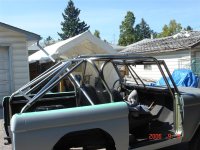
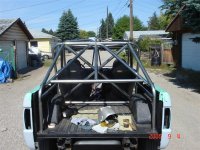
I am really liking the lines of it. I did want something both functional and aesthetic. I hope the spare carrier turns out as I envision, and the ERW is adequate, in hindsight DOM might have been better but my brother (weld tech.) figures the design is the most important thing.

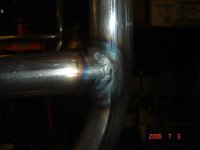
However, my brother is pissed at the amount of TIG work he has to do! ;D We did fill some of the wider notches with MIG 1st and will go over with TIG to look purty, MIG piles up a lot. Frame tie-ins will be MIG'd (out of sight).
 
Last edited:
OP
OP
malcolmzilla

malcolmzilla

Bronco Guru
Joined
Mar 18, 2003
Messages
1,522
Loc.
Calgary, AB, Canada
Working on the swingout spare carrier...
 

Attachments

  • DSC00478 (Medium).JPG
    DSC00478 (Medium).JPG
    95.9 KB · Views: 107
  • DSC00479 (Medium).JPG
    DSC00479 (Medium).JPG
    95.2 KB · Views: 141
  • DSC00480 (Medium).JPG
    DSC00480 (Medium).JPG
    93.7 KB · Views: 166
OP
OP
malcolmzilla

malcolmzilla

Bronco Guru
Joined
Mar 18, 2003
Messages
1,522
Loc.
Calgary, AB, Canada
Drilled the @#$%! sleeve holes for the hinge (but learned how to sharpen 1" drill bits on the grinder), got the sleeve material in and an alignment bar. Mocked up the spare, 35x12.50, sits lower than I thought to clear the yet to be thunk out fastening bracket up top...

I was going to have the bracket off from under the "B" hoop but that requires the tire to sit lower to clear when folding it up... might have it come off the carrier and on top of the "B", that would buy me an inch or two... or sit the carrier up and not flush with the kickers...

Also was gonna fab some form of stops for when its lowered but now think I'll just have it sit on the tailgate!
 

Attachments

  • DSC00492 (Medium).JPG
    DSC00492 (Medium).JPG
    93.3 KB · Views: 61
  • DSC00491 (Medium).JPG
    DSC00491 (Medium).JPG
    103.2 KB · Views: 61
  • DSC00490 (Medium).JPG
    DSC00490 (Medium).JPG
    93.3 KB · Views: 50
  • DSC00489 (Medium).JPG
    DSC00489 (Medium).JPG
    87.2 KB · Views: 54
  • DSC00487 (Medium).JPG
    DSC00487 (Medium).JPG
    89.8 KB · Views: 29
  • DSC00486 (Medium).JPG
    DSC00486 (Medium).JPG
    93.5 KB · Views: 116
  • DSC00488 (Medium).JPG
    DSC00488 (Medium).JPG
    87 KB · Views: 55
Last edited:
OP
OP
malcolmzilla

malcolmzilla

Bronco Guru
Joined
Mar 18, 2003
Messages
1,522
Loc.
Calgary, AB, Canada
Starting to TIG weld it all together. Slow going, lots to do.
Also gotta fab footplates, bend a dash bar grab handle and figure where to sleeve for the seatbelt anchors.
 

Attachments

  • DSC06664 (Medium).JPG
    DSC06664 (Medium).JPG
    39.1 KB · Views: 54
  • DSC06663 (Medium).JPG
    DSC06663 (Medium).JPG
    53.2 KB · Views: 94
  • DSC06662 (Medium).JPG
    DSC06662 (Medium).JPG
    51.3 KB · Views: 69
  • DSC06661 (Medium).JPG
    DSC06661 (Medium).JPG
    69.3 KB · Views: 142
  • DSC06660 (Medium).JPG
    DSC06660 (Medium).JPG
    92.4 KB · Views: 37

El Jefe

Bronco Guru
Joined
Oct 20, 2002
Messages
1,166
-WOW what a great looking design!!!

I personally like the baja-type spare mounting set up: close to what you have, only it mounts the spare in an in-vehicle position. i guess i like it as it will still allow for the little ones to seat in a back seat!!

how many bolts per mounting plate/leg are you going to use? and what size?
 
OP
OP
malcolmzilla

malcolmzilla

Bronco Guru
Joined
Mar 18, 2003
Messages
1,522
Loc.
Calgary, AB, Canada
My train of thought was:

  • do not plan to have passengers in the rear at this point (if i have a copilot i gotta find a spot for the dawg and his harness however)
  • wanted to use the custom fastback softtop that came on my 68 (pics)
  • didn't like the lines of having the spare on the bumper
  • plus if I bump a tree or rock 90% sure the spare on the bumper would tag the tailgate...

So the spare had to go inside... but then, with the B hoop triangulation, kickers, etc the only way to have the spare inside and be able to get it out was the hinged carrier. It uses sleeves and 5/8" grade 8 bolts so should add some structural value. Iit can be removed if I need to haul stuff.

I am also thinking about a way to make the carrier reversible, so if I'm running a bikini top the A frame can be flipped and the spare outside the cage for extra cargo room.

For the A and B feet, I an going to use 4x6" .125 flatbar foot plates with 4 7/16" grade 8's, and 1.75" .120 wall tube frame tie ins with bushings for isolation... fronts will need a bend to match floor pan... the C feet land right in the body C channel, to tight to do much there with that and the spring hangers... I figure in a crash or roll if that gives I have way bigger problems to worry about!
 

Attachments

  • 110-1093_IMG.JPG
    110-1093_IMG.JPG
    84.7 KB · Views: 50
  • 110-1091_IMG.JPG
    110-1091_IMG.JPG
    82.5 KB · Views: 94
  • 110-1092_IMG.JPG
    110-1092_IMG.JPG
    95.9 KB · Views: 46
OP
OP
malcolmzilla

malcolmzilla

Bronco Guru
Joined
Mar 18, 2003
Messages
1,522
Loc.
Calgary, AB, Canada
Little bit more progress:

Need to figure out:

- Seatbelt anchor points (4 pts) - likely drill and sleeve the roll cage "B" lower spreader for the lap belts, maybe add some tube from the center of the "X" to the B pillar for the shoulder belts

- The carrier latch (ideas anyone?) - prolly a 5/8" grade 8 bolt sleeved thru the A frame to a bracket off the bottom of the B hoop

- passenger grab handle - likely bend something out of 1"

Then finish welding then frame tie-ins.
 

Attachments

  • DSC06817 (Medium).JPG
    DSC06817 (Medium).JPG
    69.6 KB · Views: 90
  • DSC06816 (Medium).JPG
    DSC06816 (Medium).JPG
    78.7 KB · Views: 42
  • DSC06815 (Medium).JPG
    DSC06815 (Medium).JPG
    87.6 KB · Views: 91
  • DSC06814 (Medium).JPG
    DSC06814 (Medium).JPG
    99 KB · Views: 103
  • DSC06813 (Medium).JPG
    DSC06813 (Medium).JPG
    104.7 KB · Views: 72
  • DSC06812 (Medium).JPG
    DSC06812 (Medium).JPG
    89.1 KB · Views: 51
  • DSC06811 (Medium).JPG
    DSC06811 (Medium).JPG
    95.9 KB · Views: 98
  • DSC06810 (Medium).JPG
    DSC06810 (Medium).JPG
    106.7 KB · Views: 84

sstlaure

Bronco Slacker
Joined
Jun 7, 2004
Messages
1,881
FWIW...I had fairly good luck using a hole saw w/pilot to make my sleeve holes in the tubing. I drilled a small (3/16") hole to start through both sides of the tubing to make sure I was in the right spot with the hole saw, then I used a 1/4" pilot. Sleeves come together tight enough to the tubing to TIG.

That cage looks great. I like unique/functional designs.
 

Dave

Contributor
Bronco Guru
Joined
Aug 25, 2006
Messages
2,245
Are you happy with the 1.75". I'm in the process of buying dies for my bender and was going to go with 2.25" for the looks but am starting to consider 1.75 with head banger guards.

Dave
 
OP
OP
malcolmzilla

malcolmzilla

Bronco Guru
Joined
Mar 18, 2003
Messages
1,522
Loc.
Calgary, AB, Canada
I am happy with the 1.75" ERW, for a smaller rig I would try 1.5" DOM. 2.25" would be an odd size, and have a large bend radius, and might be hard to bend manually.

I'm not a real fan of the lines of the A-frame carrier, I added the spreader tube a bit closer to the hinges but now kinda like the earlier look better...?:?
Want a bit more flash there, but still also want the structural value... Here's my latest idea...

I am going to pick up some weld on tabs for the seatbelts, screw the sleeving (thanks for the tip sstlaure, i also have a notcher but of course where i need to sleeve i can't fit the notcher on...%)).

I will also probably be adding some tube to attach the shoulder belts just below shoulder level as per this diagram, although late model 3 points mount above the shoulder? Would going up to the "B" for them be OK?

Lap belts will go to the lower "B" spreader.

Lots of work to do yet - grab bar, carrier latch and end cap the carrier, and the spare mount plate - was going to use tube and plate and wheel studs pressed in...

I also need put a heat shrink on top over the funky gusset on the drivers side - we put so much heat in welding those up it pulled on us a bit, as my brother predicted - the B pillar footplate is about 1/4" from flush to the floor, and the A tube could also stand to come back a bit.
 

Attachments

  • desertkartsseatbelt1.jpg
    desertkartsseatbelt1.jpg
    42.9 KB · Views: 44
  • carrier idea.gif
    carrier idea.gif
    125.8 KB · Views: 120
Last edited:

sstlaure

Bronco Slacker
Joined
Jun 7, 2004
Messages
1,881
I used the hole saw without a notcher (Wasn't the easiest thing to do, about ripped my arm off twice, but it can be done.:eek: ) My drill has a level in the body so you can make sure to hit the tubing square.

I 2nd not going larger than 1.75"...there's no real reason to. FWIW...You'll also see the thinning of the tube at the bends more with a larger tube.

1.75" x 0.120 is plenty hard to bend manually. You really regret those "practice" bends when you have to pull in 3 degree increments.

www.aa-mfg.com is a great source for ready made tabs (cheap and fast.)
 
OP
OP
malcolmzilla

malcolmzilla

Bronco Guru
Joined
Mar 18, 2003
Messages
1,522
Loc.
Calgary, AB, Canada
Picked up some belt tabs at lunch. $20 for a pack of 5...
Competition Engineering, look to be 1/4"... Single shear should be OK?
 

Attachments

  • cee-3425_w.jpg
    cee-3425_w.jpg
    16.1 KB · Views: 7

sstlaure

Bronco Slacker
Joined
Jun 7, 2004
Messages
1,881
1/4" thick single shear should be just fine. Same thing I'm running.

The seatbelt brackets (think front seat buckle where it mounts to the seat frame) in newer vehicles are maybe 1/8"-3/16" single shear.

Are you running the 5th point?
 
OP
OP
malcolmzilla

malcolmzilla

Bronco Guru
Joined
Mar 18, 2003
Messages
1,522
Loc.
Calgary, AB, Canada
Scott,

I bought RCI 4 pt with an automotive latch, was thinking 5 point race style I might be lazy and not do it up. I have PRP daily driver seats.

What do you think of mounting the shoulder belts off the B hoop, as opposed to adding more tube? IIRC, the lap belt does the majority of the work anyhow?
 

Attachments

  • rci%204%20point.jpg
    rci%204%20point.jpg
    9.3 KB · Views: 10

sstlaure

Bronco Slacker
Joined
Jun 7, 2004
Messages
1,881
Shoulder belts definitely see a ton of load too. The upper half of your body probably outweighs your legs, so most of your mass is above the lap belt. The momentum of the body needs to be contained. (Speed x mass)

I ran my top attachments back into my shock tower in the rear seat. I kept them level with the hole in the seat, but I didn't add any tube behind the front seats for mine. I don't have pics on this computer or I'd show you what I'm talking about.

If you look at the pic of the rear shock towers I have in my pictures section on here, you may be able to see it. I wanted to keep access to the rear seat (single seat)

You've already got the x-brace cutting off people going into the back seat. I'd go ahead and add the little bit of tubing across the shoulders of the seats to have the belt load path ideal.
 
OP
OP
malcolmzilla

malcolmzilla

Bronco Guru
Joined
Mar 18, 2003
Messages
1,522
Loc.
Calgary, AB, Canada
Thanks for the advice.

I will mock the belts up in the next night or so, both on the existing X brace, and off additional spreaders. Pics of course.

Seats are bolted to the floor thru the stock holes... probably not going to mount em to the cage due to height issues, and no tilt column in the budget (yet).

No A to B (door) spreaders as the frame tie-ins and rocker protection going in underneath should be adequate, and egress is important, want to be able to use it as a daily driver. The kicker frame tie ins are going to be tricky.

Gotta bend some new 1.75" tube for the A frame and the 1" grab handle anyways, so probably will add the 2 shoulder belt tubes in... no plans for rear seat, it will be trail cargo and tools, and gonna use the funky custom fastback softtop.
 

sstlaure

Bronco Slacker
Joined
Jun 7, 2004
Messages
1,881
I would think that you can just run some horizontal stubs between the b-pillar and the x-brace to get the tube at the right height, then you could attach the belt down at the floor tubes and have it travel vertical to the tube, then roll over the tube to horizontal to go through the seats. The belt loads would be applied properly as the tubing would re-direct the forces and you would have a nice clean install.
 
OP
OP
malcolmzilla

malcolmzilla

Bronco Guru
Joined
Mar 18, 2003
Messages
1,522
Loc.
Calgary, AB, Canada
Reworked the spare carrier, boxed in the ends, added a grab handle.
Harness tabs tomorrow.
 

Attachments

  • DSC06819 (Medium).JPG
    DSC06819 (Medium).JPG
    101.6 KB · Views: 91
  • DSC06821 (Medium).JPG
    DSC06821 (Medium).JPG
    98.7 KB · Views: 106
  • DSC06822 (Medium).JPG
    DSC06822 (Medium).JPG
    97.2 KB · Views: 107
Top