• Just a reminder that you won't be able to start new posts or reply to existings posts in the Archive forum.

    This is where all the old posts go so they can still be used for reference and searched.
  • Welcome to ClassicBroncos! - You are currently viewing the forums as a GUEST. To take advantage of all the site features, please take a moment to register. It's fast, simple and absolutely free. So please join our community today!
    If you have problems registering or can't log into your account, please contact Admin.

CPA 75' Frame Off Restoration

DuctTape

Bronco Guru
Joined
Jun 20, 2008
Messages
1,148
Loc.
Bozeman, MT
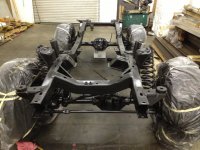
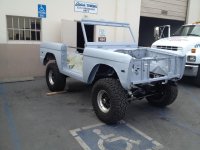
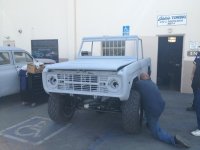
I did por 15 on undercarriage and I like how it came out. Be careful on your choice of matte or gloss, you don't want to hate it after it is done.

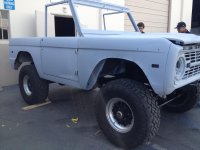
I went carpet interior but I wish I would have lined it with bedliner.

On the engine compartment - I went with body color paint because it was easier and cheaper. I do like the look of a separate color in engine compartment.

Double check on por heat rating in engine compartment before you commit, I can't remember if it melts easy or not.
 

tw322

Sr. Member
Joined
Dec 23, 2011
Messages
459
Looks like you are off and running. I really like the paint on that green one you posted.
 
OP
OP
N

Numberfool

Jr. Member
Joined
Sep 8, 2012
Messages
173
Body came back from being blasted today.

More rust than I had hoped for, but pretty well in the spots I anticipated. Drivers floor worse. Bit of a bummer. Get out the plasma cutter and weld I guess.

Part of the process. Cleaned up the frame, will continue that this week while I wait for the engine and tranny to come back. Bit of some good news... found the PO had done the axles and diff's. Get to paint those up and leave alone.

I think another sheetmetal purchase from TBP is in my future.....
 

Attachments

  • IMG_1148.jpg
    IMG_1148.jpg
    94 KB · Views: 265
  • IMG_1150.jpg
    IMG_1150.jpg
    109 KB · Views: 266
  • IMG_1158.jpg
    IMG_1158.jpg
    78.5 KB · Views: 255
  • IMG_1162.jpg
    IMG_1162.jpg
    70.9 KB · Views: 248
  • IMG_1186.jpg
    IMG_1186.jpg
    130.4 KB · Views: 245
  • IMG_1187.jpg
    IMG_1187.jpg
    105.4 KB · Views: 227
OP
OP
N

Numberfool

Jr. Member
Joined
Sep 8, 2012
Messages
173
Back from Michigan, got a better look at some of the rust spots, not as bad as I thought.

Pulled the trailer hitch that was butchered on, which had spliced the bumper connection points. At that point, the bottoms fell off. Easier just to fab new bottom pieces and weld back on. Pictures show the before and after.

Received a pile of parts from TBP....

From the looks of the heater, looks like a replacement is in order.
 

Attachments

  • photo 1.jpg
    photo 1.jpg
    102.7 KB · Views: 184
  • photo 2.jpg
    photo 2.jpg
    55.6 KB · Views: 162
  • photo 3.jpg
    photo 3.jpg
    88.2 KB · Views: 175
  • photo 4.jpg
    photo 4.jpg
    100.8 KB · Views: 181

bsquared

Contributor
Sr. Member
Joined
Dec 4, 2010
Messages
970
I was in Ventura last weekend seeing an old friend. You live in a beautiful place, man!

Great pics and good luck on the build! Wish I had access to all those tools and shop bays.

Cheers, B2
 

Brawnko

Jr. Member
Joined
Feb 2, 2006
Messages
299
Loc.
Mechanicsville
good to see another bean counter on here! Working on the bronco is therapy for me! Man you are off to the races on your project! Keep up the good work and I will be following!
 
OP
OP
N

Numberfool

Jr. Member
Joined
Sep 8, 2012
Messages
173
I was in Ventura last weekend seeing an old friend. You live in a beautiful place, man!

Great pics and good luck on the build! Wish I had access to all those tools and shop bays.

Cheers, B2

It is nice here indeed. Pretty nice weather year round.

My company manufactures chambers, so it is nice to have some welding tools around. My personal tool collection is a little light, but with the project I am sure its all I will get for Christmas now.... better than ties for dad!

Thought I was all alone out this way and was pleasantly surprised to get an IM from someone right here in my city that just bought an EB and is here on the forum. In true CB member style, he offered to come over and help. Great community of guys here.
 
OP
OP
N

Numberfool

Jr. Member
Joined
Sep 8, 2012
Messages
173
good to see another bean counter on here! Working on the bronco is therapy for me! Man you are off to the races on your project! Keep up the good work and I will be following!

Thanks... much appreciated. Were proving not all bean counters are geeks and cant turn a wrench.... well, at least we will prove the wrench part. On the other hand, I better see if I can get this mess of parts back together before I say either!
 

Scoop

Contributor
Have Bronco, Will Travel
Joined
Feb 1, 2006
Messages
10,814
Loc.
Cuchara, CO
It is nice here indeed. Pretty nice weather year round.

My company manufactures chambers, so it is nice to have some welding tools around. My personal tool collection is a little light, but with the project I am sure its all I will get for Christmas now.... better than ties for dad!

Thought I was all alone out this way and was pleasantly surprised to get an IM from someone right here in my city that just bought an EB and is here on the forum. In true CB member style, he offered to come over and help. Great community of guys here.

Funny you should mention this. If you are truly keeping track of all the costs going into your Bronco project you also need to add in the cost of tools you buy (or receive instead of ties!) I probably have as much in tools as I have in my trail rig! :eek:
 
OP
OP
N

Numberfool

Jr. Member
Joined
Sep 8, 2012
Messages
173
Finished up the the frame painting today. Took much longer to fix the ends of the frame where the bumpers attached and where I had to cut off the trailer hitch. Finished ends are below. Also got by drivers side pan in and new transmission hump.

Spent lots of hours with a wire wheel on the frame. Steam cleaning, wire wheel... metal prep and then a proper coat of POR-15. At near setup of the POR, then added a good top coat of POR's Chassis Black to give it UV protection.

Feels good to have paint on the frame.

Hopefully will have the engine by weeks end.
 

Attachments

  • IMG_1963.jpg
    IMG_1963.jpg
    108 KB · Views: 237
  • IMG_1962.jpg
    IMG_1962.jpg
    76.2 KB · Views: 209
  • IMG_1960.jpg
    IMG_1960.jpg
    94.7 KB · Views: 221
  • IMG_1959.jpg
    IMG_1959.jpg
    60.8 KB · Views: 212
  • IMG_1958.jpg
    IMG_1958.jpg
    83.6 KB · Views: 216
  • IMG_1948.jpg
    IMG_1948.jpg
    73.6 KB · Views: 238
OP
OP
N

Numberfool

Jr. Member
Joined
Sep 8, 2012
Messages
173
Received the tranny and t-case today. Progress is slower, lots of ordering, small progress, waiting on body shop.

Engine should be in Tuesday. Body shop needs the frame next week to do final alignment, then I get the chassis back for good and can start building. I feel like I am chomping at the bit to start assembling and building. Get this feeling sometimes as I walk by a huge pile of parts of "what did I do"... then reality sets back in and I am excited.

Put in an order for brake lines, fuel lines and shocks.

Joy of living in CA, shops arent carring hot tanks anymore. I am just going to do a real good flush on the radiator, then upgrade to an aluminum jobber down the road. Reality is likely with the motor not being stroked out or built up that the standard radiator setup is adequate. Thats my justification for not spending extra bucks on it right now....
 

Attachments

  • IMG_1964.jpg
    IMG_1964.jpg
    117.8 KB · Views: 104
  • IMG_1972.jpg
    IMG_1972.jpg
    77 KB · Views: 89
  • IMG_1971.jpg
    IMG_1971.jpg
    104.5 KB · Views: 100
  • IMG_1970.jpg
    IMG_1970.jpg
    103.4 KB · Views: 92

BluebroncoNC

Bronco Guru
Joined
Jul 30, 2007
Messages
1,728
Loc.
Asheville, NC
I went with body color inside of the engine compartment, to the bottom of the cowl, por-15 the frame and rest of the underside. You can click the link on my sig to see pic's.

good luck.
 
OP
OP
N

Numberfool

Jr. Member
Joined
Sep 8, 2012
Messages
173
I went with body color inside of the engine compartment, to the bottom of the cowl, por-15 the frame and rest of the underside. You can click the link on my sig to see pic's.

good luck.

Thanks.... I was talking with my body shop today and they recommended the same dividing lines on body paint / vs POR-15.
 
OP
OP
N

Numberfool

Jr. Member
Joined
Sep 8, 2012
Messages
173
Chassis made the trip back to the body shop to be test fit with the body, alignment done,etc. After, I get the chassis back and can start motor / driveline assembly.

Pictures show the body having a frame reunion. Have to make some decisions soon.... whether to add the chrome trim strips across body and doors (bought them and leaning that way) and whether to linex the interior or not.

BC Broncos made me up some brake lines and fuel lines. Looking forward to installing it all.

Welding / Body repair will be starting. Blasting revealed some bondo fixes from the past.. picture 3 you can see on the door.
 

Attachments

  • IMG_1981.jpg
    IMG_1981.jpg
    73.5 KB · Views: 155
  • IMG_1980.jpg
    IMG_1980.jpg
    95 KB · Views: 170
  • IMG_1978.jpg
    IMG_1978.jpg
    84.6 KB · Views: 153
  • IMG_1977.jpg
    IMG_1977.jpg
    82.3 KB · Views: 198
  • IMG_1976.jpg
    IMG_1976.jpg
    73.9 KB · Views: 160
  • IMG_1974.jpg
    IMG_1974.jpg
    78 KB · Views: 151
OP
OP
N

Numberfool

Jr. Member
Joined
Sep 8, 2012
Messages
173
Alright, I strive to be a man of my word. I said this was a CPA build and would post costs.

Here is where I am as of today. Long way to go. Still completely in pieces, no exhaust (thanks for the PM here on the forum, think I picked up a nice magnaflow), no shocks and a boatload of interior work and engine work as it goes back together.

Had high aspirations of driving it home from the body shop. Long gone on that. I dont want anyone touching it after paint. I want to gently install every part myself.

Glad my wife doesnt read the forums to see this cost sheet. Ill post updates to it as the build goes along.
And yes, zero tool costs accounted for. You guys will have to grant me that glaring denial of cost.
 

Attachments

  • Build Cost at 11-2-12.PNG
    Build Cost at 11-2-12.PNG
    13.6 KB · Views: 277

DuctTape

Bronco Guru
Joined
Jun 20, 2008
Messages
1,148
Loc.
Bozeman, MT
And yes, zero tool costs accounted for. You guys will have to grant me that glaring denial of cost.

Goes without saying!

I keep track too, and I make myself feel better about the economic loss by reminding myself it isn't an investment, it's a hobby.
 
OP
OP
N

Numberfool

Jr. Member
Joined
Sep 8, 2012
Messages
173
Things are moving slower than I would like, not for lack of desire. Took 2 extra weeks to get the motor back... Seemed like poor logic for me to rush the builder of it.

Have the motor back, have started reassembly. Got the flywheel back on and started now sorting through all the small parts that need to be painted or replaced.... The enevitable "while your at it" which essentially means, open your wallet.

Should have the chassis back from body shop Monday and can start putting the things on it. Have a pile of parts I would love to bolt together.

ImageUploadedByTapatalk1353609486.170925.jpg
 
Top