• Just a reminder that you won't be able to start new posts or reply to existings posts in the Archive forum.

    This is where all the old posts go so they can still be used for reference and searched.
  • Welcome to ClassicBroncos! - You are currently viewing the forums as a GUEST. To take advantage of all the site features, please take a moment to register. It's fast, simple and absolutely free. So please join our community today!
    If you have problems registering or can't log into your account, please contact Admin.

CPA 75' Frame Off Restoration

OP
OP
N

Numberfool

Jr. Member
Joined
Sep 8, 2012
Messages
173
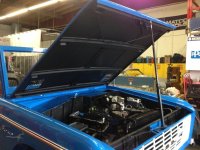
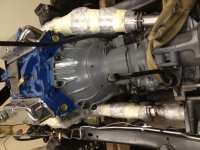
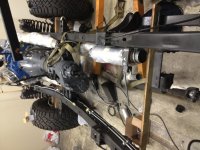
Motor is back on the chassis. Got the transmission and transfer case mounted up. Torque converter was a bit of a challenge getting mated up in the housing, but it got there with enough persuasion.

Lots of fun swimming through parts and finding the right nuts and bolts. I bagged and tagged everything, but still managed to lose a water pump and motor mount nuts.

Got the gas tanks flushed and started another parts order for the small things I can't resist replacing "while I'm at it".

Will start brake lines and fuel lines next week.

ImageUploadedByTapatalk1354427450.259047.jpg
ImageUploadedByTapatalk1354427465.383432.jpg
ImageUploadedByTapatalk1354427491.173484.jpg
 
OP
OP
N

Numberfool

Jr. Member
Joined
Sep 8, 2012
Messages
173
Brake lines are connected in the back, new hard lines to the front (thanks BC Broncos). Drive line is back in and connected up.

Fuel lines tomorrow. Been too long, have to sort out the fuel selector switch, which is not entirely making sense the first time a laid out the lines. Doing hard lines on the fuel and moving the filter before the switch. PO had the filter inches before the carb.

Of course, I was an idiot and gleefully tore out my "smog" canister thinking I'm exempt and can get rid of it. Just whacked it all out not even looking at lines. Then became a junkee on this forum and realized that canister serves a bigger purpose.... Keeping my wife happy that the garage doesn't smell like gas. Need to sort out how to hook it up. Wondering why Ford didn't push it to the rear. I think it was by the passenger floor board when I cut it out.

Floor boards are out. Replacing both sides and the tranny hump. Will weld in, then Linex the underneath. Was going to do inside, changed my mind. Will paint and then duramat, etc.

I get the captain obvious award in this next statement: This is a lot of work. Would still do it and thoroughly enjoying it. But, I thought I knew when I started, but really didn't comprehend the level of work. Yes, and money. Everyday it's more parts... The small stuff adds up and adds time to the build. I am enjoying it and oddly think I will end up with way more of an attachment to it. Had lots if jeeps before and redid them, never frame off.

Body goes to paint in another week... Still not even close on a color. Would like blue, really like a green as well. Trying to sort out if I will stick to an official 75' color or just paint it a color I think is nice.

ImageUploadedByTapatalk1354681984.373910.jpg
ImageUploadedByTapatalk1354682065.865144.jpg
ImageUploadedByTapatalk1354682097.333083.jpg
ImageUploadedByTapatalk1354682116.585501.jpg
ImageUploadedByTapatalk1354682137.228124.jpg
ImageUploadedByTapatalk1354682156.058298.jpg
 
OP
OP
N

Numberfool

Jr. Member
Joined
Sep 8, 2012
Messages
173
Well, two steps forward, one step back. I guess I should be grateful for forward progress.

Was putting the harmonic balancer on, rotating the crank and noticed the starter seemed to catch. Pull it and found the flex plate has a slight warp to it. I had reused it as it looked fine. Rebuilt everything except that, would have been quite a shame to start her up and hear that noise. Actually, I'm pretty grateful to have found it before the body went on. Funny part was before I tore her apart, I heard a light "tink, tink, tink" at certain idle speeds. Never knew what it was and my brother in law and I after crawling under and listening, assumed it was the torque converter. Now that I look at the starter, I can see a light wear on its nose. $70 at the speed shop and a new one is on its way. Hope to put the tranny back on (again), next week.

Floor boards are done and welded up.

ImageUploadedByTapatalk1355031671.531843.jpg
ImageUploadedByTapatalk1355031715.376868.jpg
 
OP
OP
N

Numberfool

Jr. Member
Joined
Sep 8, 2012
Messages
173
Having all sorts of issues getting a proper flexplate. Been through ordering, checking, none fit. Order a stock plate, the bolt pattern is an inch off. Finally, was told by a dealership that yeah, Ford changed that.... you have to buy a new torque converter. Spent another $100, we will see on Weds if it solves it so I can button up the tranny to the engine.

Decided to start on the exhaust.

Ordered the 2-1 kit from BC. They fully disclosed to me I have long headers, its made for shorties. Told them I would cut and modify. Gone pretty smooth so far. See pics attached.

Hoping for some advice on the interference of the left side tube to the front driveshaft. Looks really close to me. These were the original headers from the PO, I just had them dipped. SO, he was running it like this before. But, geez, it looks close. Wondering if anyone has advice on that or if I need to make a cut on the header tube end, flare it out a bit, then weld up the flange to give me more breathing room.
 

Attachments

  • photo 1.jpg
    photo 1.jpg
    106.3 KB · Views: 150
  • photo 2.jpg
    photo 2.jpg
    113.2 KB · Views: 139
  • photo 3.jpg
    photo 3.jpg
    113.5 KB · Views: 148
OP
OP
N

Numberfool

Jr. Member
Joined
Sep 8, 2012
Messages
173
Thought I would do an update.

Exhaust system is in and done. Engine is buttoned up as much as can be done until the body is on.

STILL trying to get my flexplate replacement. Been struggling for weeks. Viperwolf diagnosed it in about 30 seconds via a picture and sent me the proper part #s to replace the torque converter and its matching plate. Should arrive tomorrow and hopefully tranny goes on.

Body work is wrapping up. See pics attached.

Also, went skiing with the family this weekend. Ended up grabbing a uhaul trailer and towing home a 71 in very original condition. Seemed like normal behaviour at the time. Going to eventually build it for my daughter.

u6amutaz.jpg
aqegejyt.jpg
myja9ute.jpg
eve9e8az.jpg


The impulse buy:
ty7ytepy.jpg
 

Fireball05

Bronco Guru
Joined
Oct 7, 2012
Messages
1,822
Details and more photos of the 71?

Bet you aren't going to keep a detailed cost spreadsheet on that build! :)
 
OP
OP
N

Numberfool

Jr. Member
Joined
Sep 8, 2012
Messages
173
Details and more photos of the 71?

Bet you aren't going to keep a detailed cost spreadsheet on that build! :)

Its a 1971. Very original condition. Its cut in the rear, but the same family owned it since the early 70s. Its been non-operated and unregistered since 1996. Floors and body are clean. Hood is rusted out.

302, 3 on the tree, Dana 44 up front, 9" rear.

Still sorting out my plans for it. Money and time will probably determine how far I take it.

Here are the photos. Work on the hood already started. I told my body shop he could fix it if he could do it for less than a new hood. Pic attached.
 

Attachments

  • IMG_2222.jpg
    IMG_2222.jpg
    79.1 KB · Views: 91
  • IMG_2226.jpg
    IMG_2226.jpg
    85.6 KB · Views: 95
  • IMG_2224.jpg
    IMG_2224.jpg
    83.8 KB · Views: 96
  • IMG_2223.jpg
    IMG_2223.jpg
    88.1 KB · Views: 110
  • IMG_2219.jpg
    IMG_2219.jpg
    75.2 KB · Views: 102
  • IMG_2227.jpg
    IMG_2227.jpg
    83.3 KB · Views: 131

Fireball05

Bronco Guru
Joined
Oct 7, 2012
Messages
1,822
Looks pretty darn nice! That hood looks a lot like mine. Would be interested to hear how the repair goes. I think the inside layer which is actually the support piece will be the tricky part.
 
OP
OP
N

Numberfool

Jr. Member
Joined
Sep 8, 2012
Messages
173
Looks pretty darn nice! That hood looks a lot like mine. Would be interested to hear how the repair goes. I think the inside layer which is actually the support piece will be the tricky part.

You nailed it.... The 2nd layer was shot as well.

ImageUploadedByTapatalk1357011444.610719.jpg
ImageUploadedByTapatalk1357011456.876547.jpg
ImageUploadedByTapatalk1357011469.180099.jpg

Got the body off the frame. It'll be months I am sure before I take it much further. Have to get the 75' done.

ImageUploadedByTapatalk1357011526.128444.jpg ImageUploadedByTapatalk1357011550.778168.jpg ImageUploadedByTapatalk1357011575.908208.jpg
 

broncosbybart

Bronco Guru
Joined
Mar 13, 2002
Messages
2,644
Just stumbled across this thread. Great work and congrats on the impulse buy. The addiction begins....
 

Kurt

Full Member
Joined
Nov 10, 2001
Messages
555
Loc.
Badger State
I like how the body panels are in place while the final bodywork is done. I will definitely be doing the same on my build, in order to finalize proper alignment before painting.
 
OP
OP
N

Numberfool

Jr. Member
Joined
Sep 8, 2012
Messages
173
Progress....!

Odd-ball flex plate issue was solved (huge thanks to viperwolf) and the tranny and t case are back on the chassis.

Rolling chassis was delivered back to paint shop and.....

Doors and front clips started paint today.

See pics below. Very happy to see color going on after 4 months of work.

I have started a complete tear down on the 71 I picked up, but will give that one a head start before I put together a build thread. It will be a Luber.

I will post completed paint photos once its done with color sanding.

ImageUploadedByTapatalk1357787600.484786.jpg ImageUploadedByTapatalk1357787610.860648.jpg ImageUploadedByTapatalk1357787620.591702.jpg
 

Fireball05

Bronco Guru
Joined
Oct 7, 2012
Messages
1,822
That thing is gonna be pretty! What color blue did you go with, and what about SS vs. BC/CC? Sorry if I missed that information.

Please keep me posted with how that hood repair goes on the 71. Thx!
 
OP
OP
N

Numberfool

Jr. Member
Joined
Sep 8, 2012
Messages
173
That thing is gonna be pretty! What color blue did you go with, and what about SS vs. BC/CC? Sorry if I missed that information.

Please keep me posted with how that hood repair goes on the 71. Thx!

Thanks... I am happy with the color as well. I finally just relinquished color control and let the women in my life make the call.


It is PPG 2611, Light Grabber Blue
Dash, stripes, etc will be Wimbledon White 8378
Ended up going single stage. Lots of merit on both sides... It was 50/50.
It will get three coats, then water sand, take off a layer or two, and shoot 2 more.
 
OP
OP
N

Numberfool

Jr. Member
Joined
Sep 8, 2012
Messages
173
CPA 75' Frame Off - * Finally Home From Paint

Time for an update:

Tow truck just dropped her back home....

- Paint is done
- Flares are on
- Raptor Liner on the inside, tail gate, engine bay and underhood
- Driveline is roughly back together

Excited to get back to work.... the reality of getting a vehicle running that I drove before tearing it apart of course comes to mind...
 

Attachments

  • Photo Jan 17, 9 33 34 PM.jpg
    Photo Jan 17, 9 33 34 PM.jpg
    102.3 KB · Views: 197
  • Photo Feb 02, 2 56 53 PM.jpg
    Photo Feb 02, 2 56 53 PM.jpg
    101.4 KB · Views: 215
  • Photo Feb 02, 2 57 17 PM.jpg
    Photo Feb 02, 2 57 17 PM.jpg
    108.4 KB · Views: 214
  • Photo Feb 05, 4 51 52 PM.jpg
    Photo Feb 05, 4 51 52 PM.jpg
    88.5 KB · Views: 220
  • Photo Feb 05, 4 53 43 PM.jpg
    Photo Feb 05, 4 53 43 PM.jpg
    87.4 KB · Views: 191
  • Photo Feb 05, 4 53 55 PM.jpg
    Photo Feb 05, 4 53 55 PM.jpg
    83.6 KB · Views: 181
  • Photo Feb 05, 4 51 41 PM.jpg
    Photo Feb 05, 4 51 41 PM.jpg
    99.5 KB · Views: 215
OP
OP
N

Numberfool

Jr. Member
Joined
Sep 8, 2012
Messages
173
Started on the Centech harness today.
So far, pretty good. I have been worried about the quality and such. I went down to the National Roadster show at Pomona a few weeks back and Painless had a booth there. The quality of theirs looked phenomenal... So of course I have been worried about my decision to save 300-400 and go with the Centech. Looms seem decent so far though. . A couple items where the runs are too long or not long enough... Such as side marker lamps. But, it's too early to sort out yet. Put about 3 hours in. But all in all a good clean set and start. I'll post pictures of the wiring install if anyone is interested.

Hoping to be done with the wiring by next week and actually have this thing run for the first time since last September.
 
Top