• Welcome to ClassicBroncos! - You are currently viewing the forums as a GUEST. To take advantage of all the site features, please take a moment to register. It's fast, simple and absolutely free. So please join our community today!
    If you have problems registering or can't log into your account, please contact Admin.

Dana 44 disc front for 76-77

Crawdad

Bronco Guru
Joined
Feb 16, 2011
Messages
3,635
I'm looking for videos, links, How to's, or websites to help me break down my 76-77 Dana 44 disc front axle. I'm looking to break it down to a point and pass on to someone with way more experience than I have. I have watched lots of videos of jeep, chevy etc Dana 44s and I haven't seen a single EB front axle. All I want to do is learn how to remove the locking hub all the way to removing the axle shafts. If it means I need to open the case and unbolt a nut or four to release the axle shaft that what I need to know. I may have not searched well enough so much thx in advance.
Matt
 

71Broncitis

Full Member
Joined
Dec 1, 2014
Messages
152
Pick up a Chilton's manual (better yet, a Ford shop manual).

Not to be a smart ass, but if you intend on turning it over to someone else, tearing it apart is the easy part (lefty loosey). ;)


Sent from my XT1254 using Tapatalk
 
OP
OP
Crawdad

Crawdad

Bronco Guru
Joined
Feb 16, 2011
Messages
3,635
I've gotta remove the big snap ring somehow. I found it late last night and didn't get heavily involved. I figure I can pick away at it till it falls out. It's the Jam Nuts and will I need a specific socket to remove those? I'm seeing guys on YouTube use a flat head screwdriver and hammer. You guys may have some luck with that approach and if it works I'll do it too.
 

Attachments

  • IMG_2642.jpg
    IMG_2642.jpg
    157.2 KB · Views: 145
  • IMG_2643.jpg
    IMG_2643.jpg
    114.2 KB · Views: 136
OP
OP
Crawdad

Crawdad

Bronco Guru
Joined
Feb 16, 2011
Messages
3,635
What are you planning to hand it off for? just curious, getting the axle shafts out is quite easy. Like 71 said, the manual will give you good instructions.

A friend of mine owes me a favor. He is going to change my gears to 4.56s something of which I want no part of. My plan is to give him one of my two 3rd member and give him the D44 housing minus the axles on out. Basically I'm making it easy on me to pick up and take to him.
 

chuck

Bronco Guru
Joined
Aug 14, 2001
Messages
6,474
Loc.
Ingram, Texas
remove the spring with a pick or small screwdriver, put a couple of screws back into the hub and you should be able to just pull it out. remove the caliper. Buy the d-44 spindle nut socket from anyplace, I like the one with the teeth on the inside because it does not slip. take the outer nut off then the lock washer then the inner nut. The hub/rotor should pull off, then remove the 5 spindle nuts and pull the spindle now you can pull the axles. If you want this is the time to remove the knuckles.
 

thegreatjustino

Contributor
Red Head Grease Monkey
Joined
Jan 23, 2002
Messages
15,751
Loc.
Stockton, CA
The front axle is made by Dana corporation. It's a model 44. If you've watched them take a Dana 44 apart on a GM and Jeep, the Bronco 44 is for the most part the same. They're all Dana 44s.
 

DirtDonk

Contributor
Bronco Guru
Joined
Nov 3, 2003
Messages
47,821
Even if you're just pulling things apart for your friend to work on, at some point presumably you're going to be doing routine maintenance on this rig? If so you MUST own a spindle nut socket. Agree with Chuck that the ones with the four prongs recessed or internally are easier to use, but whatever you get can still work as long as it's the correct size.

And if people are still promoting the hammer-n-screwdriver method in this modern day of easy to access information, then it's a lost cause we're ever going to get rid of it completely.
People did that before they knew the tools existed, or were in a bind and could not do it any other way. But can you imagine trying to apply accurate torque to the inner nut, or even getting close to the 70lb minimum torque of the outer? Good luck with that!

So yeah, get the tool.
When you try to put it all back together you'll be thanking yourself for being so foresighted!
True too, for the next time you re-pack your wheel bearings.

Paul
 
OP
OP
Crawdad

Crawdad

Bronco Guru
Joined
Feb 16, 2011
Messages
3,635
Even if you're just pulling things apart for your friend to work on, at some point presumably you're going to be doing routine maintenance on this rig? If so you MUST own a spindle nut socket. Agree with Chuck that the ones with the four prongs recessed or internally are easier to use, but whatever you get can still work as long as it's the correct size.

And if people are still promoting the hammer-n-screwdriver method in this modern day of easy to access information, then it's a lost cause we're ever going to get rid of it completely.
People did that before they knew the tools existed, or were in a bind and could not do it any other way. But can you imagine trying to apply accurate torque to the inner nut, or even getting close to the 70lb minimum torque of the outer? Good luck with that!

So yeah, get the tool.
When you try to put it all back together you'll be thanking yourself for being so foresighted!
True too, for the next time you re-pack your wheel bearings.

Paul

The 70 lbs torque was what I was looking for when I put it all back together. That's 70 lbs for the outer nut, what's the torque for the inner jam Nut?
 
OP
OP
Crawdad

Crawdad

Bronco Guru
Joined
Feb 16, 2011
Messages
3,635
Managed to get the big snap ring out in like five minutes. The other round inside part came out with ease.

All that was left was the two Jam Nuts and washer. By the grace of the Bronco Gods I remembered my dad had a large socket in his bronco part stash he gave me yrs ago. As it turned out it was a spindle nut socket. It's so nice to have the right tools for the job. From the videos I've watched the washer is between the two Jam Nuts, but my washer was on the very outside of the two Jam Nuts. One JN has a nipple and should go first with nipple pointing out. The washer sits on top of that JN with the nipple resting in one of the holes. The last JN goes on last. Is this correct?

The spindle and caliper brackets are stuck on. I took a wooden block and 5 lb hammer and started beating. It did not budge so Im gonna soak it with WD40 overnight.
 

DirtDonk

Contributor
Bronco Guru
Joined
Nov 3, 2003
Messages
47,821
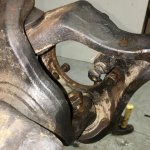
Yeah, those spindles can be a bear.

The exact procedure for the front bearings is often misrepresented on the internet as well.
And the 70 lb torque value is a good "minimum" to use. I've never had one not work at 70, but the range over the years has ranged from 70 to 120 or so. I use 80-100 generally.

The steps are thusly...

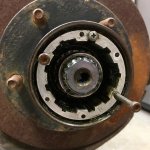
1. Inner "adjusting" nut with the little pin pointed outward has a two-stage setting:
1a. Initially torqued to 50 ft lbs while spinning the wheel/rotor. This seats the cup/race and squeezes excess grease out of the rollers for a more accurate setting.
1b. Back off the nut a quarter turn/90°.
Ignore how loose the bearings are now. That will change.

2. Slide the lock ring on with the inner tab in the groove on the spindle obviously. The holes are slightly offset, so if one does not line up with the pin you can flip the ring over and try again. If it still does not line up and pop right in a hole, you can reach around the ring and turn the inner nut just enough to line up with the nearest hole.
If it's really close, it usually doesn't really matter if you loosen or tighten the nut.

3. Torque outer lock/jam nut to 80-100 lbs.
This final torque not only locks things in place, but it imparts enough force to literally stretch the spindle and tighten the wheel bearings from that very loose setting, to a free-play level of between .001" and .010" specification. Anywhere in between those two is fine.
When following this procedure as I outlined, mine has always fallen right about .006" as measured with a dial-indicator. Without fail.

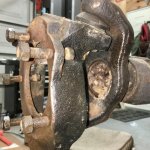
And while you're making sure it's all in good shape, and your hardware sounds like it was installed incorrectly, verify the condition of a few things.
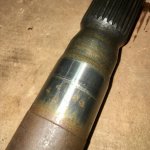
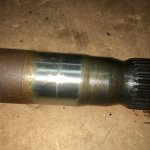
First make sure the pin on the inner nut is still intact and long enough to engage one of the holes in the ring. Not sure how it didn't get wiped off when the outer nut was up against it, but if you see it's still there, great. They're very often wiped out from incorrect installations.
Next make sure the locking ring's tab is not worn off to the point it won't stay inside the groove on the spindle. If you can line it up with the pin and still spin it around by hand, and it spins the inner nut, you must replace it. Hopefully if that's the case, it turns out to be only the lock ring and not the groove that is worn.

A little wear and tear on the notches in the nuts is not grounds for replacement. But if they're really buggered up it can make it hard to use the wrench.

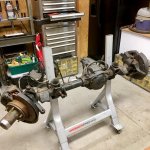
Good luck. Sounds like it's coming along.

Paul
 
OP
OP
Crawdad

Crawdad

Bronco Guru
Joined
Feb 16, 2011
Messages
3,635
Thx Paul,
This is a pic of where I left off last night after tucking the kiddos in for bed. I figure if I knock in the inner bolts that it would pop off but that didn't happen. Thx for the directions. I'll update once I get both sides broken down. Thx again!
Matt
 

Attachments

  • IMG_2644.jpg
    IMG_2644.jpg
    177.2 KB · Views: 170

66broncoCT

Contributor
Full Member
Joined
Feb 6, 2012
Messages
301
Loc.
Torrington, CT
There is a slide hammer attachment for getting those off. Its a tight fit when everything's new but when its rusted in between the spindle and the knuckle it might as well be welded. The attachment I'm talking about threads on the end of the spindle then you just bang it off with the slide hammer. Most auto parts stores rent them out. There's also a tool that threads on the end and has a bolt through the middle that forces against the axle shaft and pushing the spindle out. Never used that one but should work fine too. Looks like nick's trix sells it through WH and Bronco Graveyard:
http://www.nickstrix.com/products.html
 

chuck

Bronco Guru
Joined
Aug 14, 2001
Messages
6,474
Loc.
Ingram, Texas
If you have a slide hammer put a spindle nut back on and use the s-hammer on it. If you have the 5 nuts removed only rust is holding it on. Removing the studs will not help.
 

DirtDonk

Contributor
Bronco Guru
Joined
Nov 3, 2003
Messages
47,821
Yeah, familiar territory. Definitely keep it soaking in penetrating oil, because it's a combination of a pretty decent press-fit and years of moisture creating just the right environment for "natural welding" to take place.
The disc brake caliper brackets do make it a bit easier, with the leverage and handles it affords, but don't hit or pull on them too hard trying to get them off, or you could tweak them to the point that the calipers can bind up.

In the worst case scenarios, you need a slide-hammer puller or a spindle removal tool like our #9214 on this page: http://www.wildhorses4x4.com/category/s?keyword=spindle+tool

And speaking of caliper brackets... The Ford design is actually very robust and works well. But it's even more critical than most that the sliding surfaces be kept clean and lubed. I always dress them down with a file, then use anti-seize lube during assembly.

Paul
 
OP
OP
Crawdad

Crawdad

Bronco Guru
Joined
Feb 16, 2011
Messages
3,635
The penetrating fluid may have helped a tad but still had to knock it a few times. After shoving three screwdrivers and the use of an air hammer it finally popped off. The axle slid right out and man was it ugly. Going to HF tomorrow to buy a Bearing Press Kit to remove the knuckle. With yaws help I've been able to get a lot done. Thx guys!
Matt
 

Attachments

  • IMG_2646.jpg
    IMG_2646.jpg
    180.6 KB · Views: 98
  • IMG_2647.jpg
    IMG_2647.jpg
    153.6 KB · Views: 89
OP
OP
Crawdad

Crawdad

Bronco Guru
Joined
Feb 16, 2011
Messages
3,635
Pics of the axles

Should I replace or just clean up very well and rebuild?
 

Attachments

  • IMG_2650.jpg
    IMG_2650.jpg
    130.2 KB · Views: 87
  • IMG_2651.jpg
    IMG_2651.jpg
    134.5 KB · Views: 76
  • IMG_2649.jpg
    IMG_2649.jpg
    138.8 KB · Views: 82
OP
OP
Crawdad

Crawdad

Bronco Guru
Joined
Feb 16, 2011
Messages
3,635
Pic of caliper bracket and spindle

Lots of rust and undercoat.
 

Attachments

  • IMG_2648.jpg
    IMG_2648.jpg
    181.3 KB · Views: 70

DirtDonk

Contributor
Bronco Guru
Joined
Nov 3, 2003
Messages
47,821
Should I replace or just clean up very well and rebuild?

Well, the shafts themselves are pretty pitted and that could introduce stress riser areas, but the sealing surface looks usable with a little dress-up.
If you're not going to hot-shoe it around and do lots of heavy four-wheeling, I'd just dress up the seal area and call them good.

I would take some 400-1000 sandpaper, or crocus cloth, or Emory cloth, or whatever your preferred weapon is, and smooth the area that's already polished, particularly the groove where the seal has worn into the metal over the years.
If you can easily and quickly smooth it to the point where your fingernail doesn't catch on it (or just barely does even) then I'd say you're good.
Only you can tell for sure though if the groove is too deep to mess with. But I've seen worse come back to the living and work well.

A secondary line of defense is that when you install the new seals, you can seat them at a slightly different level. This puts the lip on a different point of the axle. Presumably far enough to reach undamaged surface.
I actually don't know if a 44 seal is capable of being seated to a different level though, like other types are. Maybe someone else can tell you if that's the case. I've only done a few and have never had to change the level.

Good luck.

Paul
 

chuck

Bronco Guru
Joined
Aug 14, 2001
Messages
6,474
Loc.
Ingram, Texas
Use a scraper like a 1" washer on the end of a rod to scrap the dirt out of the tube and be sure to hold the axle spline end up when installing to keep from pushing dirt into the diff. PS you have to remove the carrier to replace the inner seals.
 
Top