• Welcome to ClassicBroncos! - You are currently viewing the forums as a GUEST. To take advantage of all the site features, please take a moment to register. It's fast, simple and absolutely free. So please join our community today!
    If you have problems registering or can't log into your account, please contact Admin.

DIY bumper/tire carrier

pocketlock

Contributor
Jr. Member
Joined
Oct 29, 2022
Messages
124
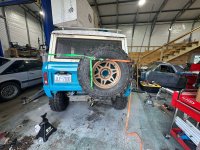
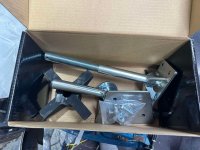
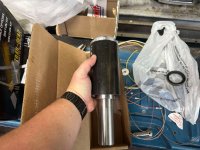
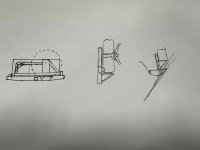
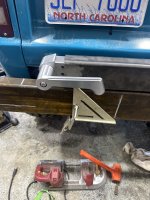
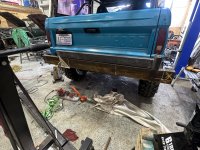
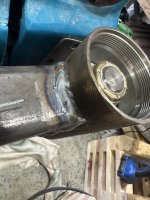
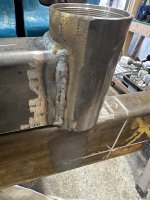
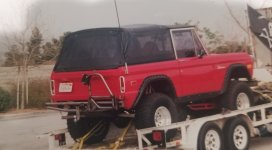
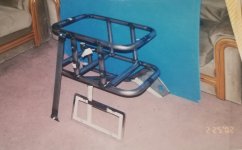
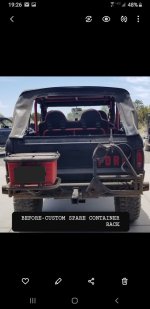
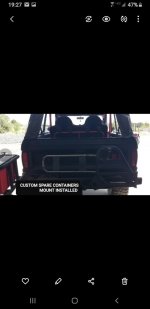
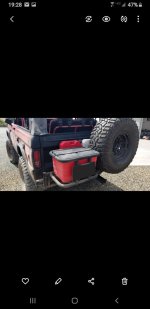
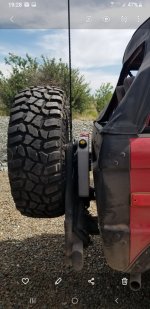
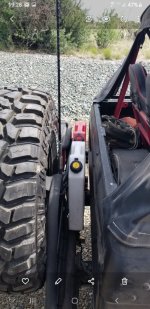
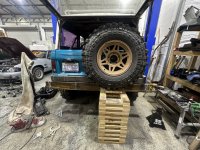
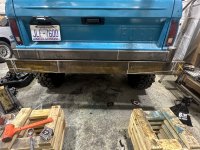
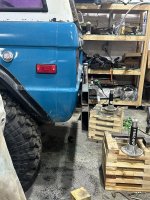
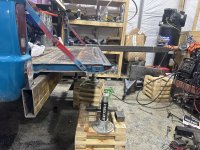
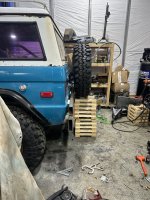
Started taking a welding/offroad fabrication class at the local community college. I've been welding for a decade now, but mostly self taught. I figured some actual instruction wouldn't hurt. As part of the class we are doing a couple of welding projects. The two I decided to do are to build a tire carrier bumper and rock sliders. I've ordered 2x6x3/16 steel for both. I ordered a summit machine spindle and a tire mount similar to the genright style jeep mounts. The bumper plans will be to taper the ends of the bumper up slightly and wrap around the edge with some plate to act as lower corner guards. I have 37x12r17 SX2 tires so I'm trying to figure out how to keep the tire as out of the way as possible. My plans are to have the tire as low as possible to still be able to see out the back window, and to keep it clear of the tail lights. This creates an issue when it comes to departure angles. My current thoughts to help on 2 counts, is to build a small skid underneath the tire. This will act as a shield to protect the tire from sharp dropoffs, following the departure angle to keep out of the way generally, and act as a ledge to rest the tire on when I am tightening the spindle for the tire mount. The tire mount will also be adjustable to allow me to change if I go up or down a tire size in the future. Figuring enough range to cover 35-40" tires. I'll include some rough pictures to see what everyone thinks. But wanted to get some opinions on if this is a terrible idea or if it should work. Also planning to have a cooler mount on the swingout and a small table that will create a small corner with the tailgate to take a break on the trails, grab lunch, etc. Thanks!
 

Attachments

  • 457095735_535844112251036_3493479595578967260_n.jpg
    457095735_535844112251036_3493479595578967260_n.jpg
    304.7 KB · Views: 81
  • 458089679_481381468204532_4012319753351927773_n.jpg
    458089679_481381468204532_4012319753351927773_n.jpg
    200.1 KB · Views: 83
  • 455675169_1726757928059952_2532862843009020587_n.jpg
    455675169_1726757928059952_2532862843009020587_n.jpg
    186.3 KB · Views: 84
  • 458754355_966689688553014_4311833854489100723_n.jpg
    458754355_966689688553014_4311833854489100723_n.jpg
    78.6 KB · Views: 87
OP
OP
P

pocketlock

Contributor
Jr. Member
Joined
Oct 29, 2022
Messages
124
I'd love to see what others have built to keep their tire safe and low, but on the outside of the vehicle. Unfortunately with a 37 and a kid coming, in the bed of the bronco isn't a good choice anymore.
 

Yeller

Contributor
Bronco Guru
Joined
Mar 27, 2012
Messages
6,518
Loc.
Rogers County Oklahoma
Congratulations on the kid!

Bumpers are a great welding learning tool and many of us that was an our first early project. Wish I had pics to share, I haven’t built a bumper in 20+ years. Well say that, one that goes on something with a sheet metal body to protect anyway lol.
 
OP
OP
P

pocketlock

Contributor
Jr. Member
Joined
Oct 29, 2022
Messages
124
Some pictures of what I have so far. The bumper hangs down just a hair from the shape of the frame horns, not sure if I’m going to cut and adjust or let it be and taper the tire carrier to match the rear profile. Still need to extend the swing out but got a fancy latch from a jeep style tire carrier to use.
 

Attachments

  • IMG_7877.jpeg
    IMG_7877.jpeg
    218.3 KB · Views: 63
  • IMG_7876.jpeg
    IMG_7876.jpeg
    298.6 KB · Views: 61
  • IMG_7880.jpeg
    IMG_7880.jpeg
    224.7 KB · Views: 66
  • IMG_7879.jpeg
    IMG_7879.jpeg
    213.6 KB · Views: 62

Yeller

Contributor
Bronco Guru
Joined
Mar 27, 2012
Messages
6,518
Loc.
Rogers County Oklahoma
Looks great!

Would you like a few tips? I spend a lot of my professional time coaching welders on fundamentals. I’m always hesitant to freely critique work that someone is proud of, and you should be! The work is structurally solid, have a few tips that will help you critique yourself to the machine looking weld bead that we all strive for.
 
OP
OP
P

pocketlock

Contributor
Jr. Member
Joined
Oct 29, 2022
Messages
124
Looks great!

Would you like a few tips? I spend a lot of my professional time coaching welders on fundamentals. I’m always hesitant to freely critique work that someone is proud of, and you should be! The work is structurally solid, have a few tips that will help you critique yourself to the machine looking weld bead that we all strive for.
Sure! I’m definitely an amateur so I don’t mind tips.
 

Yeller

Contributor
Bronco Guru
Joined
Mar 27, 2012
Messages
6,518
Loc.
Rogers County Oklahoma
I like to ask, never want to insult anyone lol

Just a couple of things to try. First turn the voltage down until the arc feels balanced and smooth, when it is right there will be little to no spatter. Second weld horizontal to the ground when possible, and push the puddle. Pushing the puddle will make your weld lay out smooth. Dragging it makes it hump up in the middle. If you need to weld vertical to the ground be under 180amps, over that it will not penetrate and just run away, also this is the only time you drag your puddle. Upside side down, use the same technique as on horizontal but at a lower amperage

Huge basics to remember,

Heat (amperage)= wire speed.
Voltage = puddle fluidity
They have to balance each other.

Voltage too high, puddle runs away and spatter is bad

Wire speed too high, holes in your base metal lol.

There are more but this gets you making a good weld. After this is under control you can work on mechanics which I’m happy to help with but we need to start here. Baby steps.

I
 
OP
OP
P

pocketlock

Contributor
Jr. Member
Joined
Oct 29, 2022
Messages
124
I like to ask, never want to insult anyone lol

Just a couple of things to try. First turn the voltage down until the arc feels balanced and smooth, when it is right there will be little to no spatter. Second weld horizontal to the ground when possible, and push the puddle. Pushing the puddle will make your weld lay out smooth. Dragging it makes it hump up in the middle. If you need to weld vertical to the ground be under 180amps, over that it will not penetrate and just run away, also this is the only time you drag your puddle. Upside side down, use the same technique as on horizontal but at a lower amperage

Huge basics to remember,

Heat (amperage)= wire speed.
Voltage = puddle fluidity
They have to balance each other.

Voltage too high, puddle runs away and spatter is bad

Wire speed too high, holes in your base metal lol.

There are more but this gets you making a good weld. After this is under control you can work on mechanics which I’m happy to help with but we need to start here. Baby steps.

I
These were welded flat, my welder is a Vulcan 215, the only adjustments on the unit are wire speed (A-G), wire size (0.25-0.35), and metal thickness. It has a synergy light that makes sure I’m not overdoing it but that’s it. Is funny you say to push haha, I’ve push welded my entire life. The instructors at this school want me to pull weld so it’s been a learning curve. I believe my splatter came from going over the tack welds but I appreciate the advice! I’m wishing I had gotten a different welder with voltage and wire speed controls vs this one. But I got a great deal on it so hard to complain.
 

FORD*DIEHARD

Contributor
Full Member
Joined
Sep 20, 2018
Messages
324
I do not remember which vendor I bought the rear bumper from but I got it with just the spare tire mount as they only offered at the time one with an ice chest rack but it was up high, so my dad's friend made an ice chest rack and duplicated the mount to swing out. I have been wanting to get some Rotopax gas/water cans. But again I did not want them mounted up high and as everyone knows there is very limited space to mount anything and keep it safe while wheelin. So after a lot of trial and error locations, I thought about trying to see if it would work to mount an extra bar onto the spare tire swing out and have the Rotopax cans would be between the rear bumper and the tailgate, as you can see it worked. It's hard to see but I also added a plate across the spare tire mount to hold another Rotopax can.

Sonny
 

Attachments

  • 20240402_211241.jpg
    20240402_211241.jpg
    87 KB · Views: 27
  • 20240402_211227.jpg
    20240402_211227.jpg
    104.2 KB · Views: 30
  • Screenshot_20240918-192640_Gallery.jpg
    Screenshot_20240918-192640_Gallery.jpg
    76.3 KB · Views: 24
  • Screenshot_20240918-192706_Gallery.jpg
    Screenshot_20240918-192706_Gallery.jpg
    47.2 KB · Views: 25
  • Screenshot_20240918-192736_Gallery.jpg
    Screenshot_20240918-192736_Gallery.jpg
    64 KB · Views: 23
  • Screenshot_20240918-192819_Gallery.jpg
    Screenshot_20240918-192819_Gallery.jpg
    61.7 KB · Views: 25
  • Screenshot_20240918-192837_Gallery.jpg
    Screenshot_20240918-192837_Gallery.jpg
    144.7 KB · Views: 23
  • Screenshot_20240918-192842_Gallery.jpg
    Screenshot_20240918-192842_Gallery.jpg
    165.6 KB · Views: 29

Yeller

Contributor
Bronco Guru
Joined
Mar 27, 2012
Messages
6,518
Loc.
Rogers County Oklahoma
Your instructor needs to go to school from this century lol.

Part of the issue with welding is most never learn the science, they do what their uncle showed them, it works but isn’t right. I have visited a lot of welding schools, I have yet to find one that teaches correct science and mechanics. Some get one or the other but none get both, yet others miss it all.

I can promise dragging horizontal is wrong, push is king. Looks like he’s telling you to push-pull the puddle or small circles too, which is unnecessary and a waste of time.

If you really want to blow his mind ask him the cost difference between a 3/16” bead versus a 1/4” bead. The answer is 120%, 120% more wire, 120% gas and the killer, 120% more labor.

Over welding is literally holding the world together, not the quality of the welds. If welding for a living, knowing the costs and how to reduce them is how to be competitive and make money. Very few understand the real costs and how to produce real quality, their solution is to weld more when the real solution is learn the science, follow the science and apply the science.
 
OP
OP
P

pocketlock

Contributor
Jr. Member
Joined
Oct 29, 2022
Messages
124
Your instructor needs to go to school from this century lol.

Part of the issue with welding is most never learn the science, they do what their uncle showed them, it works but isn’t right. I have visited a lot of welding schools, I have yet to find one that teaches correct science and mechanics. Some get one or the other but none get both, yet others miss it all.

I can promise dragging horizontal is wrong, push is king. Looks like he’s telling you to push-pull the puddle or small circles too, which is unnecessary and a waste of time.

If you really want to blow his mind ask him the cost difference between a 3/16” bead versus a 1/4” bead. The answer is 120%, 120% more wire, 120% gas and the killer, 120% more labor.

Over welding is literally holding the world together, not the quality of the welds. If welding for a living, knowing the costs and how to reduce them is how to be competitive and make money. Very few understand the real costs and how to produce real quality, their solution is to weld more when the real solution is learn the science, follow the science and apply the science.
He’s a younger guy in his 30s like me haha, funny you say that. Not saying you are wrong. He has been teaching me to tighten my bead up vs the big fat welds I used to do and has taught different patterns to use depending on position. (Push pull, spirals/loops, arcs or zigzag. Good eye! The welds above were loops because those felt most comfortable from what he had showed us but I always did U’s when I pushed the puddle before. He does teach a bit of the science in that he was trying to get me to move more to keep from heat soaking my metal and making it more brittle on a molecular level. But in his defense this isn’t a welding class to pass exams or get a job in the field. It’s for hobbyists working on building tube doors bumpers or doing field repairs on their rigs. Again not saying you’re wrong and I appreciate any input to help make me a better welder and fabricator for my own parts!
 

Yeller

Contributor
Bronco Guru
Joined
Mar 27, 2012
Messages
6,518
Loc.
Rogers County Oklahoma
For less heat soak, more heat, move faster and push a straight bead with the wire tip directly in the groove. This will produce a narrow bead that will be smooth and reduce warpage of your base metals.

I remember when I was you, 35 years later I’m still learning. One of the wonders of welding is there is a lot of ways to do get it done and most of them work, some are more efficient than others and some look better than others. At the end of the day steel gets held together.
 
OP
OP
P

pocketlock

Contributor
Jr. Member
Joined
Oct 29, 2022
Messages
124
For less heat soak, more heat, move faster and push a straight bead with the wire tip directly in the groove. This will produce a narrow bead that will be smooth and reduce warpage of your base metals.

I remember when I was you, 35 years later I’m still learning. One of the wonders of welding is there is a lot of ways to do get it done and most of them work, some are more efficient than others and some look better than others. At the end of the day steel gets held together.
That last part has been my motto through most of my self taught welding. A lot of it may not have been pretty. But it’s all held together. That’s the whole reason I’m doing the class is trying to get better form. I appreciate the advice!
 
OP
OP
P

pocketlock

Contributor
Jr. Member
Joined
Oct 29, 2022
Messages
124
Ended up cutting the bumper stubs off to correct the angle of the swing arm. Previously it was parallel to the floor but that meant it was drastically off from the line of the tailgate. Since I’m planning to put a table for eating lunch on the trails or working on stuff on the trails I wanted it to be even with the tailgate but still even with the bumper, so I couldn’t offset the hinge. Overall I think it looks good and will look better once the new flares and side guards are on. Tossed the tire up to see how it was going to look and I’m pretty happy with it so far.
 

Attachments

  • IMG_7908.jpeg
    IMG_7908.jpeg
    310.4 KB · Views: 30
  • IMG_7907.jpeg
    IMG_7907.jpeg
    258 KB · Views: 28
  • IMG_7906.jpeg
    IMG_7906.jpeg
    301.9 KB · Views: 29
  • IMG_7905.jpeg
    IMG_7905.jpeg
    323.8 KB · Views: 26
  • IMG_7909.jpeg
    IMG_7909.jpeg
    306.3 KB · Views: 26
OP
OP
P

pocketlock

Contributor
Jr. Member
Joined
Oct 29, 2022
Messages
124
Wow - I didn't expect it to use open roller bearings. Must be messy inside. It certainly looks stout, but I'm gonna keep using one with sealed bearings.
There is a seal for the bottom. My instructor uses it and it isn’t messy outside of the housing.
 
Top