• Welcome to ClassicBroncos! - You are currently viewing the forums as a GUEST. To take advantage of all the site features, please take a moment to register. It's fast, simple and absolutely free. So please join our community today!
    If you have problems registering or can't log into your account, please contact Admin.

Fireball's '76 build thread - "Piece by Piece" - PAINTED, ASSEMBLED & ON THE ROAD!

OP
OP
Fireball05

Fireball05

Bronco Guru
Joined
Oct 7, 2012
Messages
1,822
After 2 months of down time, today she roared back to life. I few extra pumps of the accelerator to get some 87 octane up to the right places, a little flick of the key and RUMBLE,RUMBLE,RUMBLE! I know for lots of folks 2 months isn't that long without having your truck run, but it seemed long to me.

The mini-engine bay rewire is complete. The factory wiring that was there was in very good shape, but somewhere along the 37 year lifespan things got added, deleted and changed here and there, so my goal was to tidy everything up. It takes a surprisingly large amount of effort, physical and mental, to sort out the wiring diagrams and then the actual layout and lengths of the wires.

Items completed:
Partial engine rewire, new starter solenoid
Remove radiator, have flushed and cleaned.
Install new radiator hoses and mounts and fan shroud
Remove brand new heater core that was leaking, replace with 2nd new heater core, cross fingers hope it doesn't leak a 2nd time
Relocate overflow tank, regulator and solenoid to OEM locations
Install H4 headlight harness
Install used charcoal cannister
Added new ground wires, from battery terminal to block, body (under the voltage regulator stud and to the frame)

Some Before & Afters:


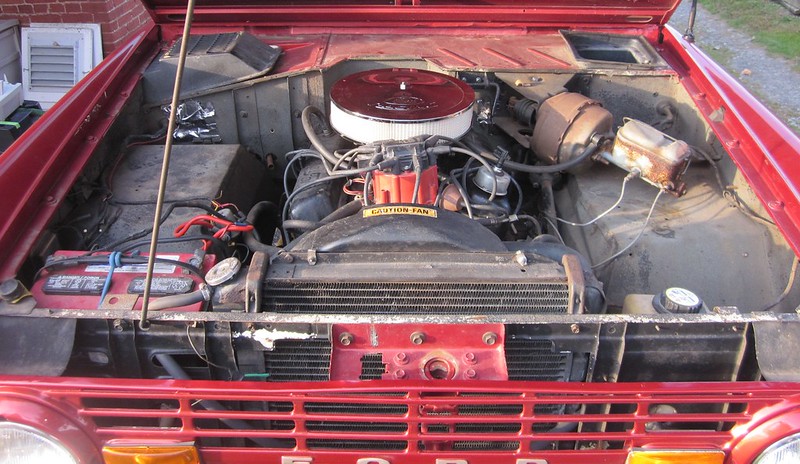
Not a big fan of the OEM routing (or lack thereof) of the overflow tank tube, so I bent up a tube and then ran hose around up under the fender apron, around the battery and into the radiator. This gets it up out of the way and looks much cleaner. Also will likely get an OEM filter assembly in the future, so should allow room for that.


Battery, regulator and solenoid wiring, with new extra ground wires:


Today I also picked up my front axle from the shop. This turned into a bit more of a rebuild than I was planning, and in the interest of time, since I don't have a press and would've had to pay someone for pressing bearing in and out, etc, I had a shop do reassemble the axle:
New inner and outer seals.
New Dana/Spicer ball joints
New napa premium u-joints
new rebuilt calipers and pads.
Everything else disassembled cleaned and painted.


Now I am actually truly ready to reassemble the front end, and conclude this small 2.5" lift kit install that has somehow magically manifested itself into a 2+ month project ;D
 

broncoitis

Bronco Guru
Joined
Jul 23, 2010
Messages
4,449
Wow, lookin good for sure! Engine bay turned out really nice and clean and I likey how you routed the overflow on the passenger fender! Hopefully get to see this at Gore! ;D
 

Blue Bastard

Bronco Guru
Joined
May 14, 2012
Messages
2,161
Strong effort for sure. Won't be long till you break it down for a full paint job. You know it's in your future.
 

allenfahey

Bronco Guru
Joined
Mar 18, 2004
Messages
2,672
Strong effort for sure. Won't be long till you break it down for a full paint job. You know it's in your future.

It's looking great Ben. Did you register for the Roundup yet? Looks like you are ready to hit the trails before paint.

Spraying Raptor is very easy wasn't it?

Pretty cool my post count now is 1966:)
 
OP
OP
Fireball05

Fireball05

Bronco Guru
Joined
Oct 7, 2012
Messages
1,822
Fireball's '76 build thread - "Piece by Piece"

I'm busy today combating Bronco lean, one front axle at a time!

uremajen.jpg


ydu5aqe4.jpg
 

texastreasures

Sr. Member
Joined
Feb 24, 2006
Messages
492
Looking Good Fireball

Looking Good Fireball Really enjoyed seeing the videos and hearing her run after you replaced the exhaust and fixed the cluster. sounds sweet.
if you still have your old battery its under warranty. let me know if you need the phone # if you have A
uto Zone up there.
 
OP
OP
Fireball05

Fireball05

Bronco Guru
Joined
Oct 7, 2012
Messages
1,822
Back down on the ground!

Been busy working on the Bronco, so time for a few quick updates:

I finished the front suspension install, started a thread here which had a few questions, and then some photos. http://classicbroncos.com/forums/showthread.php?t=223420

Back on the ground!


BCB tie rod kit, Deaver front coils, BDS shocks, WH adjustable track bar. Everything painted and powder coated and looking pretty:


I also installed some WH 6 degree shims on the rear to correct the pinion angle:


Got to drive it about 5 miles around some back roads. The ride is very soft and comfortable, but a little too much float in the front end. I was thinking this would likely be the case, so am researching upgrading the front shocks to either the Rancho RS9000 or the Bilsteins. Also, I haven't had the alignment checked and the hood, front bumper, grill and fenders aren't on yet, so will wait awhile until making any decisions. Good to drive it around again!

2.5 more weeks until Gore, the race is on!
 
OP
OP
Fireball05

Fireball05

Bronco Guru
Joined
Oct 7, 2012
Messages
1,822
Hood supports

My old hood had some rust damage on the front edge and I ended up buying a new Dynacorn hood. I also have the hood struts installed. Some reading on here, and a tip from Allenfahey about the weak point in the hood and I thought some metal supports would be in order.

Duff's makes a nicer sturdier set of hood supports, but I honestly don't like how they look.
4950.jpg


My goal was to build something simple that would hide in the lip of the hood out of the way, be removable if needed for some reason, and add the needed support. I started out with some 5/8" thick bar stock that I bought from McMaster. I cut them to size and notched the ends in the mill so they would fit snugly b/w the 2nd and 3rd hood support:


Here are a few photos with them slipped into place:


Then drilled and tapped some holes:


Marked them so I'd know which side was which after they got painted and I went to reinstall (PF=passenger front):


Then installed with some small button heads:


This should eliminate the weak point in the hood so I don't have to worry about a brand new, freshly painted hood cracking! Side bonus is it only cost $16 in bar stock and is hidden and out of the way.
 

AZ73

Contributor
Bronco Guru
Joined
Mar 28, 2012
Messages
3,610
Beautiful work! I wasn't considering struts for the hood, but after this and Nick's Mr. Roboto I might have to change my mind.
 

Crawdad

Bronco Guru
Joined
Feb 16, 2011
Messages
3,635
I got the Duff Hood Shocks for Xmas and ended up leaving them on my 76 I sold. I was torn between pulling the BC tank and the hood shocks. The tank won out but man I wish I had an extra week, those shocks wudda been mine! Ill get another set in the near/ far future!

Keep up the great work, looks better than showroom quality!
 
OP
OP
Fireball05

Fireball05

Bronco Guru
Joined
Oct 7, 2012
Messages
1,822
Paint work is beginning!

Running out of other things to do, so it's time to get ready for the new paintjob!

Thought long and hard about taking the body off the frame, but I just don't have a garage big enough to make it work, or a wallet big enough to make it happen. So we'll have to do the best with what we've got. I've got a new hood and stripped the fenders and tailgate and grille back to bare metal.

Next up was to start stripping the tub...started at the rockers, super clean!


Tail light housings cleaned up and ready to go:


Hardtop has been removed and will be painted at a later date. Or perhaps cut up into a safari top?? Doors off and windshield folded down, ready for a few laps around the body shop parking lot:


I did find some rust hiding behind the windshield seal in the driver and passenger lower corners. Will spot blast these areas and use some metal2metal filler in these areas, luckily it isn't too bad and is covered by the seal.


Doing all this by hand, using aircraft stripped, heavy duty sandpaper and stripping discs and a wire wheel is a huge PITA!!! Having the body off the frame and getting it sandblasted would've been right around a grand, but probably worth it in the long run. This isn't exactly fun work either!
 

Blue Bastard

Bronco Guru
Joined
May 14, 2012
Messages
2,161
Fireball's '76 build thread - "Piece by Piece"

Well, will it be red again or are you going a different color. What color is it originally?


Blue

Sent from my iPhone using Tapatalk 2
 
OP
OP
Fireball05

Fireball05

Bronco Guru
Joined
Oct 7, 2012
Messages
1,822
Blue,

It will not be red again. It was originally wimbledon white:


The Bronco was originally purchased by Lonestar Gas Company and used as a service vehicle for ~10 years. I have the original owners card and some of the maintenance logs from when it was used at the gas company. Sort of cool! I briefly considered repainting original color, and getting some decals made for the side, sort of like this:


but that might've been a little too plain for my tastes. Plus I'm not doing a factory correct restoration.

So, that being said, it will be repainted in a different color. Here's a little teaser for you:
 
OP
OP
Fireball05

Fireball05

Bronco Guru
Joined
Oct 7, 2012
Messages
1,822
Fireball's '76 build thread - "Piece by Piece"

Exactly! That grille photo doesn't really do the color justice. He shot the underside of the hood yesterday and it is going to look hot!!! :)
 
Top