• Welcome to ClassicBroncos! - You are currently viewing the forums as a GUEST. To take advantage of all the site features, please take a moment to register. It's fast, simple and absolutely free. So please join our community today!
    If you have problems registering or can't log into your account, please contact Admin.

Frame reinforcement plate spacers

joshua

Contributor
Sr. Member
Joined
Jun 5, 2007
Messages
1,269
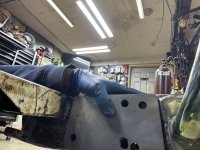
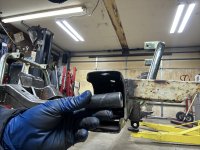
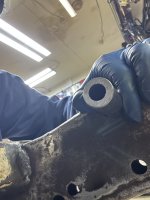
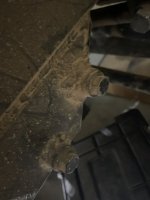
I’m doing the bc kit. And I’m at a bit of a crossroads with the spacers. They need to be ground to fit. Which is fine, but the only problem is that my frame has seen some stuff. And the walls are definitely pushed in a little on the way to the holes.

So I would have to grind them (spacers) pretty short to clear that obstacle. Leaving them to short in their final resting place.

But I was thinking about taking a die grinder to the holes of the frame. Making them big enough to slide the spacers in from one side. Then just welding that side back up around the spacers.

Thinking I would do it on the side the plate would be going back on over it anyway.
 

Attachments

  • IMG_5412.jpeg
    IMG_5412.jpeg
    193.4 KB · Views: 86
  • IMG_5414.jpeg
    IMG_5414.jpeg
    196.6 KB · Views: 86
  • IMG_5417.jpeg
    IMG_5417.jpeg
    142.5 KB · Views: 85

ntsqd

heratic car camper
Joined
Jan 30, 2005
Messages
3,551
Loc.
Upper SoKA
I have done thru-bolt frame rail spacers by butting them against the inside of the frame at one end while welding them only to the opposite side. Strongly suggest that if this is how you do decide to proceed that those spacers be bolted down tight before any welding. The spacers should be a slip-fit in the side with the large holes so that in tightening the bolts you're not also distorting the frame. Since I made the spacers I deliberately made them long enough that the ends were proud of the frame face by enough that the weld bead did not need to be ground down.
 
OP
OP
joshua

joshua

Contributor
Sr. Member
Joined
Jun 5, 2007
Messages
1,269
you could try a long bolt/all thread with nuts on the inside of the frame and wind the nuts out till you're at the desired width.
I did think about this. But the problem isn’t where the holes are. It’s long before.
 

jamesroney

Sr. Member
Joined
Sep 11, 2007
Messages
1,914
Loc.
Fremont, CA
I’m doing the bc kit. And I’m at a bit of a crossroads with the spacers. They need to be ground to fit. Which is fine, but the only problem is that my frame has seen some stuff. And the walls are definitely pushed in a little on the way to the holes.

So I would have to grind them (spacers) pretty short to clear that obstacle. Leaving them to short in their final resting place.

But I was thinking about taking a die grinder to the holes of the frame. Making them big enough to slide the spacers in from one side. Then just welding that side back up around the spacers.

Thinking I would do it on the side the plate would be going back on over it anyway.
Well, yeah...you are asking the right questions. But you need to answer the question that you didn't ask before you get too far along.

Do you need to do a repair to the inside of your frame? Or are you hoping to just drop the new spacer "nearby." If you don't need to grind out your original spacers...then it is perfectly reasonable drill a pilot hole in the new location, and use a hole saw to make a hole big enough for the spacer. Then yes, it's OK to weld the head, and pinch it to the inner rail.
But if you do all that work, and you make a perfect frame rail with supported holes in the correct location...then WHAT exactly is that spacer plate doing?

All it can do is move the steering box away from the frame, and provide additional leverage for the steering box against the frame. If you want more strength and support...you really want a support plate on the INSIDE rail. Not the OUTSIDE.

I understand why the plate exists, and I understand how someone could end up buying one. And if your frame is cheese-holed and weak then you might want a support plate. But you are welding a 1/4 inch thick plate to a 1/8 inch thick frame, at arguably the strongest part of the frame, and leaving the weaker side. Every time I do this, I end up putting the reinforcing plate on the inside of the frame, with a threaded nut provision in the rearmost hole. Then I add the spacers to the frame from the outside if needed. The weld, grind, finish, and paint. Then bolt the steering box directly to the frame.

Hope that helps.
 
OP
OP
joshua

joshua

Contributor
Sr. Member
Joined
Jun 5, 2007
Messages
1,269
Well, yeah...you are asking the right questions. But you need to answer the question that you didn't ask before you get too far along.

Do you need to do a repair to the inside of your frame? Or are you hoping to just drop the new spacer "nearby." If you don't need to grind out your original spacers...then it is perfectly reasonable drill a pilot hole in the new location, and use a hole saw to make a hole big enough for the spacer. Then yes, it's OK to weld the head, and pinch it to the inner rail.
But if you do all that work, and you make a perfect frame rail with supported holes in the correct location...then WHAT exactly is that spacer plate doing?

All it can do is move the steering box away from the frame, and provide additional leverage for the steering box against the frame. If you want more strength and support...you really want a support plate on the INSIDE rail. Not the OUTSIDE.

I understand why the plate exists, and I understand how someone could end up buying one. And if your frame is cheese-holed and weak then you might want a support plate. But you are welding a 1/4 inch thick plate to a 1/8 inch thick frame, at arguably the strongest part of the frame, and leaving the weaker side. Every time I do this, I end up putting the reinforcing plate on the inside of the frame, with a threaded nut provision in the rearmost hole. Then I add the spacers to the frame from the outside if needed. The weld, grind, finish, and paint. Then bolt the steering box directly to the frame.

Hope that helps.
I don’t suppose adding a plate to both sides would be the best of both worlds.

Also I’m very slow, as if you couldn’t already tell by my attempt to explain my plan/situation. So I guess what I’m getting at is, do you happen to have any pictures of what you did?

Also the spacers that came with the (kit) will not be long enough to protrude out of the frame rail to put a bead on them if I insert them via new big holes in the side of the rail.

And I took from what you said that I could weld the “head” flush against the rail then grind it flat. Meaning that it isn’t necessary that they protrude out of the frame before welding then grinding it flush.

Which makes sense to me, as I thought those spacers were just there to prevent the frame from collapsing. Am I understanding that right?

Otherwise I’m waiting at least a week on some steel tubing.

As to my original spacers, bottom 2 were junk. I’m wishing I would not have removed the top one at this point. But I did knock it out.

And if I’m way off don’t kill I’m slow.. 😉
 

jamesroney

Sr. Member
Joined
Sep 11, 2007
Messages
1,914
Loc.
Fremont, CA
I don’t suppose adding a plate to both sides would be the best of both worlds.
If you have adequate support on both sides, then the outer plate does nothing except make the bolts longer. But the inner plate allows you to use a full nut on the rearmost bolt...since you can notch the plate around the cross-member ear.
Also I’m very slow, as if you couldn’t already tell by my attempt to explain my plan/situation. So I guess what I’m getting at is, do you happen to have any pictures of what you did?
I'll check to see if I have any in my old photos. My last one I went with a factory Bronco box. But if I do, I'll send you a PM.
Also the spacers that came with the (kit) will not be long enough to protrude out of the frame rail to put a bead on them if I insert them via new big holes in the side of the rail.
Yeah, that's true. But if your spacers are slightly "too long" then when you put it in your frame thru your hole saw hole...it will actually land about 1/2 way in the outer frame. Which is almost perfect for a nice MIG weld. Don't worry if you get a little bit if bead in the bolt hole, because you can always drill it out from the inside. Just fill it all up, and grind it flat. Then drill it with a fresh, new, round hole.

And I took from what you said that I could weld the “head” flush against the rail then grind it flat. Meaning that it isn’t necessary that they protrude out of the frame before welding then grinding it flush.
Yeah, you don't even want it protruding. Let it recess, and fill it with MIG wire.
Which makes sense to me, as I thought those spacers were just there to prevent the frame from collapsing. Am I understanding that right?
Yup, they just keep the frame from collapsing. You should be able to torque the steering box bolts to about 105 lb-ft and see no flex. If you did it right, the difference between 80 lb-ft and 105 lb-ft is less than 1/4 turn.
Otherwise I’m waiting at least a week on some steel tubing.

As to my original spacers, bottom 2 were junk. I’m wishing I would not have removed the top one at this point. But I did knock it out.
Then it's a good time to fix it all right. If you have a welder and a grinder...you have everything you need.
And if I’m way off don’t kill I’m slow.. 😉
You are all right...
 
OP
OP
joshua

joshua

Contributor
Sr. Member
Joined
Jun 5, 2007
Messages
1,269
Thanks again James, you’ve helped me several times and haven’t steered me wrong yet!
 

ntsqd

heratic car camper
Joined
Jan 30, 2005
Messages
3,551
Loc.
Upper SoKA
@jamesroney Curious you say to not make them protrude. When it isn't a clearance issue (tire rub, etc.) I do deliberately make them protrude and I set the length to optimally use a COTS length bolt, but then I'm making the spacers from raw stock so I have that luxury.
 

jamesroney

Sr. Member
Joined
Sep 11, 2007
Messages
1,914
Loc.
Fremont, CA
@jamesroney Curious you say to not make them protrude. When it isn't a clearance issue (tire rub, etc.) I do deliberately make them protrude and I set the length to optimally use a COTS length bolt, but then I'm making the spacers from raw stock so I have that luxury.
@ntsqd If you have the luxury of being able to produce a spacer with the correct surface, AND if you make a spacer with a surface area face of sufficient area...then of course that is an excellent design.

But the OP is dealing with the handful of thinwall spacers that he has, and I assumed that he did not have a lathe and thickwall tubing at his disposal.

I'm not sure exactly how much tube diameter I would want, but probably at least enough to support the steering box "ear" so maybe 1/4 to 3/8 wall or better. Of course if you have the luxury of building your own bungs...you can thread them and use shorter bolts as well.

The moment applied to the spacer is proportional to the distance from the sector shaft to the frame. And the bending deflection is a PL^3/kEI equation. So there is a L^3 consideration. Granted your protrusions are probably only 1/4 to 1/2 inch long, and as long as the spacer is bigger than the head of the fastener...it's probably just fine. But the factory bolts it directly to the frame, and the farther I can get the rag joint from the inner apron...the better. Of course you have the radiator clearance to consider, and your way makes that better. But your way requires a bigger notch in the front body mount. So there's that. I think your way might be better for PS hose access too. Not sure.

COTS bolt is preferred over specialty fastener for sure, but the Bronco provides you with 1/2-13 grade 5 fasteners with prevailing torque nuts of the correct length for free.

Lastly, when I bury the fastener under the steering box, then my welds become invisible. So they can be really ugly. If you are a good welder, then you can show them off. My welds are sometimes less than spectacular. But my grinding and painting skills are superb.
 

ntsqd

heratic car camper
Joined
Jan 30, 2005
Messages
3,551
Loc.
Upper SoKA
I suspected that you were adjusting best method to what he had available, what would fit, and the apparent skill-set.

The spacers that I've made in the past butt up against the inner face of the load-bearing side of the frame. They protrude on the opposite side, where they're inserted from. No intentional relocation of the mounted part unless that is deemed necessary. In the case of steering box bolts where all of the mounting ears are threaded the spacers would extend out under the bolt heads. I made 2 of the 3 for the Wagon's PS box mounting like this. The third bolt had an interference issue that was best dealt with by making the spacer mount flush and have a counter-bore to clear a socket on that bolt head (I try REALLY hard to not use SHCS on a vehicle that might need remote field work performed on it).

I typically use the OD of the correct size AN washer to determine the OD of a spacer. No math there, just an Easy Button. Somebody, somewhere put a lot of thought and due diligence into Engineering that number, no need for me to redo their work. If that is some odd size between fractional bar stock sizes I just use the next larger stock size unless there's a fitment reason not to. The ID starts out 1/64" MAX larger than the bolt's nominal OD. After welding they get drilled to the AN washer ID (usually 1/32" over nominal) as a starting point, bigger by small steps if necessary to make the bolt's R&R easy.

On something that might see high cyclic loadings like a steering box I don't like to use short bolts. I hope to have learned GM's lesson there. Longer bolts can stretch a little further than a short bolt without failing. Re: GM Squarebody PS box mounting bolts and SBC short head bolts with wasted shanks so that they match the stretch of the longer head bolts.
 
Top