• Welcome to ClassicBroncos! - You are currently viewing the forums as a GUEST. To take advantage of all the site features, please take a moment to register. It's fast, simple and absolutely free. So please join our community today!
    If you have problems registering or can't log into your account, please contact Admin.

Front Disc Brake Conversion | Questions After Reading Posts and Watching YouTube

jscheier

New Member
Joined
Jun 15, 2026
Messages
42
Loc.
Parker, Colorado
Apologies in advance. I've been through so many Disc Brake conversion issue threads here and on Facebook as well as watching numerous YouTube videos on proportioning valves, resetting the shuttle valve and various other issues.

Scenario: 1969 drum/drum setup going to a WH front disc / rear drum with vacuum booster setup. Had to replace all hard lines as they were either seized or broke upon removal. All parts are installed and all leaks have been identified and resolved. The proportioning valve bleeder tool was installed into the proportioning valve before anything was installed on the vehicle.

Question #1 - in watching videos and reading many, many posts on this site and others, I have attempted to reset the shuttle valve per this video and managed to get just a dribble of fluid out of the rear lines. With the valve installed, its damn near impossible to see if it is properly centered. The next option I saw was to call a friend, have them pump the brakes, and then open a bleeder on the opposite end of the vehicle that is having a no-fluid situation (so in my case, rear is getting no fluid, so pump the brakes and open a front caliper bleeder). I tried this and still only got a dribble of fluid out of the rear. Verified that if I pull the MC lines from the prop valve, I get fluid coming out, so MC is good. Front brakes get good fluid via vacuum and gravity. I've also pressed the 'reset pin' on the leading side of the prop valve and that didn't change anything (one post said that really only works if it is the front brakes that are not getting fluid).

Is there any magic spell or potion to resolve this? I most likely brought this on myself by pumping the pedal more than one time.

Question #2 - Not really related to the brake fluid issue above, but still related to the conversion. In all the videos and posts, when installing the MC onto the booster, the goal is to have about a 1/16" gap between the MC and booster before you bolt it on. Adjusting the Hydraulic Pushrod in or out to achieve that gap. The MC / Booster setup I have will not allow me to adjust the push rod in far enough to achieve that gap. There is a metal "bullet" or "Pill" that inserts into the end of the MC that can be removed. If I remove that, and adjust the push rod out, I am able to achieve the 1/16" gap before bolting the MC to the booster. Is that an issue? Will I run out of push rod length to fully activate the MC? Based on This Thread, & this video, I think I'm good as long as I have the correct mounting depth when bolting the MC to the booster.

I've never encountered anything like this damn prop valve. In all my years of installing brake systems and racing, I've never had an issue where I couldn't get brake fluid flowing (heck, sometimes even flowing when it's not supposed to).

Thank you in advance for any assistance or guidance. I promise to pay it forward :)
 
Last edited:
OP
OP
jscheier

jscheier

New Member
Joined
Jun 15, 2026
Messages
42
Loc.
Parker, Colorado
1. Reset the Pressure Differential Shuttle Valve

If your Bronco still utilizes the factory brake distribution block, it contains an internal "shuttle pin" designed to slide and block off fluid to a leaking circuit if a sudden loss of pressure occurs (like cracking open a rear bleeder).
  • The Problem: The valve slides forward, blocking the rear port completely.
  • The Fix: Have an assistant press firmly on the brake pedal while you briefly crack a front brake bleeder screw. This creates a pressure drop in the front system, which should force the internal shuttle pin back to center. You may hear a click or see the dash "Brake" warning light turn off once it centers. Alternatively, some stock valves have a rubber-capped reset pin on the end that you can press or pull.
2. Adjust the Brake Booster Push rod as shown in this video.

If you converted to a power booster setup at the same time, the push rod between the booster and the master cylinder might be adjusted too long.
  • The Problem: If the rod constantly pushes on the master cylinder piston, it will fail to return completely to its resting position. This blocks the internal "replenishing ports," meaning fluid cannot flow from the reservoir into the brake lines.
  • The Fix: Slightly unbolt the master cylinder from the booster. If fluid suddenly starts gravity bleeding to the rear, your booster push rod needs to be shortened
How to adjust booster push rod
 
Last edited:
OP
OP
jscheier

jscheier

New Member
Joined
Jun 15, 2026
Messages
42
Loc.
Parker, Colorado
Summary Troubleshooting Order
  1. Crack the line directly at the Master Cylinder rear port—check for fluid.
  2. Crack the line right after the Proportioning Valve—check for fluid.
  3. Crack the line at the Rear Flex Hose frame bracket. - check for fluid.
 

ksagis

Contributor
Aspiring Bronco Guru
Joined
Jun 15, 2020
Messages
818
Loc.
Austin
1/16” should be fine. And to be sure we’re using words the same “gap” is clearance not preload.

Not totally clear to me if you did all the steps in your third post. If so, did you get fluid at front and rear ports of MC to verify its working?
 
OP
OP
jscheier

jscheier

New Member
Joined
Jun 15, 2026
Messages
42
Loc.
Parker, Colorado
@ksagis - Thank you for the response. For observation1, yes. The 'gap' is solely me pushing the MC onto the booster until the booster's hydraulic push rod makes contact with the MC piston. So I'd be pulling in the MC to booster ~1/16" with the nuts when installing. As shown in this video which does not have the bullet in the MC.

On the third post. Yes, I did this and about a dozen other things to see where I was getting fluid. I was originally getting fluid all the way back to the rear axle line splitter. Now, with a vacuum pump, I'm barely getting any fluid at all.
 

ksagis

Contributor
Aspiring Bronco Guru
Joined
Jun 15, 2020
Messages
818
Loc.
Austin
I'm still confused on your reply on the 1/16".

There should not be any preload on the MC piston cup when the MC is fully bolted down. i.e. if you are installing the MC on the booster and the booster push rod hits the MC piston cup before the MC is fully bolted down, then you have preload and that is wrong.
 

JeepGuy

Contributor
Bronco Guru
Joined
Aug 24, 2006
Messages
1,521
Apologies in advance. I've been through so many Disc Brake conversion issue threads here and on Facebook as well as watching numerous YouTube videos on proportioning valves, resetting the shuttle valve and various other issues.

Scenario: 1969 drum/drum setup going to a WH front disc / rear drum with vacuum booster setup. Had to replace all hard lines as they were either seized or broke upon removal. All parts are installed and all leaks have been identified and resolved. The proportioning valve bleeder tool was installed into the proportioning valve before anything was installed on the vehicle.

Question #1 - in watching videos and reading many, many posts on this site and others, I have attempted to reset the shuttle valve per this video and managed to get just a dribble of fluid out of the rear lines. With the valve installed, its damn near impossible to see if it is properly centered. The next option I saw was to call a friend, have them pump the brakes, and then open a bleeder on the opposite end of the vehicle that is having a no-fluid situation (so in my case, rear is getting no fluid, so pump the brakes and open a front caliper bleeder). I tried this and still only got a dribble of fluid out of the rear. Verified that if I pull the MC lines from the prop valve, I get fluid coming out, so MC is good. Front brakes get good fluid via vacuum and gravity. I've also pressed the 'reset pin' on the leading side of the prop valve and that didn't change anything (one post said that really only works if it is the front brakes that are not getting fluid).

Is there any magic spell or potion to resolve this? I most likely brought this on myself by pumping the pedal more than one time.

Question #2 - Not really related to the brake fluid issue above, but still related to the conversion. In all the videos and posts, when installing the MC onto the booster, the goal is to have about a 1/16" gap between the MC and booster before you bolt it on. Adjusting the Hydraulic Pushrod in or out to achieve that gap. The MC / Booster setup I have will not allow me to adjust the push rod in far enough to achieve that gap. There is a metal "bullet" or "Pill" that inserts into the end of the MC that can be removed. If I remove that, and adjust the push rod out, I am able to achieve the 1/16" gap before bolting the MC to the booster. Is that an issue? Will I run out of push rod length to fully activate the MC? Based on This Thread, & this video, I think I'm good as long as I have the correct mounting depth when bolting the MC to the booster.

I've never encountered anything like this damn prop valve. In all my years of installing brake systems and racing, I've never had an issue where I couldn't get brake fluid flowing (heck, sometimes even flowing when it's not supposed to).

Thank you in advance for any assistance or guidance. I promise to pay it forward :)
Still dealing with my brake saga but I can address a couple points.

If you remove the proportioning valve and take out the front metering valve you can actually push the little shuttle thing back into position... If that is your case with it being moved forward. Sounds to me like you have some kind of blockage to the rear.

The gap between the Booster and MC can be adjusted to use without the provided "Bullet" that goes into the MS and basically makes the contact point flush with the back of the MS.

I unfortunately still have horrible brakes after doing pretty much everything you have tried. My solution at this point is probably going to be swapping it out for a Hydro assist System.

Here are my threads on your issues. Tons and tons of information in there.

https://classicbroncos.com/forums/threads/brake-booster-losing-pressure-with-engine-running.326727/

https://classicbroncos.com/forums/threads/proportioning-valve-blow-out.329151/

Have you removed the lines that go from the MS to Proportioning valve and made sure you have fluid flowing from both lines? That would check to make sure you MS isn't the issue. You can also block the ports on the MS and press the brake pedal. If it moves after full contact you probably have a bad MS. Check for any leaking fluid from between the MS and Booster that might cause a lack of pressure to your rear brakes.

Funny how this little hydraulic system should be very simple.
 

ksagis

Contributor
Aspiring Bronco Guru
Joined
Jun 15, 2020
Messages
818
Loc.
Austin
@jscheier, if you have that much preload on MC piston, you may very well covered the ports in MC which *could be the source of your issues. Good luck.
 
OP
OP
jscheier

jscheier

New Member
Joined
Jun 15, 2026
Messages
42
Loc.
Parker, Colorado
@jscheier, if you have that much preload on MC piston, you may very well covered the ports in MC which *could be the source of your issues. Good luck.
This was actually part of the problem.

So, how did I spend Sunday?
  • First thing I did was reset the shuttle valve. I read in a tiny blurb that if you put the actual sensor back in, hit it with a test light and it lights up, then the shuttle isn't reset. Took 2-3 times with a pick to get it back to where it needed to be (and to get the test light to not illuminate).
  • Second thing I did was reset the hydraulic plunger on the booster. Took 2-3 times, but used my calipers and got it where it needed to be. It may have been blocking a portion of the rear port due to preload.
  • Then I went back to vacuum bleeding. Started pulling on the far rear valve and wasn't getting anything (or at least a very small quantity of fluid). Tried the driver's side rear and same. Broke the line loose at the axle and same. So started all the way back up at the MC and started re-checking fluid. MC feed to rear portioning valve was not pushing fluid (it was last night). Got my pick and air gun and removed what looked like casting flash from the MC ports. Then flushed it with fluid, re-bled the MC and put the line back on. Checked the front axle bowl and line to the prop valve and no issues there.
  • I'm now getting full fluid at all 4 bleeder valves.
  • Gravity bled for about 30 minutes. Sealed it back up and then started vacuum bleeding. Got lots of nice, clean fluid from every bleeder valve with no bubbles.
  • Refilled the MC, hopped in the cab and have shitty pedal feel (like no pressure) (engine off).
  • Went back and re-bled the fronts, whacking the caliper with a hammer to free up any air pockets. Got nothing.
  • Refilled the MC and let the fronts gravity bleed for another 30 minutes.
  • Refilled the MC and hopped in the cab and still have shitty pedal feel (engine off).
  • Hopped out, raised the lift and went over every single line and junction. No leaks. No dampness. No nothing.
I'm going to borrow a leg tomorrow and see if we can manually bleed the system. The fluid looks perfectly clean coming out of all 4 cylinders, so it has to be an air pocket somewhere that is causing all the fun.

I ordered an adapter for my Motive bleeder which is a pressure bleeder. Looks like Amazon can get it to me by 10am.
 
Last edited:

chuckji

Contributor
Sr. Member
Joined
May 5, 2017
Messages
470
Loc.
SE Michigan
Sounds like you did your research and have a good understanding of how the system works. But, just to confirm - you did bench bleed the master cylinder, right?
 

Fastracer

Contributor
New Member
Joined
Mar 13, 2014
Messages
34
Some basic thoughts, caliper bleeders are at the top of calipers when mounted, wheel cylinders are good and pistons move freely, rear shoes are adjusted properly, if it is the GM brake conversion did you grind for caliper mount for clearance? I have a simple gauge setup that I have used for 40 years that allows me to see actual pressure at each port starting at the MC outputs moving to the proportioning valve in and out, then to both sides of the rubber hoses and at the lines that screw into the cylinders. You will be able to see pressure and see if it holds. This is a very simple system and easier to diagnose if you know the actual values. Good luck as it can be frustrating.
 
OP
OP
jscheier

jscheier

New Member
Joined
Jun 15, 2026
Messages
42
Loc.
Parker, Colorado
Sounds like you did your research and have a good understanding of how the system works. But, just to confirm - you did bench bleed the master cylinder, right?
Bench bled. Then bled again on the bronco yesterday and again today. Zero change in pedal feel.
 
OP
OP
jscheier

jscheier

New Member
Joined
Jun 15, 2026
Messages
42
Loc.
Parker, Colorado
Amazon showed up this morning with the pressure bleeder adapter. Mounted it up, pulled up 20psi on the gauge and bled all four corners. No bubbles, and good flow at each corner.

Hopped back in the cab, pushed on the pedal and still nothing.

Pulled the MC lines and hooked up the bleeder loops and re-bled the MC for 15+ minutes. Zero signs of bubbles during that session and flow out of the MC when reinstalling the lines was good (which always makes it fun to get the lines installed). The pedal actually felt 'better' with more resistance when just bleeding the MC.

Pad was ground off the knuckle before install.

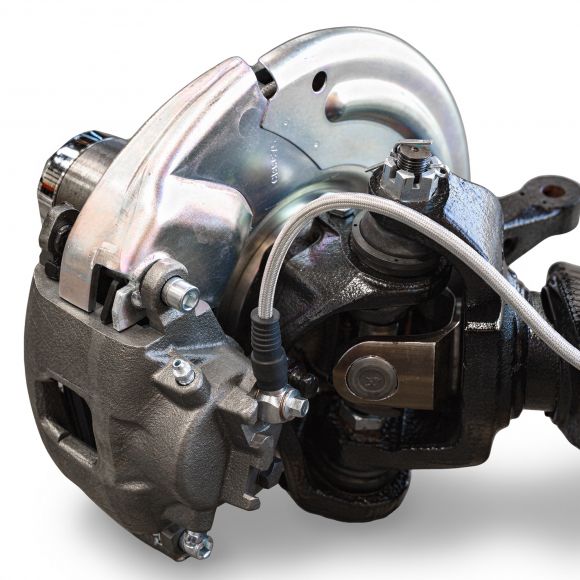
The WH kit I have, the calipers have two bleed screws. The brake line fitting also has two, but one comes capped off. I have the brake line fitting at the top, and am using that bleeder valve. In theory, I could switch calipers left to right, but then the brake line fitting would be at the bottom, The photo below is how I have the driver's side installed. You can see the second bleeder at the bottom. You can see how this same caliper could go on the passenger side, I'd just have the brake line coming into the caliper at a slightly lower position.

If the MC bleeds with no bubbles, and fluid flows freely when lines are removed, it should be good, right? If I'm getting fluid out of the proportioning valve, it should be good as well, right? At no point in the pedal travel does it feel like it's building pressure. Could it be the proportioning valve?

Am I missing anything else here? Could the pedal adjustment / rod cause an issue (pedal currently sits at 6" instead of the 7" I originally measured)?

I went back through all of @JeepGuy 's threads and he actually had a hard pedal before the booster. Mine is not hard. Booster is installed, and plumbed, but all of this mess above has been with engine off (booster would only make the pedal feel worse at this point). My PV also hasn't been leaking... so not sure if that is a candidate for replacement.

Would installing a manual proportioning valve like in THIS WH kit resolve any current or future bleeding issues?

Hope everyone is having a great Labor Day weekend! I've cleaned up and turned the lights off in the shop. Enough of this for the weekend :)


300500-5-front-disc-brake-conversion-kit-dana-30-dana-44-66-75-ford-bronco_580x580.webp
 
Last edited:

DirtDonk

Contributor
Bronco Guru
Joined
Nov 3, 2003
Messages
51,616
Hey jscheier, first of all, I'm sorry you're going through the hassle.
Second, oops! I wrote this at about 11:00 on yesterday, and while mulling things over, had to go to my second job and, as usual, got sidetracked and forgot to hit the SEND button!
Hence the ooops on my part.
So this is for the bits up to, and including ksagis' comments at about the 10:51am mark. So ignore any duplications or "already-fixed" aspects.


First, as said, there is never preload on the master. That is the condition we're always trying to avoid in every installation.

Next, a 1/16" gap is probably the maximum you'd ever want. Usually the smaller the gap, the better. There is a specification in the Ford books, but I don't remember what it is.

Third, that pull-pin on the metering valve is NOT a "reset" button. It's there ONLY to pull out when bleeding the front brakes. Some people never pull the pin and never have a problem.
Others can't get the fronts to bleed properly unless the pin is pulled.

If you are not getting fluid to either the front or the rear, then it's not the shuttle that is blocking flow. Or at least it's not the shuttle being offset. It could still be a blockage, and frankly this type of aftermarket valve is semi-problematic to begin with. Usually only regarding leaks out of the metering valve, which does not seem to be an issue here. But while I've never heard of a valve blocking flow to both circuits, I have seen where one was not allowing the rear to work.

Different boosters have different types of pin adjustments. Even among the same brand! Some have a short pin, and require the "bullet" spacer thingy. Others are long pin, and do not. The pin is included with almost all the master cylinders we sell for this reason. Then there is a third category, which we have so far seem to be successfully avoiding, where the two components are simply not compatible. Haven't run into that with our stuff before, but have seen it with different purchased combinations on various vehicles (not just Broncos).
Sounds like yours is a long-rod booster, so it seems that leaving the spacer out is the way to go. So as you figured, not a problem.
For an FYI, a deep-well master is typically used for manual brakes and booster with long rods are made to use that type. A shallow master piston is for power brakes only, and compatible masters have shorter, or even non-adjustable (back in the old days) rods. I think these days pretty much all of them are adjustable, due to nobody seeming to go by original specifications anymore, and finding out that too many parts become incompatible without an adjustable rod. AND an optional bullet!

The only thing I can think of to do at the moment, would be to bypass the proportioning/combination valve completely, and see if you're getting fluid enough to bleed at the brakes. Connect the lines directly to each other without the valve in the middle.
You could also remove the lines from the valve and blow compressed air through the assembly and see if it comes through unrestricted. I know air and liquid are different, but you should still be able to tell more about it at least.
If it's still not bleeding after bypassing the valve, then there is a blockage in some of the new lines, or components, that is causing the issue.
When you tested the master, did you disconnect the lines up at the master, or down at the valve? Did you also disconnect them at the brakes and see if any fluid was making it's way out to the ends?

If bypassing the valve seems to have cured the issue, then I'd say give us a call and get a new one on the way. Might have to run through your testing methods again to whoever is on the phone, but if it's a defective part, we'll replace it.
I have not seen a bad one come back to us for more than seven or eight years (maybe more) but in that case it was definitely a defective brand new valve. That customer only had trouble with one end (I think it was the front), but replacing it with another one fixed his issue.

Paul

Ok, so now for an additional question. When you say "nothing" or "no brake" or "no pedal" what exactly do you mean.
I'm asking because, if the engine is off and not providing vacuum to the booster, then if all the hydraulics and all the mechanicals are in order, you should not be able to press the pedal even one inch.
On the other hand, if the hydraulics are not building pressure, or the gap between the booster rod and the master piston is too great, then your pedal will just go down to the floor. Or to whatever level makes things cooperate.
So you may already have said it and I missed it, but just exactly is the pedal doing. Blow by blow if you please.

Thanks!

Paul
 

DirtDonk

Contributor
Bronco Guru
Joined
Nov 3, 2003
Messages
51,616
  • First thing I did was reset the shuttle valve. I read in a tiny blurb that if you put the actual sensor back in, hit it with a test light and it lights up, then the shuttle isn't reset. Took 2-3 times with a pick to get it back to where it needed to be (and to get the test light to not illuminate).
Then, if all else is still working, your shuttle is not stuck in one position. So that's a good sign at least for one aspect of the proportioning/combination valve.
  • Second thing I did was reset the hydraulic plunger on the booster. Took 2-3 times, but used my calipers and got it where it needed to be. It may have been blocking a portion of the rear port due to preload.
So what is your "gap" so to speak. Or "free-space" depending on the book you're reading on the subject.
Remember, with a pedal-ratio supposedly in the 6:1 neighborhood, a 1/4" gap equals 1 1/2 inches of pedal free travel before it does anything with the master.
I know you're down in the fractions, but I wanted to mention this because it's still very easy to mess up dimensions when using standard measuring tools.
My go-to (in spite of having all the tools) is still the old-school method of adjusting the rod out until it hits the piston first. Then turning it back in until it ONLY JUST clears before the master flange seats on the booster face.
Has worked for me for 50 years and never had an issue.
  • Then I went back to vacuum bleeding. Started pulling on the far rear valve and wasn't getting anything (or at least a very small quantity of fluid). Tried the driver's side rear and same. Broke the line loose at the axle and same. So started all the way back up at the MC and started re-checking fluid. MC feed to rear portioning valve was not pushing fluid (it was last night). Got my pick and air gun and removed what looked like casting flash from the MC ports. Then flushed it with fluid, re-bled the MC and put the line back on. Checked the front axle bowl and line to the prop valve and no issues there.
Interesting. Lots of work, but you've been getting down to the nitty-gritty for sure.
So you've got good flow to the combination valve.
  • I'm now getting full fluid at all 4 bleeder valves.
Meaning all four at the wheels? Hmm, interesting again, since yesterday I was suspecting the valve and not the master.
  • Gravity bled for about 30 minutes. Sealed it back up and then started vacuum bleeding. Got lots of nice, clean fluid from every bleeder valve with no bubbles.
  • Refilled the MC, hopped in the cab and have shitty pedal feel (like no pressure) (engine off).
I'd say you've bled it to plenty. Otherwise known as "bled to death" so to speak!
But back to my previous question, just what is the pedal feel you're feeling?
  • Went back and re-bled the fronts, whacking the caliper with a hammer to free up any air pockets. Got nothing.
  • Refilled the MC and let the fronts gravity bleed for another 30 minutes.
  • Refilled the MC and hopped in the cab and still have shitty pedal feel (engine off).
  • Hopped out, raised the lift and went over every single line and junction. No leaks. No dampness. No nothing.
At this point I think we can safely say (at least for the valve and the rear brakes, that you have fluid in all the right places. I'm not thinking there's a problem with the calipers, but there's always room for suspicion when it comes to modern day calipers!
As someone else mentioned previously though, do you have full clearance at the caliper/knuckle interface? You can look down over the top and see daylight between the caliper and the knuckle casting?
Got pics?
I'm going to borrow a leg tomorrow and see if we can manually bleed the system. The fluid looks perfectly clean coming out of all 4 cylinders, so it has to be an air pocket somewhere that is causing all the fun.

I ordered an adapter for my Motive bleeder which is a pressure bleeder. Looks like Amazon can get it to me by 10am.
All good ideas, but at this point I think your bleeding skills are honed to a fine edge!
I guess another gallon of fluid won't hurt anything (as long as it's not on the paint!), and what's another 14 hours of frustration among friends? :) ;)

Anyway, good luck and all that crap. But if you can describe the pedal action a little further, that would be great.

Thanks

Paul
 
OP
OP
jscheier

jscheier

New Member
Joined
Jun 15, 2026
Messages
42
Loc.
Parker, Colorado
@DirtDonk / Paul - when I say nothing or no pedal, the pedal goes to the floor with minimal resistance. If you do multiple pumps, it is not firming up. This is with the engine off, and, as you have stated, my expectation would be that it would be 'firm' on the first pump drawing towards 'damn solid' at 2-3 pumps (with no booster assist).

I've never run into a scenario that with multiple pumps of the brake pedal, that it doesn't firm up. The only scenario I can think of is if there is a leak (I lied earlier... I went back out to pull the MC from the booster to see if there was a leak. Bone dry).
 

DirtDonk

Contributor
Bronco Guru
Joined
Nov 3, 2003
Messages
51,616
Well at least the bone dry thing is a good sign.
So the next "test" I would think, since you're doing all this, is to NOT bleed it anymore just yet.
Figure out a way to completely block the two output ports on the master.
If when they are blocked and you still have no pedal, then the only two things it could be are a defective master, or the booster rod is not adjusted correctly yet.

Paul
 
OP
OP
jscheier

jscheier

New Member
Joined
Jun 15, 2026
Messages
42
Loc.
Parker, Colorado
So what is your "gap" so to speak. Or "free-space" depending on the book you're reading on the subject.
Remember, with a pedal-ratio supposedly in the 6:1 neighborhood, a 1/4" gap equals 1 1/2 inches of pedal free travel before it does anything with the master.
I know you're down in the fractions, but I wanted to mention this because it's still very easy to mess up dimensions when using standard measuring tools.
My go-to (in spite of having all the tools) is still the old-school method of adjusting the rod out until it hits the piston first. Then turning it back in until it ONLY JUST clears before the master flange seats on the booster face.
Has worked for me for 50 years and never had an issue.
After reading the posts on Saturday night, I went back and pulled the MC off of the booster. I used the end of my digital calipers to measure the depth of the bore on the MC, and then the length of the booster rod. I set them to be equal. then put the MC back onto the booster. There was just a small gap between the booster and MC where I would have needed to use the nuts to pull the MC into the booster. I removed the MC and shortened the booster rod by 1/4 turn until that gap was gone. I suppose it could still be short, but it definitely isn't long.

Interesting. Lots of work, but you've been getting down to the nitty-gritty for sure.
So you've got good flow to the combination valve.
Correct. I've got solid flow into and out of the Prop Valve
Meaning all four at the wheels? Hmm, interesting again, since yesterday I was suspecting the valve and not the master.
Yep. I pulled the lines at each junction and made sure it had good flow.
I'd say you've bled it to plenty. Otherwise known as "bled to death" so to speak!
But back to my previous question, just what is the pedal feel you're feeling?
If you were to sit in the driver's seat and put your foot on the pedal, with minimal effort (Engine off), you can push the pedal to the floor. If you give it multiple pushes, the pedal pressure does not increase, and will still go to the floor.

At this point I think we can safely say (at least for the valve and the rear brakes, that you have fluid in all the right places. I'm not thinking there's a problem with the calipers, but there's always room for suspicion when it comes to modern day calipers!
As someone else mentioned previously though, do you have full clearance at the caliper/knuckle interface? You can look down over the top and see daylight between the caliper and the knuckle casting?
Got pics?
I don't have any pics handy, but I can grab one or two tomorrow. I ground off the Dana 30 knuckle 'bump' when I was doing king pin replacement (and U-joints, seals, etc). it's ground perfectly flush with the knuckle (real easy to do when it's on the bench) and then painted all pretty :)
All good ideas, but at this point I think your bleeding skills are honed to a fine edge!
I guess another gallon of fluid won't hurt anything (as long as it's not on the paint!), and what's another 14 hours of frustration among friends? :) ;)

Anyway, good luck and all that crap. But if you can describe the pedal action a little further, that would be great.
I may get a chance to get out in the shop tomorrow afternoon. If I do, I'll grab a video of the pedal. Will probably still be hard to judge effort, but trust me, it's minimal.
 
OP
OP
jscheier

jscheier

New Member
Joined
Jun 15, 2026
Messages
42
Loc.
Parker, Colorado
Well at least the bone dry thing is a good sign.
So the next "test" I would think, since you're doing all this, is to NOT bleed it anymore just yet.
I've not got arthritis, carpal tunnel and brake fluid 'tingles' :)
Figure out a way to completely block the two output ports on the master.
If when they are blocked and you still have no pedal, then the only two things it could be are a defective master, or the booster rod is not adjusted correctly yet.

Paul
That actually is something I had not thought of. I will get some plugs and see what happens.

Any opinion on this question from earlier?

Would installing a manual proportioning valve like in THIS WH kit resolve any current or future bleeding issues?

It would remove that stupid proportioning valve with a proper adjustable one. Also get rid of the cast MC.

Thanks for your input (again)!
 
Last edited:
Top