• Just a reminder that you won't be able to start new posts or reply to existings posts in the Archive forum.

    This is where all the old posts go so they can still be used for reference and searched.
  • Welcome to ClassicBroncos! - You are currently viewing the forums as a GUEST. To take advantage of all the site features, please take a moment to register. It's fast, simple and absolutely free. So please join our community today!
    If you have problems registering or can't log into your account, please contact Admin.

Gunmetal Gray Luber No More - Meet "Mallory," My Mallard Green Rig!

Pa PITT

Contributor
Bronco Guru
Joined
Jul 15, 2005
Messages
11,279
Loc.
Stephenville TEXAS
.. Bond you've done a fine job of Pictureing you build.
.. One question ...Will that intake fit under your hood.
.. OK 2Nd that black on the under body parts& frame .. is that under coating or Spray paint.
.. Nice build.
 
OP
OP
ILikeBond

ILikeBond

Sr. Member
Joined
Jan 27, 2009
Messages
908
.. Bond you've done a fine job of Pictureing you build.
.. One question ...Will that intake fit under your hood.
.. OK 2Nd that black on the under body parts& frame .. is that under coating or Spray paint.
.. Nice build.

1 - Hope so! I have a 1" body lift and it's the standard Explorer GT40 cobra intake which a lot of people use, so I think it will fit, but I'll find out when I put the body back on.

2 - Chassis saver. It's like Por-15, but easier to use (less steps). After spending countless hours on my back wire wheeling and otherwise scrubbing years of mud and dirt off, then painting with chassis saver, I ended up finding a too-good-to-pass-up deal on body work and paint, so it was actually later sandblasted and redone in Rhino liner.

Thanks for the compliments!
 

DirtDonk

Contributor
Bronco Guru
Joined
Nov 3, 2003
Messages
49,247
I can't see how the foam in the center would cause any issue out at the edges either. Like you say, the two iron pieces sandwich things pretty tight between them. Nice little bit of extra sealing the weather out would be my guess.
But there's an easy way to tell what you have. Just turn the engine over by hand and listen for any grinding. Easy peasy.

And yes, even that little bit of gap is enough. You only need a smidge (technical terminology) for it to clear. The two key characteristics (besides clearance) are the imbalance and the ring gear's alignment with the starter gear As long as those two are good, so are you.

Paul
 

motoman

Bronco Guru
Joined
Jan 29, 2002
Messages
1,729
Loc.
Phoenix, AZ
Getting excited to see it on the road soon! ;) Warms my heart to see your daughter out there with you. Some of my fondest moments when working on mine is with the kids help! Even if you have to make stuff up for them!

sm_9inch7.JPG


sm_P1010012.JPG
 
OP
OP
ILikeBond

ILikeBond

Sr. Member
Joined
Jan 27, 2009
Messages
908
Warms my heart to see your daughter out there with you. Some of my fondest moments when working on mine is with the kids help! Even if you have to make stuff up for them!

Ha! Totally. She often asks me if she can "decorate" the Bronco by sticking whatever old metal part, say, in a hole on the frame.

Sure, honey, sure...

She also frequently asks what "that" is, and my policy is treat her like an adult. "This is the pressure plate. See, this fork holds this thing called a throwout bearing, and when you push the pedal, it pushes this forward and takes the pressure off the clutch disc, here, so that you can shift the gears of the transmission like this."

Obviously, at 3.5 years she doesn't understand, but I figure enough of these conversations and explaining the mechanics of things and whatnot, and showing her how, "look, if I shift the transfer case into gear and turn this yoke in the back, the one in the front will turn too - pretty cool, huh?," that it'll start to sink in and build an interest in such things.

At least she seems more interested than my wife in such explanations!

Thanks for the post motoman! ;D
 
OP
OP
ILikeBond

ILikeBond

Sr. Member
Joined
Jan 27, 2009
Messages
908
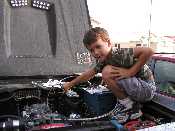
Have made some more progress, thought I'd post up a few pics.

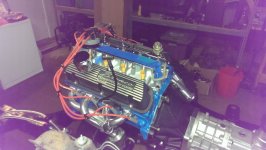
- Clutch linkage installed
- Fuel injectors and rails installed
- Heater/Coolant tubes installed
- ACT, Water Temp Sensor installed
- EGR delete plate installed
- NOS OEM explorer TB installed
- Phenolic spacer installed
- Upper (Explorer GT-40) prepared (plugged) and installed

I also--with heavy heart--have decided to sub out my Bronco script valve covers. Rather than deal with the modifications I would have to make, I decided to purchase some aftermarket stock mustang style ones that would put the oil fill in front of the engine and be completely sealed up otherwise.

Still have to put the Saganaw pump (with WH bracket) on (my engine builder still has the pump, gotta get it back from him), and a pulley for the water pump, but it's getting there!

I'll start with some finished pics that show off how she sits right now a little first, then post more installation pics perhaps later this evening.
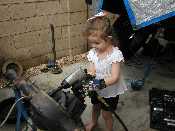
2m5ywpv.jpg
301d9fr.jpg
256ejw0.jpg


1zxac8.jpg


207q7tf.jpg
25z2jk5.jpg


2llncpw.jpg
1znybdt.jpg


2ur6xrm.jpg


wlxflu.jpg
2v2fdxy.jpg


2nip1y9.jpg
 

Shepcj71

New Member
Joined
Feb 26, 2011
Messages
146
Loc.
Byron, Ga
Hey man looking good!! thanks for posting! Seeing some good progress on others rigs always motivates me to keep plugging away on my rig when I'm not in the mood. Thanks for the motivation.

Shep
 
OP
OP
ILikeBond

ILikeBond

Sr. Member
Joined
Jan 27, 2009
Messages
908
Thanks, Shep! I've gotten more done in the past few months than the previous year or more. Figure I've realistically got another year to put it all back together once the body is done too. Slow but steady...

Here are some progress pictures of the engine, just for the record, and for those interested.

The first set of pictures, with the engine home from the builder is in this post. The battle to mate it up with the NV3550 is pictured in this post.

I'll pick up from there.

First set: distributor & wires in; oil pan rod in; fuel injectors in; fuel rails in; switched valve covers.
 

Attachments

  • IMAG4763.jpg
    IMAG4763.jpg
    106.3 KB · Views: 62
  • IMAG4860.jpg
    IMAG4860.jpg
    88.9 KB · Views: 50
  • IMAG4855.jpg
    IMAG4855.jpg
    85.6 KB · Views: 51
  • IMAG4840.jpg
    IMAG4840.jpg
    96 KB · Views: 53
  • IMAG4829.jpg
    IMAG4829.jpg
    85.5 KB · Views: 52
  • IMAG4820.jpg
    IMAG4820.jpg
    82.3 KB · Views: 57
  • IMAG4819.jpg
    IMAG4819.jpg
    77.5 KB · Views: 52
  • IMAG4765.jpg
    IMAG4765.jpg
    85 KB · Views: 62
  • IMAG4865.jpg
    IMAG4865.jpg
    89.5 KB · Views: 49
  • IMAG4869.jpg
    IMAG4869.jpg
    82.3 KB · Views: 51
OP
OP
ILikeBond

ILikeBond

Sr. Member
Joined
Jan 27, 2009
Messages
908
Second set: plugging & capping upper intake, running hoses.
 

Attachments

  • IMAG5061.jpg
    IMAG5061.jpg
    58.7 KB · Views: 61
  • IMAG5059.jpg
    IMAG5059.jpg
    50.3 KB · Views: 61
  • IMAG5057.jpg
    IMAG5057.jpg
    55.5 KB · Views: 58
  • IMAG5055.jpg
    IMAG5055.jpg
    51.2 KB · Views: 59
  • IMAG5054.jpg
    IMAG5054.jpg
    26.7 KB · Views: 61
  • IMAG5051.jpg
    IMAG5051.jpg
    56.7 KB · Views: 60
  • IMAG5049.jpg
    IMAG5049.jpg
    45.2 KB · Views: 61
  • IMAG5045.jpg
    IMAG5045.jpg
    62.8 KB · Views: 68
OP
OP
ILikeBond

ILikeBond

Sr. Member
Joined
Jan 27, 2009
Messages
908
Third set: installing phenolic spacer, upper intake, EGR delete plate, Explorer throttle body, connecting fuel pressure regulator and PCV.

That's it for now!
 

Attachments

  • IMAG5076.jpg
    IMAG5076.jpg
    68.3 KB · Views: 67
  • IMAG5072.jpg
    IMAG5072.jpg
    68.3 KB · Views: 71
  • IMAG5069.jpg
    IMAG5069.jpg
    86 KB · Views: 69
  • IMAG5068.jpg
    IMAG5068.jpg
    83.1 KB · Views: 67
  • IMAG5064.jpg
    IMAG5064.jpg
    89.1 KB · Views: 78
  • IMAG5063.jpg
    IMAG5063.jpg
    79.3 KB · Views: 71
  • IMG_8486.jpg
    IMG_8486.jpg
    125.4 KB · Views: 75

DirtDonk

Contributor
Bronco Guru
Joined
Nov 3, 2003
Messages
49,247
Lots of fun when you can see the engine come together.

You may find that your PCV hose is going to hit the body/firewall. Not a huge deal since it's rubber, but will eventually rub through perhaps. Even with that sharp bend, if you can shorten it a bit that might be good.

Keep the cool pics coming. Did you talk about the valve covers anywhere? I don't remember seeing the discussion if so.

Thanks

Paul
 
OP
OP
ILikeBond

ILikeBond

Sr. Member
Joined
Jan 27, 2009
Messages
908
Paul,

Thanks for the head's up, I can definitely shorten that hose.

Although I love the Bronco Script valve covers, they have to be modified pretty significantly to run on an EFI, especially if you want the oil fill at the front of the engine. I decided I'd take the path of least resistance and go with more stock ones.
 
OP
OP
ILikeBond

ILikeBond

Sr. Member
Joined
Jan 27, 2009
Messages
908
So I've been holding out on you guys a bit.

Almost 2 years ago, I got an unexpected referral/offer to paint the Bronco at a price I couldn't pass up, so while my original plan had been to keep it gunmetal grey, as when I bought it, and just touch the paint up myself, all of a sudden I had the option to choose any color I wanted.

It's been at the painter's for quite a long time, during which time I was able to take back the chassis and put together the drive train over the past several months. But today, with some help from a Bronco Brother and his son who generously lent a hand, I got the chassis back under the painted tub. It still needs some work here and there for me to be ready to take it back to the garage and start putting it together.

I was kind of hoping to wait until it was in that kind of shape to show pictures, but at this point I figure it's enough to be interesting. So first some of pics from today's adventure, then I'll post some progress pics along the way.

Starts with us loading up the chassis. My daughter was almost as excited as me about getting the Bronco back soon.
 

Attachments

  • IMG_9784.jpg
    IMG_9784.jpg
    84.1 KB · Views: 228
  • IMG_9780.jpg
    IMG_9780.jpg
    98.2 KB · Views: 177
  • IMG_9777.jpg
    IMG_9777.jpg
    97.4 KB · Views: 176
  • IMG_9774.jpg
    IMG_9774.jpg
    108.2 KB · Views: 179
  • IMG_9772.jpg
    IMG_9772.jpg
    100.5 KB · Views: 167
  • IMG_9762.jpg
    IMG_9762.jpg
    104.7 KB · Views: 157
  • IMG_9760.jpg
    IMG_9760.jpg
    120.6 KB · Views: 157
  • IMG_9756.jpg
    IMG_9756.jpg
    100.7 KB · Views: 180
  • IMG_9794.jpg
    IMG_9794.jpg
    99.1 KB · Views: 166
  • IMG_9791.jpg
    IMG_9791.jpg
    95.5 KB · Views: 176
  • IMG_9787.jpg
    IMG_9787.jpg
    85.7 KB · Views: 227
  • IMG_9785.jpg
    IMG_9785.jpg
    90.9 KB · Views: 182
OP
OP
ILikeBond

ILikeBond

Sr. Member
Joined
Jan 27, 2009
Messages
908
Engine and Undercarriage shots. The undercarriage, from the firewall to the rear, including in the wheel wells, is sprayed with Lizard Skin. Not planning on running carpet, and thus no dynamat, so hopefully this helps with the noise and heat.

Had a strange problem. Even though I set up the Wild Horses shock jock shock towers and gas tank with the body on and with the 1" body lift installed, setting it back down, the body is resting on the shock towers and tank. Not exactly sure why, as nothing on the suspension has changed. Looks like it'll need some modification in any event. Unfortunately it looks like I'll have to cut into the tub for the shock towers, and then just drop the tank a bit.
 

Attachments

  • IMG_9817.jpg
    IMG_9817.jpg
    98.3 KB · Views: 96
  • IMG_9802.jpg
    IMG_9802.jpg
    79.9 KB · Views: 100
  • IMG_9798.jpg
    IMG_9798.jpg
    88.8 KB · Views: 99
  • IMG_9832.jpg
    IMG_9832.jpg
    95.3 KB · Views: 94
  • IMG_9830.jpg
    IMG_9830.jpg
    108.5 KB · Views: 90
  • IMG_9829.jpg
    IMG_9829.jpg
    120.3 KB · Views: 96
  • IMG_9813.jpg
    IMG_9813.jpg
    92.5 KB · Views: 91
  • IMG_9812.jpg
    IMG_9812.jpg
    101.6 KB · Views: 98
  • IMG_9782.jpg
    IMG_9782.jpg
    65.5 KB · Views: 110
  • IMG_9809.jpg
    IMG_9809.jpg
    59.4 KB · Views: 123
  • IMG_2119.jpg
    IMG_2119.jpg
    103.2 KB · Views: 93
  • IMG_2117.jpg
    IMG_2117.jpg
    132.4 KB · Views: 103
OP
OP
ILikeBond

ILikeBond

Sr. Member
Joined
Jan 27, 2009
Messages
908
Various painted parts... and the only pic of me from the day, lookin her over.
 

Attachments

  • 20150426_1031221.jpg
    20150426_1031221.jpg
    79 KB · Views: 116
  • IMG_9834.jpg
    IMG_9834.jpg
    99.2 KB · Views: 82
  • IMG_9824.jpg
    IMG_9824.jpg
    64 KB · Views: 79
  • IMG_9823.jpg
    IMG_9823.jpg
    60.2 KB · Views: 76
  • 20150411_144454.jpg
    20150411_144454.jpg
    101.2 KB · Views: 80
  • 20150411_131417.jpg
    20150411_131417.jpg
    55.5 KB · Views: 94
OP
OP
ILikeBond

ILikeBond

Sr. Member
Joined
Jan 27, 2009
Messages
908
Now some progress pictures from the times I've dropped in over the past 18 months or so. Starting when it was dropped off in September 2013. My guy blasted it, got rid of the bondo, did the bodywork that was needed, cut the wheel wells, did the underside and wheel wells in lizard skin, the inside of the tub in color-matched Raptor, then the paint. A couple of the last few pics are before the clear, where it looks quite a bit duller.
 

Attachments

  • IMAG3397.jpg
    IMAG3397.jpg
    75.4 KB · Views: 85
  • IMAG3393.jpg
    IMAG3393.jpg
    77.2 KB · Views: 86
  • IMAG3173.jpg
    IMAG3173.jpg
    71 KB · Views: 88
  • IMAG3147.jpg
    IMAG3147.jpg
    88.3 KB · Views: 84
  • IMAG3145.jpg
    IMAG3145.jpg
    63.9 KB · Views: 83
  • IMAG1357.jpg
    IMAG1357.jpg
    87.6 KB · Views: 90
  • IMG_9125.jpg
    IMG_9125.jpg
    73.7 KB · Views: 74
  • IMG_9128.jpg
    IMG_9128.jpg
    85.8 KB · Views: 85
  • IMG_9130.jpg
    IMG_9130.jpg
    102 KB · Views: 84
  • 20150411_124927.jpg
    20150411_124927.jpg
    67.1 KB · Views: 120

NGABronco

Contributor
Bronco Guru
Joined
Feb 4, 2007
Messages
7,455
Loc.
N. GA now South Carolina
Hey man that is awesome!!! I bet you're grinning bigger than your daughter and the dog!!!!!;D;D

Any way you can put some body lift bushings in and clear the shocks???%)%)

I like the green!!!:cool::cool:
 
OP
OP
ILikeBond

ILikeBond

Sr. Member
Joined
Jan 27, 2009
Messages
908
Any way you can put some body lift bushings in and clear the shocks???%)%)

I like the green!!!:cool::cool:

Thanks, NGA! Increasing the body lift might be an option, but I was really hoping to keep it minimal, to just the 1" lift, to keep the COG as low as possible and the gaps as small as possible. We'll see.
 

broncoitis

Bronco Guru
Joined
Jul 23, 2010
Messages
4,449
In those pics it almost looks like there is not BL installed at all. That is kinda strange. Has to be something off somewhere! Paint looks really good! Keep the pics coming! Great build.
 
OP
OP
ILikeBond

ILikeBond

Sr. Member
Joined
Jan 27, 2009
Messages
908
In those pics it almost looks like there is not BL installed at all. That is kinda strange. Has to be something off somewhere! Paint looks really good! Keep the pics coming! Great build.

We initially set the tub on the frame lined up to the mounts, but the body was resting on the shock towers. So we put a few of the pucks in the front to kind of see-saw it (look at the photo with the dog). But that left it resting on the shock towers with more space between the frame and body than is used up by the 1" lift pucks.
 
Top