


Community
Buy / Sell


Bronco Tech
3 Arm Wiper Setup
Fix Motor Mount
Roll Cage Braces
Throttle Body 65mm
Wheel Alignment
Heat Riser Replacement
Vent Window Repair
Center Console Mount
Straighten Bumper
Ford 6R80 6 spd
More Tech...
Fix Motor Mount
Roll Cage Braces
Throttle Body 65mm
Wheel Alignment
Heat Riser Replacement
Vent Window Repair
Center Console Mount
Straighten Bumper
Ford 6R80 6 spd
More Tech...

-
Welcome to ClassicBroncos! - You are currently viewing the forums as a GUEST. To take advantage of all the site features, please take a moment to register. It's fast, simple and absolutely free. So please join our community today!If you have problems registering or can't log into your account, please contact Admin.
You are using an out of date browser. It may not display this or other websites correctly.
You should upgrade or use an alternative browser.
You should upgrade or use an alternative browser.
Gunmetal Gray Luber No More - Meet "Mallory," My Mallard Green Rig!
- Thread starter ILikeBond
- Start date
OP
OP
ILikeBond
Sr. Member
- Joined
- Jan 27, 2009
- Messages
- 908
It's been about a year since I took the rig off the road for a build, at which time I told myself I'd have it done in a year. %) But here's what I've really accomplished in the first year:
- Tore Bronco down to tub, frame, and front axle
- Installed 1" lift
- Removed 40 years of dirt, grime, grease, mud, and oil from the undercarriage and frame
- Painted most of undercarriage and all of frame with Chassis Saver
- Repaired a few spots of damaged metal on front clip
- Accumulated lots of parts
I haven't posted in about 5 months, however, b/c progress has been slow (ok, nonexistent). With a little help and motivation from some Bronco Brothers, though, I finally have some progress to report.
Part of the reason I haven't made much progress is I was waiting to spray some Lizard Skin and the engine compartment with body-color paint, until my wife could arrange to be out of the house for a couple days with the baby (due to the smells). That time never really came, and I couldn't start putting it back together unpainted, so it just sat.
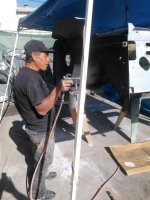
Well, a member here, Tony (Passauf), hooked me up with a body and paint guy who does good work at very reasonable prices. So I decided this was the best way to keep moving forward, and as a bonus, I could get body work done (rig is pretty straight, but could be improved in some areas, such as door gaps). In addition, although I was going to try to live with my single-stage paint and just patch up some scratches and stuff, now the plan is to take the body to metal (sandblast), and paint and raptor the whole thing.
In addition, he's going to remove the body and I'll take the chassis back while he works for a couple months, which will make it a lot easier to start putting things back together. So even though I didn't intend it, my build just became a frame-off!
The downside is, it means I spent hours getting to know my angle grinder intimately for no reason. But c'est la vie. Puts hair on the chest cleaning a Bronco manually with the tub on the frame in a crowded, dirty garage, right?
So now I find myself faced with that age-old dilemma, what color!? I'm vacillating between an appropriate shade of Green, Blue, Orange, or keeping it as it is now, in the Gunmetal Grey family. Hmmmm... possibilities. ;D
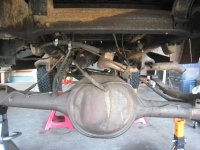
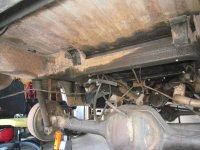
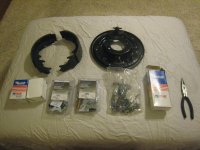
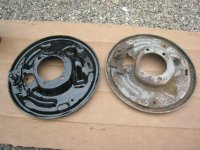
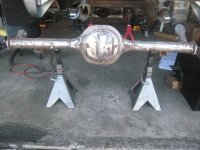
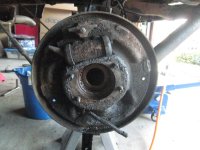
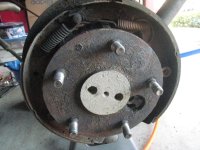
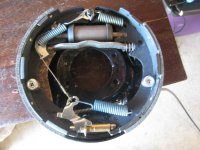
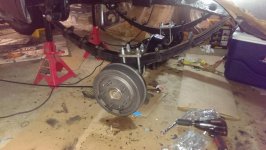
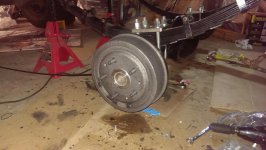
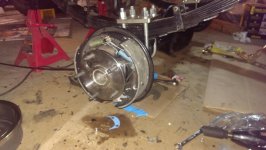
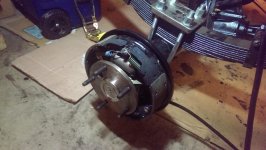
Well, here's the recent work. I put the ford 9" back together, which included cleaning and repainting with Chassis Saver the axle housing and backing plates; rebuilding the drum bakes with all new parts; installing a new third member with ARB locker and 4.88 gears (built by Bronco Connection); and installing new Wild Horses 31 spline axles (I think these are Yukons?).
Here are pics of the breakdown and drum rebuild, which I muffed up the first time and had to re-do.
- Tore Bronco down to tub, frame, and front axle
- Installed 1" lift
- Removed 40 years of dirt, grime, grease, mud, and oil from the undercarriage and frame
- Painted most of undercarriage and all of frame with Chassis Saver
- Repaired a few spots of damaged metal on front clip
- Accumulated lots of parts
I haven't posted in about 5 months, however, b/c progress has been slow (ok, nonexistent). With a little help and motivation from some Bronco Brothers, though, I finally have some progress to report.
Part of the reason I haven't made much progress is I was waiting to spray some Lizard Skin and the engine compartment with body-color paint, until my wife could arrange to be out of the house for a couple days with the baby (due to the smells). That time never really came, and I couldn't start putting it back together unpainted, so it just sat.
Well, a member here, Tony (Passauf), hooked me up with a body and paint guy who does good work at very reasonable prices. So I decided this was the best way to keep moving forward, and as a bonus, I could get body work done (rig is pretty straight, but could be improved in some areas, such as door gaps). In addition, although I was going to try to live with my single-stage paint and just patch up some scratches and stuff, now the plan is to take the body to metal (sandblast), and paint and raptor the whole thing.
In addition, he's going to remove the body and I'll take the chassis back while he works for a couple months, which will make it a lot easier to start putting things back together. So even though I didn't intend it, my build just became a frame-off!
The downside is, it means I spent hours getting to know my angle grinder intimately for no reason. But c'est la vie. Puts hair on the chest cleaning a Bronco manually with the tub on the frame in a crowded, dirty garage, right?
So now I find myself faced with that age-old dilemma, what color!? I'm vacillating between an appropriate shade of Green, Blue, Orange, or keeping it as it is now, in the Gunmetal Grey family. Hmmmm... possibilities. ;D
Well, here's the recent work. I put the ford 9" back together, which included cleaning and repainting with Chassis Saver the axle housing and backing plates; rebuilding the drum bakes with all new parts; installing a new third member with ARB locker and 4.88 gears (built by Bronco Connection); and installing new Wild Horses 31 spline axles (I think these are Yukons?).
Here are pics of the breakdown and drum rebuild, which I muffed up the first time and had to re-do.
Attachments
-
 IMG_1428.jpg114.1 KB · Views: 75
 -
 IMG_1427.jpg118.4 KB · Views: 76
 -
 IMG_1784.jpg101.5 KB · Views: 73
 -
 IMG_1771.jpg121.4 KB · Views: 73
 -
 IMG_2255.jpg117.3 KB · Views: 70
 -
 IMG_1493.jpg114.5 KB · Views: 73
 -
 IMG_1483.jpg126.4 KB · Views: 71
 -
 IMG_1455.jpg122 KB · Views: 68
 -
 IMG_1453.jpg107.8 KB · Views: 74
 -
 IMG_2043.jpg101.2 KB · Views: 85
OP
OP
ILikeBond
Sr. Member
- Joined
- Jan 27, 2009
- Messages
- 908
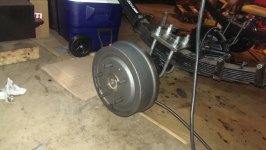
Here's the re-assembly. Before this, I pushed the axle back an inch.
Took me like 3 days trying to get the retainer plates on the axles close enough to start a nut, until I finally broke down, called WH, and they suggested I check whether I had removed the previous seal from the axle housing. Thought I had, but I hadn't. A little crowbar and hammer work later, and the axles went right in, just like they're supposed to. Imagine that!
Took me like 3 days trying to get the retainer plates on the axles close enough to start a nut, until I finally broke down, called WH, and they suggested I check whether I had removed the previous seal from the axle housing. Thought I had, but I hadn't. A little crowbar and hammer work later, and the axles went right in, just like they're supposed to. Imagine that!
Attachments

OP
OP
ILikeBond
Sr. Member
- Joined
- Jan 27, 2009
- Messages
- 908
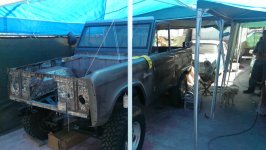
So for the first time in a year, she was off the stands and on all 4 shoes. It was time for me to remove the camping gear she had so generously been storing and get her out in the wild.
With no steering or brakes, and confronted with a short, downhill driveway that ends on a busy street, we moved slowly, methodically, using a dead man and come along when needed, and using gravity to our advantage when possible. My 2-year old daughter was "helping out" and kept telling me to "be careful, Daddy."
Was awesome to see the Bronco in the open air again, and even though she's without anything but the tub, frame, and axles, enjoyed seeing her stance with the new Wild Horses 3.5" leafs too.


Finally, after much contemplation, I've decided to cut her. If I had the time and resources to have more than one Bronco right now, I'd leave her uncut and find another to play with. But I don't, and I've made build choices oriented toward serious capabilities, and feel like I'd be fighting that. Since she's not that close to original anyway, and since I like how Broncos look both ways, that's my decision. I'll probably keep the cutouts for a rainy day in any event.
So looks like I may need to change the build thread as she may not end up a Gunmetal Gray LUBER at all. Part of what makes building them so fun, I guess.
With no steering or brakes, and confronted with a short, downhill driveway that ends on a busy street, we moved slowly, methodically, using a dead man and come along when needed, and using gravity to our advantage when possible. My 2-year old daughter was "helping out" and kept telling me to "be careful, Daddy."
Was awesome to see the Bronco in the open air again, and even though she's without anything but the tub, frame, and axles, enjoyed seeing her stance with the new Wild Horses 3.5" leafs too.
Finally, after much contemplation, I've decided to cut her. If I had the time and resources to have more than one Bronco right now, I'd leave her uncut and find another to play with. But I don't, and I've made build choices oriented toward serious capabilities, and feel like I'd be fighting that. Since she's not that close to original anyway, and since I like how Broncos look both ways, that's my decision. I'll probably keep the cutouts for a rainy day in any event.
So looks like I may need to change the build thread as she may not end up a Gunmetal Gray LUBER at all. Part of what makes building them so fun, I guess.
TwoDalesDad
Bronco Guru
- Joined
- Jul 19, 2011
- Messages
- 1,515
Mr Bond..You have really done some nice work to your luber. One of my first outings with the wife...ended more or less the same way....bronco leaning...and looking sad. A good friend said Oh...let me put the tires and wheels on for you.....And I of course said.....ok Joey....Thanks for the helpfulness. A couple blocks from the house....my wife says Oh...then another...Oh...then again Oh...and you know the rest.....The right front was wedged inside the fender.....
I walked back to the house picking up lugnuts along the way....when we returned with the wheels on....joey states...oh you need longer nutz...and I say...%$$#&&*.
I walked back to the house picking up lugnuts along the way....when we returned with the wheels on....joey states...oh you need longer nutz...and I say...%$$#&&*.
I have enjoyed re-reading your thread... keep up the good work!
OP
OP
ILikeBond
Sr. Member
- Joined
- Jan 27, 2009
- Messages
- 908
Been a long time since I've posted, but have some progress... sort of. Bronco has been with a body & paint guy for 8 months. I told him to take his time, as mine has been taken up with too much work lately anyway. Still, looking forward to getting it back soon and starting to reassemble. Maybe I'll even be able to drive it this year. Hope springs eternal.
Btw, that's Lizard Skin on the firewall, which runs down the underside of the tub back to the back of the front seats, and also sprayed in the wheel wells. Tub will also be raptor lined under and inside in the same tint as the paint. I have a picture, but I'm not telling yet. :-X
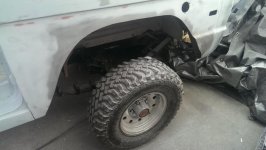
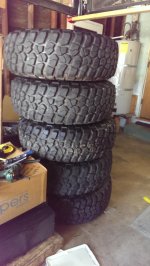
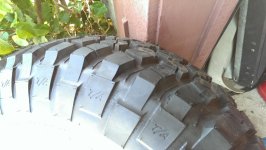
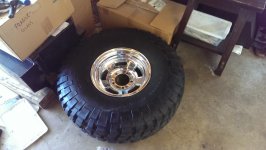
I've had a set of 5 new-in-box 15x8 M/T Alcoa forged Challengers that I purchased off a member here sitting in my garage for months. Found a nice deal on craigslist for a set of 5 BFG KM2s, 35x12.5x15, from a Jeep guy for whom they were too big. He had to drop to 33s to keep from ruining his flares and to be able to exceed 55 on the highway. Had less than 100 miles, and I got the 5 for under a grand. Good deal.
Oh, and I cut it . . . and it's not going to be grey anymore ;D. I'm going to have to change the thread title.
Btw, that's Lizard Skin on the firewall, which runs down the underside of the tub back to the back of the front seats, and also sprayed in the wheel wells. Tub will also be raptor lined under and inside in the same tint as the paint. I have a picture, but I'm not telling yet. :-X
I've had a set of 5 new-in-box 15x8 M/T Alcoa forged Challengers that I purchased off a member here sitting in my garage for months. Found a nice deal on craigslist for a set of 5 BFG KM2s, 35x12.5x15, from a Jeep guy for whom they were too big.
He had to drop to 33s to keep from ruining his flares and to be able to exceed 55 on the highway. Had less than 100 miles, and I got the 5 for under a grand. Good deal.Oh, and I cut it
. . . and it's not going to be grey anymore ;D. I'm going to have to change the thread title.Attachments
-
 i0000010_2.jpg86 KB · Views: 144
 -
 i0000010.jpg107.1 KB · Views: 138
 -
 i0000010_3.jpg103.9 KB · Views: 148
 -
 IMAG3175.jpg64.9 KB · Views: 143
 -
 IMAG3173.jpg71 KB · Views: 135
 -
 IMAG3147.jpg88.3 KB · Views: 132
 -
 IMAG3145.jpg63.9 KB · Views: 140
 -
 IMAG1357.jpg87.6 KB · Views: 147
 -
 IMAG3351.jpg78.1 KB · Views: 128
 -
 IMAG3331.jpg72.3 KB · Views: 134
 -
 IMAG3320.jpg69.7 KB · Views: 151
 -
 IMAG3317.jpg95.1 KB · Views: 163
Ohio Bronco 21
Bronco Guru
Ok, What color then? Looking great.
broncobsession
Bronco Guru
- Joined
- Aug 12, 2001
- Messages
- 4,049
Wow. Talk about a 180. When I read 35's I thought "how's he gonna squeeze those in an uncut?".
OP
OP
ILikeBond
Sr. Member
- Joined
- Jan 27, 2009
- Messages
- 908
Wow. Talk about a 180. When I read 35's I thought "how's he gonna squeeze those in an uncut?".
Complete 180' change.
Hey, look at post #64! I did my 180 a good while ago! Seriously, though, the build kind of has a life and mind of its own. A lot of it has been what parts I can find good deals on on CL or here on classifieds. Feeling real good about where it'll end up, though.
Hopefully painted pictures soon.
Ohio Bronco 21
Bronco Guru
Sometimes the Bronco builds go their own way. I guess the Bronc knows what it wants to be and a good owner helps it get that way, lol. Happened to me before.
http://classicbroncos.com/forums/showthread.php?t=129986
http://classicbroncos.com/forums/showthread.php?t=129986
OP
OP
ILikeBond
Sr. Member
- Joined
- Jan 27, 2009
- Messages
- 908
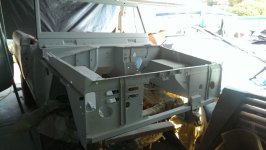
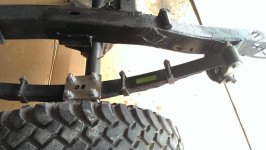
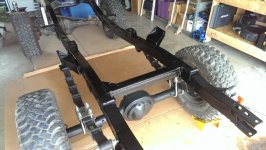
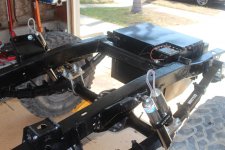
Some progress. Guy doing body work and paint had taken body off frame and so, while I never intended or anticipated it, this has officially become a frame-off resto. Anyway, I couldn't pass up the opportunity to work on the chassis without the body, so I grabbed the chassis back and got back to work.
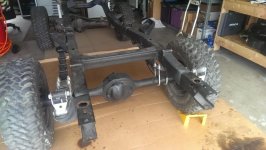
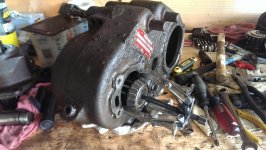
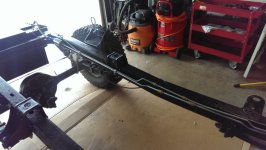
I had done as much work on the frame and rear set-up as I could previously with the body on, including chassis saver, so I didn't have too much to do when I got it back. Had to clean it up (lots of primer and dust on it from sitting at the guy's place), touch-up with chassis saver in a few places, then I sprayed it black to get a uniform tone. Took a sawzall to the stock shock mounts and put the rear Bilsteins and 23-gallon tank on. Next thing is to start running fuel and brake lines, but big thing now is to get drive train done. To that end, I finished disassembling my Dana 20 and working on cleaning, restoring, rebuilding, maybe going with Terralow's, we'll see.
Anyway, I couldn't pass up the opportunity to work on the chassis without the body, so I grabbed the chassis back and got back to work.I had done as much work on the frame and rear set-up as I could previously with the body on, including chassis saver, so I didn't have too much to do when I got it back. Had to clean it up (lots of primer and dust on it from sitting at the guy's place), touch-up with chassis saver in a few places, then I sprayed it black to get a uniform tone. Took a sawzall to the stock shock mounts and put the rear Bilsteins and 23-gallon tank on. Next thing is to start running fuel and brake lines, but big thing now is to get drive train done. To that end, I finished disassembling my Dana 20 and working on cleaning, restoring, rebuilding, maybe going with Terralow's, we'll see.
Attachments
-
 IMAG3635.jpg70.8 KB · Views: 88
 -
 IMAG3631.jpg86.9 KB · Views: 85
 -
 IMAG3619.jpg77.8 KB · Views: 91
 -
 IMAG3616.jpg78.3 KB · Views: 89
 -
 IMAG3613.jpg65.9 KB · Views: 99
 -
 IMAG3606.jpg86.7 KB · Views: 92
 -
 IMAG3531.jpg97.9 KB · Views: 101
 -
 IMAG3528.jpg65.2 KB · Views: 99
 -
 IMAG3649.jpg96 KB · Views: 90
 -
 IMAG3646.jpg72.3 KB · Views: 83
 -
 IMAG3636.jpg73.8 KB · Views: 96
OP
OP
ILikeBond
Sr. Member
- Joined
- Jan 27, 2009
- Messages
- 908
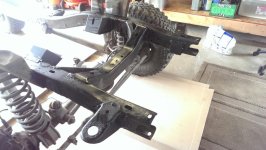
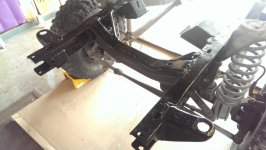
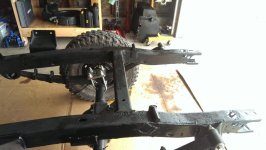
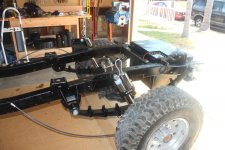
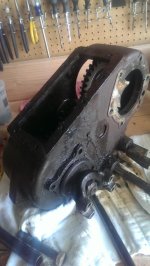
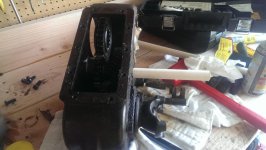
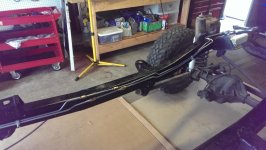
Here are a few of what it looks like at the moment, as well as a few Dana 20 breakdown pictures (didn't clean up front axle and spring and shock towers because that's all being replaced).
Attachments
-
 IMG_6959.jpg84.6 KB · Views: 91
 -
 IMG_6955.jpg93.7 KB · Views: 92
 -
 IMG_6953.jpg100.3 KB · Views: 95
 -
 IMG_6952.jpg102.5 KB · Views: 95
 -
 IMG_6950.jpg105.8 KB · Views: 91
 -
 IMG_6947.jpg78.9 KB · Views: 86
 -
 IMG_6946.jpg97.6 KB · Views: 97
 -
 IMAG3598.jpg79.7 KB · Views: 84
 -
 IMAG3600.jpg76 KB · Views: 76
 -
 IMAG3658.jpg101.2 KB · Views: 88
 -
 IMG_6973.jpg79.2 KB · Views: 81
OP
OP
ILikeBond
Sr. Member
- Joined
- Jan 27, 2009
- Messages
- 908
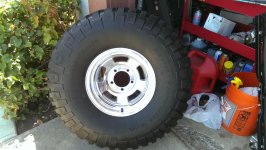
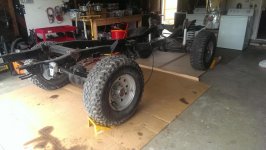
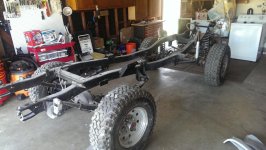
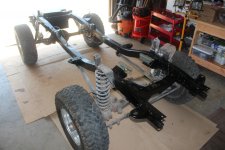
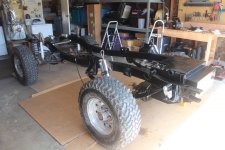
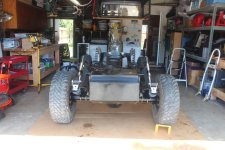
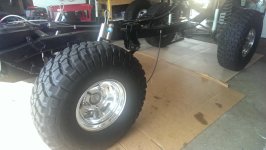
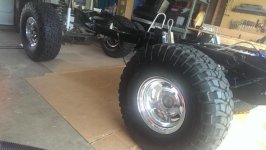
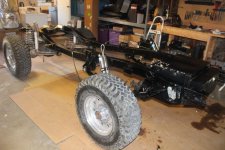
Finished running the fuel lines, and she got some new shoes this weekend. Set of NOS Mickey Thompson forged Challengers. Went from 31x10.5's to 35x12.5's. Starting to look like a serious chassis. Now it just needs a drive train. "Just."
Attachments

ProjectCumminsBronco
Full Member
Where did you get that fuel line?
Similar threads
- Locked
- Replies
- 2
- Views
- 5K
- Replies
- 3
- Views
- 2K
- Locked
- Replies
- 17
- Views
- 3K
- Replies
- 6
- Views
- 2K
- Replies
- 56
- Views
- 12K