• Welcome to ClassicBroncos! - You are currently viewing the forums as a GUEST. To take advantage of all the site features, please take a moment to register. It's fast, simple and absolutely free. So please join our community today!
    If you have problems registering or can't log into your account, please contact Admin.

Loose rocker arms

turleydog

New Member
Joined
Feb 20, 2013
Messages
18
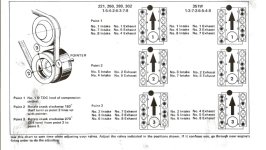
I replaced the valve stem seals on the driver's side bank of my original 302. Didn't know which one was broken, so pulled the head, and changed them all. That went ok, considering I don't know much about engines. Now I'm starting to put it all back together. Got new heads bolts, new gaskets, all that. When I put the pushrods and rocker arms back on, they seem MUCH looser than the rocker arms on the passenger side bank.

What am I missing here? These are original heads, lifters, rocker arms on a 1975 302.

FYI: this is by far the deepest I've ever torn into an engine. (didn't really know what I was getting myself into, to be honest)

Thanks in advance
 

dave67fd

Bronco Guru
Joined
Sep 24, 2010
Messages
2,863
Follow the diagram below for each position of the crank.
Adjust the rocker arm nut until you just can't rotate the pushrod and then make a full turn more. The video is the same but uses more crank indexing.

Hoping you either replaced the pushrods and lifters or properly ID'd them when you removed them. Putting back the originals in a random order is a no no.

https://www.youtube.com/watch?v=3xM1v1HZ2Wg
 

Attachments

  • scan0006-2.jpg
    scan0006-2.jpg
    85.6 KB · Views: 109

DJs74

Bronco Guru
Joined
Apr 1, 2014
Messages
1,135
Follow the diagram below for each position of the crank.
Adjust the rocker arm nut until you just can't rotate the pushrod and then make a full turn more. The video is the same but uses more crank indexing.

Hoping you either replaced the pushrods and lifters or properly ID'd them when you removed them. Putting back the originals in a random order is a no no.

https://www.youtube.com/watch?v=3xM1v1HZ2Wg

Boy that diagram looks familiar... Tom Monroe's SBF?

turleydog, let us know how you're doing and if you still need some guidance. As mentioned, if you reused your existing components, hopefully you kept them separated and identified.

DJs74
 
OP
OP
T

turleydog

New Member
Joined
Feb 20, 2013
Messages
18
Well crap. No, I didn't keep the rocker arms / pins separated. How screwed am I?

I also already put the intake manifold back on, and would rather not pull it again.

What is the worst that will happen if I put this thing back together and run it? I can replace the all in the future, but I really want to get this thing at least to run before the end of the week (before I head back offshore). Am I going to start bending rocker arms / pins? Or is it just going to cause tapping that I'm going have to adjust later?

Landon
 
OP
OP
T

turleydog

New Member
Joined
Feb 20, 2013
Messages
18
I've only taken apart the driver's side bank. I grabbed the fan blade, and rotated it so that the lifters were all the way down when I installed the rocker arms. When I put the arms on, and run the nut all the way down, the nut only becomes tight when the stud runs out of thread. There's no need to turn the rod(pin?), because the arm never really makes contact with it or the valve, before it runs out of thread on the stud. If you grab the rocker arm, you can jiggle it easily.

Is this normal, or are these valves just extremely worn out?

I'm definitely not trying to get this engine perfect, just something that I can run down the street for a mile or two.

Thanks again for the quick responses, guys.
 

Broncobowsher

Total hack
Joined
Jun 4, 2002
Messages
35,241
Did you get a valve job or anything else, or just seals?

My guess is you are dealing with lifters that have been pumped down a bit.
As for mixing pushrods and rockers, good practice is to keep them matched. Not necessarly a requirement, just good practice.

FYI, when valves wear, the face of the valve wears and the rocker arms actually get tighter. They only get looser if the valve tip, rocker arm, pushrod, or cam wear. A quick valve job is like lots of valve wear real fast. Done right they also trim the valve tips to get the height back like stock. Then shim the springs as the retainer will be sitting higher.

At this point, just bolt the rockers on and start it up. Expect a little valve tick for a minute as the lifters come back to life. I am fairly sure things will turn out a lot better then you are worried about right now. When you do the other side, just keep the rockers and pushrods in order. I expect you to find them looser like the first side as well.
 
OP
OP
T

turleydog

New Member
Joined
Feb 20, 2013
Messages
18
whew! that's a relief. Thanks for the advice. Hopefully will have it all back together tomorrow, and we'll see how she goes.
 

dave67fd

Bronco Guru
Joined
Sep 24, 2010
Messages
2,863
I've only taken apart the driver's side bank. I grabbed the fan blade, and rotated it so that the lifters were all the way down when I installed the rocker arms. When I put the arms on, and run the nut all the way down, the nut only becomes tight when the stud runs out of thread. There's no need to turn the rod(pin?), because the arm never really makes contact with it or the valve, before it runs out of thread on the stud. If you grab the rocker arm, you can jiggle it easily.

Is this normal, or are these valves just extremely worn out?

I'm definitely not trying to get this engine perfect, just something that I can run down the street for a mile or two.

Thanks again for the quick responses, guys.

What your describing and the the way you did it doesn't make much sense.
Hopefully you at least installed all the pieces correctly. If you don't do the valve adjustment procedure I listed properly (or close to it) your asking for trouble. Just bolting the rockers on and starting it doesn't work and you will most likely break something.
You are this far along, do it correctly unless your plan is to drive it one or two miles to the junk yard if it would even make it that far.
 

bax

Contributor
Old Member
Joined
Aug 22, 2005
Messages
14,494
why did you pull the head to change valve stem seals? Could of done that with just the valve cover removed. Yes follow the diagram above.
 

DJs74

Bronco Guru
Joined
Apr 1, 2014
Messages
1,135
turleydog, you mentioned in your original post that you've not been to deep into engines and builds... Do you have and are you using a book for this job? I only ask because removing heads, intakes, etc is a pretty significant undertaking and its a must to follow the proper torque sequence and torque values for the cylinder head and intake. If you are using a book for that, it should also cover the rocker arm install and adjustment. If you are not using a book... STOP and regroup. If you are expecting good results from this repair, it is critical that the cylinder head and intake have been reinstalled properly - otherwise, the rocker arms will become a moot point.


DJs74
 
OP
OP
T

turleydog

New Member
Joined
Feb 20, 2013
Messages
18
Went back and followed instructions from Dave67 re: setting the torque on the rocker arm bolts. That went ok, i guess. Took a bit of Youtubing to figure out what TDC was and how to get it. One of the rocker nuts cracked, but I'll get a new one.

Heads and intake manifold installed with new gaskets. Proper torque pattern followed, and staged up to final torque.

Now trying to get the distributor back in. Took this off pretty much out of curiosity to see how it worked. Still got #1 cylinder on TDC, so I'm trying to get the distributor to slide back in, with the rotor pointing to where #1 wire will be on the cap. The rotor contacts the worm gear, then starts to rotate back clockwise, but then the whole thing gets jammed and wont push down further. There seems to be a pin way down at the bottom that should be keyed into the bottom of the distributor. This keyed pin can be wiggled around with a screwdriver. Having difficulty getting it all to line back up.
 

m_m70

Contributor
Sr. Member
Joined
Jun 14, 2001
Messages
1,641
Loc.
Pacifica, CA
that pin is the hexagon shaft that drives your oil pump. if you look at the bottom of the distributor shaft you will see the hexagon hole that the shaft will slide into. very important piece of the puzzle. sometimes it takes some playing with to get the distributor to line up and engage the shaft but doable.
 

DJs74

Bronco Guru
Joined
Apr 1, 2014
Messages
1,135
Went back and followed instructions from Dave67 re: setting the torque on the rocker arm bolts. That went ok, i guess. Took a bit of Youtubing to figure out what TDC was and how to get it. One of the rocker nuts cracked, but I'll get a new one.

Heads and intake manifold installed with new gaskets. Proper torque pattern followed, and staged up to final torque.

Now trying to get the distributor back in. Took this off pretty much out of curiosity to see how it worked. Still got #1 cylinder on TDC, so I'm trying to get the distributor to slide back in, with the rotor pointing to where #1 wire will be on the cap. The rotor contacts the worm gear, then starts to rotate back clockwise, but then the whole thing gets jammed and wont push down further. There seems to be a pin way down at the bottom that should be keyed into the bottom of the distributor. This keyed pin can be wiggled around with a screwdriver. Having difficulty getting it all to line back up.

They can be trying... Try to over compensate with the rotor button further around than where you want it to fall in at #1, because you are engaging gears while traveling downward, the rotor is always going to rotate while you are pushing the distributor down to its resting position.

DJs74
 

DJs74

Bronco Guru
Joined
Apr 1, 2014
Messages
1,135
They can be trying... Try to over compensate with the rotor button further around than where you want it to fall in at #1, because you are engaging gears while traveling downward, the rotor is always going to rotate while you are pushing the distributor down to its resting position.

DJs74


Also... If for some reason you cannot get the distributor in at the right spot for #1' you can always compensate with the plug wires by moving each one one spot on the cap... But it will go eventually, patience is key - no pun intended

DJs74
 

Rustytruck

Bronco Guru
Joined
Feb 24, 2002
Messages
10,875
rotate the motor a little while pushing down on the distributor. As soon as the hex flats line up the distributor will go all the way down. Then rotate the motor back to top dead center and see if your on #1 plug wire.
 

savage

Contributor
Bronco Nut
Joined
Apr 18, 2007
Messages
2,482
Loc.
Renton
I've used a oil prime tool to TURN the oil pump shaft just enough to get the distributor to slide on the oil pump shaft. Like DJs74 says patience is key.
 
Last edited:
OP
OP
T

turleydog

New Member
Joined
Feb 20, 2013
Messages
18
This is becoming a wolrd class pain in the rear. Debating removing the oil pump to manually rotate the shaft. But that would involve removing the driver side belt, a pump,, and a little finned radiator looking deal. I'd rather not, but seems I may have to.
 

savage

Contributor
Bronco Nut
Joined
Apr 18, 2007
Messages
2,482
Loc.
Renton
You don't have to remove the oil pump to rotate the pump shaft. when a engine is rebuilt and before you start it ,you prime the oil system threw the distributor hole, using a tool, I've use one to TURN the oil pump shaft, threw the hole the distributor goes into, to get the OIL PUMP SHAFT TO LINE UP WITH THE DISTRIBUTOR.THIS IS JUST A NOTHER WAY TO GET THE OIL PUMP SHAFT TO LINE UP WITH THE DISTRIBUTOR.
 

Attachments

  • $_1.jpg
    $_1.jpg
    7.6 KB · Views: 22
Last edited:

DJs74

Bronco Guru
Joined
Apr 1, 2014
Messages
1,135
This is becoming a wolrd class pain in the rear. Debating removing the oil pump to manually rotate the shaft. But that would involve removing the driver side belt, a pump,, and a little finned radiator looking deal. I'd rather not, but seems I may have to.

turleydog... Take a breath, get a cool beverage, relax and forget about removing the oil pump, you'd have to remove the oil pan to get to the oil pump... None of that is necessary.
Like said, the oil pump shaft is a hexagon shaft... Like a bolt head and the distributor drive gear is a hex like a 6 point socket, you just have to be patient and get them to engage close as possible to #1 under the cap, doesn't have to be exact because you can rotate the distributor to adjust after its in.
The shaft does not sit concentric in the hole after you remove the distributor, they tend to fall which ever way gravity pulls it, the distributor sets it concentric in the hole... So you're not only fighting the hex, you're also fighting gravity but IF you're patient and fiddle with it... You WILL get it

DJs74
 

cs_88

Bronco Guru
Joined
Jul 28, 2005
Messages
1,321
This is becoming a wolrd class pain in the rear. Debating removing the oil pump to manually rotate the shaft. But that would involve removing the driver side belt, a pump,, and a little finned radiator looking deal. I'd rather not, but seems I may have to.

You can just use a socket taped to an extension to get down in there and turn the oil pump drive shaft in small amounts until it finally lines up with the distributor and it'll drop in. Make sure you tape the socket to the extension so it can't fall into the oil pan.
patience grasshopper.
 
Top