• Just a reminder that you won't be able to start new posts or reply to existings posts in the Archive forum.

    This is where all the old posts go so they can still be used for reference and searched.
  • Welcome to ClassicBroncos! - You are currently viewing the forums as a GUEST. To take advantage of all the site features, please take a moment to register. It's fast, simple and absolutely free. So please join our community today!
    If you have problems registering or can't log into your account, please contact Admin.

Mass Confusion Build. After 2 1/2 years It started!!

OP
OP
71massbronco

71massbronco

Bronco Guru
Joined
Mar 13, 2011
Messages
1,321
Its really starting to look good! I am looking forward to watching you put the front of the tub together. Take lots of pics!

I tend to get overwhelmed with everything that needs to be done and can't decide what to do next. I have the attention span of a gerbal so I tend to get distracted when I find something that needs to be done and looks like it will only take a minute, which usually takes an hour. I am amazed that not only have I decided to start with the frame and get it as complete as possible, but that I remember to take pictures of the progress. I have no patience. It was killing me to not put the drag link and stablizer on the still wet painted Dana44. I need counseling. :p
 

tasker

Contributor
all knowing of nothing
Joined
Jun 2, 2006
Messages
20,847
Loc.
NH
looking really, really good. You should take a ride up to the 8 point club in Sterling saturday afternoon. Be a nice selection of trucks and you'll get to meet a few people.
 
OP
OP
71massbronco

71massbronco

Bronco Guru
Joined
Mar 13, 2011
Messages
1,321
I now have a rolling chassis again. After a trip to the hardware store for some more,...uhhh hardware, got the radius arms back on. Was a tricky operation putting the new radius arm bushings on. Had to use a ratchet strap over the axle to suck the arm back enough to get the bolt started. Also had to drill new cotter pin holes for the castle bolts. Put my hoist to good use for this one man job! Enjoy.;)
 

Attachments

  • 1019111946.jpg
    1019111946.jpg
    102 KB · Views: 92
  • 1019112059.jpg
    1019112059.jpg
    103.2 KB · Views: 94
  • 1019112059a.jpg
    1019112059a.jpg
    100.1 KB · Views: 95
OP
OP
71massbronco

71massbronco

Bronco Guru
Joined
Mar 13, 2011
Messages
1,321
looking really, really good. You should take a ride up to the 8 point club in Sterling saturday afternoon. Be a nice selection of trucks and you'll get to meet a few people.

Just found out I have a birthday party to attend with my 8 year old, so won't be making it. That sucks.:mad:
 
OP
OP
71massbronco

71massbronco

Bronco Guru
Joined
Mar 13, 2011
Messages
1,321
Went out and cleaned up my garage (finally) was getting hard to walk around in there. Also ordered gaskets, plugs, and a new water pump at the local NAPA.

After the cleanup, took a shot at building a center tunnel for the ailing rusted out one that was there before. I have to say I thought that this was a little above my paygrade but i gave it a shot anyway. Was very happy with the result. I have no sheet metal bending experience. None. So this was a big confidence booster. I think I am in trouble, because I can't wait to get out there and bend some more metal!

So I measured, remeasured and then measured again. I also have a small brake that I haven't used that much, so I was interested in seeing what I could do with it. Found that the tunnel angle from horizontal is 127 degrees down each side. Top was 10.25 inches across, and 8.5 down each side giving it a one inch flange. I was generous with the flange length as I found that when I scrimp, it bites me in the ass later on.

The challenge was the inside flanges that attach to the center of the middle pan section. My brake is 36 inches wide and too wide for small bends on metal already bent. So I improvised by using a small piece of metal and c clamps, and sheet metal pliers. This did the trick. My brake doesn't make as sharp a bend as the original metal, but I kind of like the smoother corners.

Last pic, Happy Halloween from the Mass Casualty Clan.;D
 

Attachments

  • 1021111839.jpg
    1021111839.jpg
    94.2 KB · Views: 120
  • 1022112321.jpg
    1022112321.jpg
    108.1 KB · Views: 115
  • 1022112320a.jpg
    1022112320a.jpg
    71.6 KB · Views: 109
  • 1022112320.jpg
    1022112320.jpg
    93 KB · Views: 108
OP
OP
71massbronco

71massbronco

Bronco Guru
Joined
Mar 13, 2011
Messages
1,321
First on the list, was fixing some cancer on my DS door jam.Also took old transmission tunnel off crossmember, then went to grind down the welds, and my grinder finally bit the dust. Well not really, the brushes just wore out. Of course no where in the specs does it say what size the brushes are.:mad: Knew this day was coming as it was losing power this last week. Picked up a new one but by the time I got back, the wife wanted a fire in the fireplace so I couldn't grind down the old welds. I also spent the after noon rebending my inner rocker, wasn't happy with the alignment. Also roughed in the outer rocker and door post to the body. Once I get the other inner rocker, and floor pan fabbed, I off to the races and assembly can begin.

I took a few pics of the progress as always.
 

Attachments

  • 1023111623a.jpg
    1023111623a.jpg
    95.4 KB · Views: 122
  • 1023111623.jpg
    1023111623.jpg
    98 KB · Views: 105
  • 1023111608.jpg
    1023111608.jpg
    85.4 KB · Views: 107
  • 1023111258.jpg
    1023111258.jpg
    64.4 KB · Views: 111
  • 1023111257a.jpg
    1023111257a.jpg
    68.2 KB · Views: 108
  • 1023111257.jpg
    1023111257.jpg
    77.8 KB · Views: 109
OP
OP
71massbronco

71massbronco

Bronco Guru
Joined
Mar 13, 2011
Messages
1,321
Today was a ADD day.

Couldn't decide what I wanted to do, so my equipment chose for me. My great washer/body mount fix wasn't as great as I thought it was. I think I missed the part on the tech install that said I should have got washers that had a 1 1/2 hole to clear the body mounts. I think the size of my washers was 1 inch. So I got a metal hole saw and got through the first one. My trusty drill, that my brother gave me as a birthday present over 12 years ago, was probably a little under powered. Drill started to smoke on the second cut. That is bad. So I stopped.

Since I had to move on due to drill default, I went to a corner of the bed that I had given very little attention to. The more I probed, the more rust I cut out. Finally got it all out by using my air saw. Took a piece of metal and bent it to follow the grade from the bed to the middle pan. Had to notch it to get it to fit. I will treat the metal, then attach this replacement tomorrow.
 

Attachments

  • 1024111713.jpg
    1024111713.jpg
    62.8 KB · Views: 69
  • 1024111713a.jpg
    1024111713a.jpg
    90.2 KB · Views: 67
  • 1024111713b.jpg
    1024111713b.jpg
    62.6 KB · Views: 73

tasker

Contributor
all knowing of nothing
Joined
Jun 2, 2006
Messages
20,847
Loc.
NH
i love your tenacity! way to get after it! still need to plan a trip down too....
 
OP
OP
71massbronco

71massbronco

Bronco Guru
Joined
Mar 13, 2011
Messages
1,321
I didn't know it it was possible to spend two and a half hours just rehabbing a crossmember. Well it is. I am learning to get rid of the itch of trying to hurry thru things on this bronco. I have to remember 'big picture". :cool:

Yeah, I know I could've ordered a new, but what fun is that?

Now it is solid as a rock, no more flexi flexi. I would hate to look over and see the wife fall through the floorboard.
 

Attachments

  • 1030111233.jpg
    1030111233.jpg
    87.7 KB · Views: 99
  • 1030111137.jpg
    1030111137.jpg
    73.9 KB · Views: 95
  • 1030111126.jpg
    1030111126.jpg
    84.1 KB · Views: 102
  • 1028111640a.jpg
    1028111640a.jpg
    75.3 KB · Views: 101
  • 1028111613.jpg
    1028111613.jpg
    93.2 KB · Views: 99
  • 1028111612.jpg
    1028111612.jpg
    104.5 KB · Views: 98
OP
OP
71massbronco

71massbronco

Bronco Guru
Joined
Mar 13, 2011
Messages
1,321
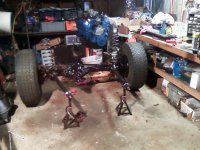
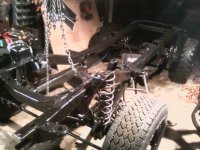
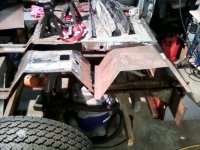
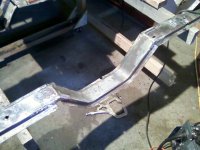
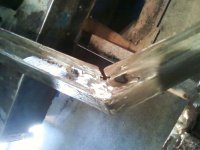
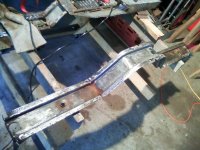
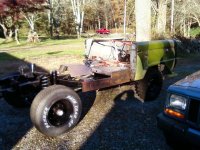
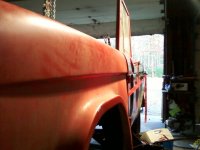
Today was a big day. Last week I was getting frustrated by trying to get things to go together. Had the body off the frame and trying to get the measurements between the first and second crossmember and wasn't happy with the accuracy. So I decided to put the body back on the frame. Was very excited. I put the one inch BL on it too to see how much difference there would be. I was pretty amazed at the clearance.

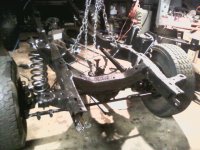
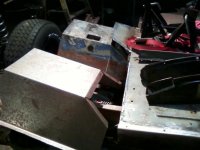
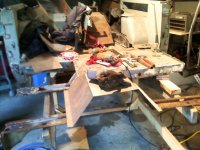
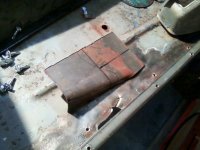
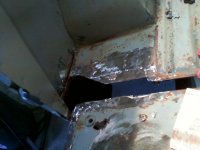
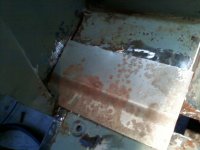
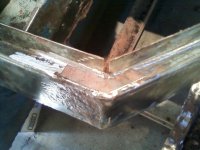
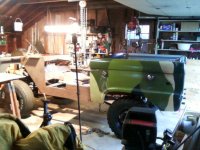
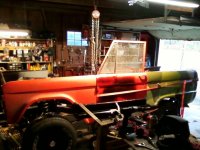
So after getting it back in the garage, I started fitting my DIY panels with vice grips and clamps just to rough in the panels. Then I had to take the kids to the Pumpkin Carving exhibit at the zoo. After returning home, just to see how close I was, I fitted my DS QPanel to see how far off I was. I was stunned to see it fit up perfect. Not so much an 1/8 inch off. (I know this is probably going to change once I start welding, but I was pretty happy with myself.)

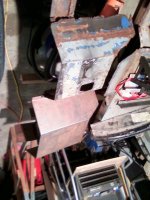
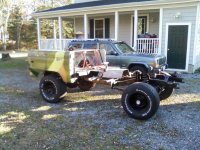
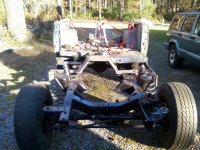
The other thing that surprised me was the amount of clearance I now had. I know this is going to settle but comparing this to the first pics of the EB when I got it home it seems to be pretty significant. I have no SL as of right now.

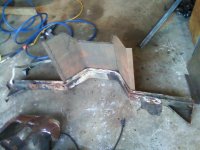
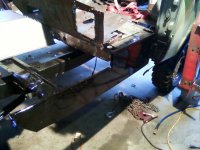
The sagging suspension was due to tired shocks, blown out spring cups. As far as the leafs go, Russ seams to thing they were shot. I believe he was right but this is what I have to go with right now. I can see daylight between the leafs so until I can get the budget back on track, I am staying with the stock suspension and 1" BL.

One last note: I mentioned in the first part of the build that I was going to leave it uncut. Well , a couple of weeks ago, I was seriously considering cutting it. Yeah, I know, I know.

But now I am loving the stance and the look, so LUBER lovers, don't despair. As of right now, it is staying uncut.
 

Attachments

  • 1106111610.jpg
    1106111610.jpg
    103.2 KB · Views: 132
  • 1106111440b.jpg
    1106111440b.jpg
    143.5 KB · Views: 142
  • 1106111440a.jpg
    1106111440a.jpg
    139.2 KB · Views: 116
  • 1106111440.jpg
    1106111440.jpg
    137.8 KB · Views: 124
Last edited:

tasker

Contributor
all knowing of nothing
Joined
Jun 2, 2006
Messages
20,847
Loc.
NH
my project truck has newer leafs in it with the stickers still on them if you're looking for some...
 
OP
OP
71massbronco

71massbronco

Bronco Guru
Joined
Mar 13, 2011
Messages
1,321
Today, no pics, will try to post the updates tomorrow.

I finished welding up the door post that had rusted through. Then I worked on getting my inner rocker aligned and attached, then coated it with chassis paint to keep it from rusting.

Spent alot of time trying to align my new outer rocker to fit right before I weld it on. Doesn't want to line up. I took the other side's outer rocker that I am using again on the PS since it was close and they are switchable. It fit perfectly, so I was a little confused to why the aftermarket wasn't working. I compared them side by side and couldn't see any measurable difference. I tried tweeking it a little but that was a bust. I think I am going to tack it the post, then finesse it in to place. Just worried about ruining my rocker.

One thing that I noticed that the rocker is a little wider depth wise, then the specs and has to be clamped down so it fits the inner rocker. This really was screwing up alignment as well, until figured it out.
 
OP
OP
71massbronco

71massbronco

Bronco Guru
Joined
Mar 13, 2011
Messages
1,321
You have found what the rest of us have but now it out in the open, the rockers aes not right.:-X

Yep, got that right. VERY aggravating. I will figure it out. Any tricks to it that could help me out?

BTW, Stupidboy, I just went through your build thread again a couple of days ago, (matter of fact headed over there after I write this) and your rig is looking better then ever. Keep the good work up. Gives me something to shoot for.

D
 
OP
OP
71massbronco

71massbronco

Bronco Guru
Joined
Mar 13, 2011
Messages
1,321
Went back out to bang out this outer rocker problem. Like yesterday, I hung the door to position the doorpost and did fitment for the rest of the inner fenders. I am using the fiberglass fenders from the PO and it lined up on the door post pretty good. Once everything was looking decent, I screwed everything together.

Then on to the outer rocker. Man, what a PITA. I had to bend in the tops slightly, put a cut in it then tap it into place. There still was a pretty sizable gap on the firewall side, that I ended up cutting out some extra metal so it would mold better to the post. Got it in the ballpark.

For those of you who haven't done this yet, I would have definitely done some things differently.
One lesson I have learned from this was I should have cut the thing apart one section at a time, and put it together one section at a time. I would have also measured more (thought I got everything that needed to be measured, measured. I was wrong, I wasn't even close.)

Now on with the show....
 

Attachments

  • 1114111845.jpg
    1114111845.jpg
    84.1 KB · Views: 104
  • 1114111817.jpg
    1114111817.jpg
    88.3 KB · Views: 110
  • 1114111547.jpg
    1114111547.jpg
    95.3 KB · Views: 114
  • 1114111542.jpg
    1114111542.jpg
    62.6 KB · Views: 108
  • 1114110756.jpg
    1114110756.jpg
    89.6 KB · Views: 109
  • 1106111610a.jpg
    1106111610a.jpg
    90.9 KB · Views: 112
  • 1114111849.jpg
    1114111849.jpg
    43.8 KB · Views: 99

stupidboy

Contributor
My wifes porn star.
Joined
Dec 29, 2009
Messages
5,790
Loc.
Morrisdale Pa.
For those of you who haven't done this yet, I would have definitely done some things differently.
One lesson I have learned from this was I should have cut the thing apart one section at a time, and put it together one section at a time. I would have also measured more (thought I got everything that needed to be measured, measured. I was wrong, I wasn't even close.)

You learned something there, for your next one.;D But really, if its so bad (like mine was) that you don't have anything to measure from and there is nothing to begin with, you sometimes can't do 1 spot at a time. That is best though. I have also found that the more expensive oem rockers are worth the extra money in fit. Your getting it, don't give up!!;)
 
Top