• Just a reminder that you won't be able to start new posts or reply to existings posts in the Archive forum.

    This is where all the old posts go so they can still be used for reference and searched.
  • Welcome to ClassicBroncos! - You are currently viewing the forums as a GUEST. To take advantage of all the site features, please take a moment to register. It's fast, simple and absolutely free. So please join our community today!
    If you have problems registering or can't log into your account, please contact Admin.

Mass Confusion Build. After 2 1/2 years It started!!

OP
OP
71massbronco

71massbronco

Bronco Guru
Joined
Mar 13, 2011
Messages
1,321
Thanks, Pat. You are right. It was pretty bad. Had about a one inch sag on the DS that would have thrown things off. I have to wait a couple of weeks before I get my lower window cowl ordered. This is the piece that is holding me back from getting the rest locked in. Next time (and ohhhh yes there is another Bronco in my future!) I will not scrimp or cheap out. I just want a Bronco I can drive around. Don't get me wrong, I am not going to slop through this, but I may have a little half a$$ing going on to get it on the road.
 

Stutsmo

Contributor
Bronco Guru
Joined
Jan 24, 2009
Messages
2,549
I bought the cheap rockers for mine some thing tells me i am going to regret it! Your bronco is coming together nice keep at it!
 
OP
OP
71massbronco

71massbronco

Bronco Guru
Joined
Mar 13, 2011
Messages
1,321
Thanks Stutsmo.

Today reinforced the shady #1 crossmember. Noticed a cold weld when I ground down the weld. Tried to reweld it,but burnt right through the metal. So I opted to cut out some 1x1 and tack it in for reinforcement. I decided to do both sides of the questionable metal.

Then finally cut out the DIY inner rocker from my sheet metal and gave it two out of the three bends it needed. Was going to try and bend the last long bend by doing some creative clamping. Decided to wait and see if I can take it to my FIL's shop and bend it in the brake over there.
 

Attachments

  • 1121111528.jpg
    1121111528.jpg
    68.8 KB · Views: 80
  • 1121111545.jpg
    1121111545.jpg
    67.5 KB · Views: 81
  • 1121111553.jpg
    1121111553.jpg
    82.3 KB · Views: 80
  • 1121111823.jpg
    1121111823.jpg
    39.9 KB · Views: 77
Last edited:
OP
OP
71massbronco

71massbronco

Bronco Guru
Joined
Mar 13, 2011
Messages
1,321
Today was supposed to be a light day with the Bronco, but I got in a groove and kept going. Got some parts painted up, like the gas pedal and throttle linkage, e brake, and the floor shifter. Then mounted the shifter on the transmission. I also painted the transmission crossmember and mounted it to the transmission as well. I couldn't locate one of the bushings for the mount and spent at least ten minutes looking for it. Then realized where I put it.(nice pic of it on top of my carb) %)

Then I tried to mount the transmission and engine back together, but was getting fatigued and decided to save it for another day.
 

Attachments

  • 1125112037.jpg
    1125112037.jpg
    85.4 KB · Views: 92
  • 1125112036.jpg
    1125112036.jpg
    85.2 KB · Views: 81
  • 1125111823.jpg
    1125111823.jpg
    88.9 KB · Views: 85
  • 1125111545b.jpg
    1125111545b.jpg
    95.1 KB · Views: 81
  • 1125111545a.jpg
    1125111545a.jpg
    131.6 KB · Views: 86
  • 1125111545.jpg
    1125111545.jpg
    107.1 KB · Views: 84
OP
OP
71massbronco

71massbronco

Bronco Guru
Joined
Mar 13, 2011
Messages
1,321
Got the engine and transmission reunited and back on the frame. Then got them back on the frame, and ready to wrench down. Had to remove the center tunnel to make the job easier since I am essentially a one man operation. Also had to remove the Hurst stick and the T stick so they would clear the crossmember. The only victim was one old spark plug that got broken.

Was going to try and link up the hurst shifter, but it appears I am missing some hardware. I am going to have to go diving in the parts bins to see if I have them. I also need to cut my tunnel for the shifters, but that is for another day.:cool:
 

Attachments

  • 1126111856.jpg
    1126111856.jpg
    118.3 KB · Views: 93
  • 1126111856a.jpg
    1126111856a.jpg
    99.1 KB · Views: 76
  • 1126111857.jpg
    1126111857.jpg
    53.4 KB · Views: 74
OP
OP
71massbronco

71massbronco

Bronco Guru
Joined
Mar 13, 2011
Messages
1,321
After working in the garage, not being able to find my tools, tripping over equipment and parts, I had had enough and it was time to reorganize the garage and clean it up a bit. Spent the morning getting that done. Still have a little more to do but at least I got the heavy cleaning out of the way.

Also, I had been looking on craigslist on a daily basis looking for the sweet deals. Never seemed to get anywhere, but finally with some persistence, it finally paid off.

First off in need of a new hood as the one MC came with was chewed through with rust on the front lip. Also in need of a few other things, including matching rims. Was really looking for some of the 90's bronco rims, really like the look, but guys here in the NE want a fortune for them. So second choice (was really the first, until i saw the 90's factory rims) were original factory steelies. I visited a few yards around here, and you would think stock rims would be easy to come by. No luck.

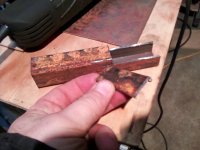
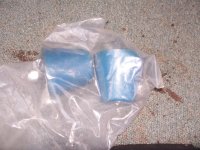
I found an ad that the guy had a hood, windshield, and other parts. So I gave him a call and a day later, I came home with the hood, windshield, two blue front bumpstops, and four stock steel rims for $95.

I didn't even know he had the rims until he tried to sell me some nice shiny chrome mags that were actually pretty cool. He said that his son bought them for his little ranger, then had to inform him they were the wrong size for the old bronco at which he seemed surprised. He even got out the tape measure to double check, then after he saw they were the wrong size for me, he said "well, i have the stock rims downstairs. You interested in them?" Was a good day.
 

Attachments

  • 100_2493.jpg
    100_2493.jpg
    146.3 KB · Views: 65
  • 100_2492.jpg
    100_2492.jpg
    138.2 KB · Views: 69
  • 100_2491.jpg
    100_2491.jpg
    126.8 KB · Views: 66
  • 100_2490.jpg
    100_2490.jpg
    67.6 KB · Views: 65
  • 100_2489.jpg
    100_2489.jpg
    114 KB · Views: 66
  • 100_2488.jpg
    100_2488.jpg
    233.7 KB · Views: 68

Stutsmo

Contributor
Bronco Guru
Joined
Jan 24, 2009
Messages
2,549
Score;D Great job on that purchase! Your garage is looking good also, now get back to work on the Bronco and show us some more pics lol!
 
OP
OP
71massbronco

71massbronco

Bronco Guru
Joined
Mar 13, 2011
Messages
1,321
Score;D Great job on that purchase! Your garage is looking good also, now get back to work on the Bronco and show us some more pics lol!
I'm tryin', I'm tryin!:p I am ordering my lower cowl window frame thingy this week. This is the piece that is kind of holding back the progress of the build. After I get that piece, then it is full on and I can put this thing back together!

Was going to do some cutting this morning but my 10 year old begged me to take him to IHOP after cleaning the garage. So I opted to spend some quality time eatin' pancakes and picking up Bronco parts. I put him to work though, and made him put a rim in the truck when I bought the parts today. Then by the time we got home, it was time to go to a friends house for a post Thanksgiving day dinner.

Note to Randy, (tasker) Sorry bro, opted for this hood because it was $25 and about 90 miles closer! I still may want those springs though!;)
 

tasker

Contributor
all knowing of nothing
Joined
Jun 2, 2006
Messages
20,878
Loc.
NH
good job on the buy! always like it when stuff gets used rather than sit around.
 
OP
OP
71massbronco

71massbronco

Bronco Guru
Joined
Mar 13, 2011
Messages
1,321
Slow day at work, so I got to spend a little extra time on the EB today. I ended up bending up the the PS inner rocker the rest of the way. Not perfect, but good enough.

I cut the t stick hole for the tcase and cut out the shifter hole for the Hurst conversion. Also cut the front one inch off my transmission tunnel. I then used that one inch that I lopped off as a rear extension to make up on on my measuring mistake. Then remounted the tunnel with new added inch on the back.

Also did some PS post repair, cutting out the cancer and replacing it with fresh metal. This took a little more finesse, as post was a little more far gone then I thought.
 

Attachments

  • 100_2503.jpg
    100_2503.jpg
    160.2 KB · Views: 88
  • 100_2502.jpg
    100_2502.jpg
    100.9 KB · Views: 83
  • 100_2501.jpg
    100_2501.jpg
    48 KB · Views: 87
  • 100_2498.jpg
    100_2498.jpg
    118.5 KB · Views: 84
  • 100_2497.jpg
    100_2497.jpg
    87.6 KB · Views: 89
  • 100_2496.jpg
    100_2496.jpg
    83.4 KB · Views: 88
  • 100_2495.jpg
    100_2495.jpg
    145.1 KB · Views: 96
  • 100_2494.jpg
    100_2494.jpg
    117.1 KB · Views: 93
  • 100_2504.jpg
    100_2504.jpg
    132.8 KB · Views: 82
  • 100_2505.jpg
    100_2505.jpg
    137.6 KB · Views: 92

Stutsmo

Contributor
Bronco Guru
Joined
Jan 24, 2009
Messages
2,549
holy cow! ;D. Seriously I am impressed. Keep up the fab work and take lots of pics. Its pretty cool that you are bending alot of your panels instead of buying them.
 

TTTGOWYO

Tyler T. - EB Obsessed
Joined
Sep 3, 2007
Messages
2,151
Loc.
Louisville
It is so nice to see someone who is WAY further into a mess, but making it work, and making it RIGHT! This gives me hope, as I started with much less problems, hopefully I can end up with something as nice as yours will be. Good Luck!
 
OP
OP
71massbronco

71massbronco

Bronco Guru
Joined
Mar 13, 2011
Messages
1,321
Thanks for the compliments guys. If it weren't for the other builds on here, I would be neck deep and have absolutely no clue as to what to expect or how to fix it. So now when I poke my screwdriver through a hole and get some rusty love in return, I am not surprised anymore.
 
Top