• Welcome to ClassicBroncos! - You are currently viewing the forums as a GUEST. To take advantage of all the site features, please take a moment to register. It's fast, simple and absolutely free. So please join our community today!
    If you have problems registering or can't log into your account, please contact Admin.

migs' build thread - A 1970 Bronco ...an ever evolving project

OP
OP
migs

migs

Sponsor/Vendor
Bronco Guru
Joined
Nov 12, 2011
Messages
1,378
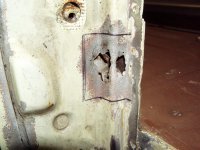
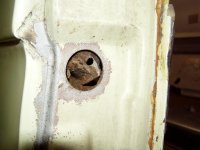
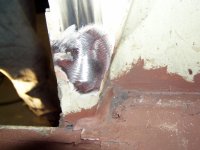
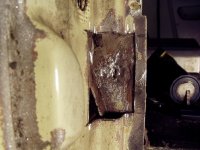
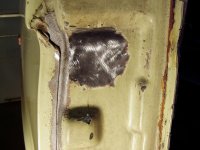
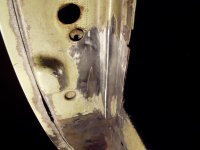
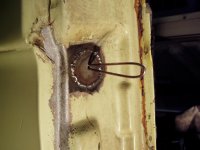
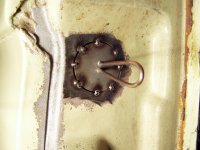
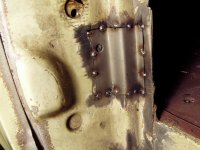
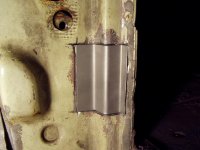
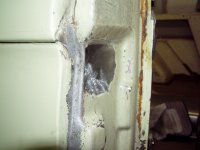
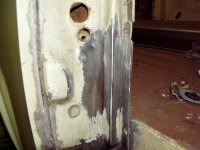
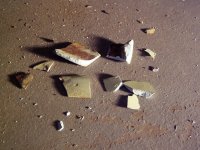
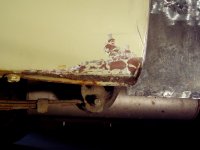
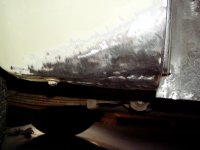
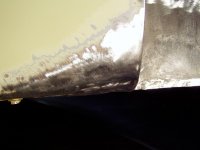
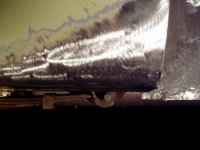
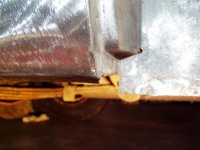
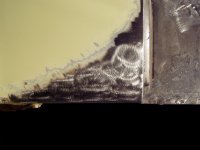
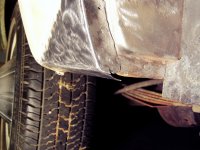
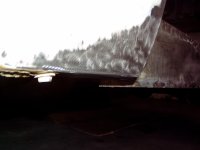
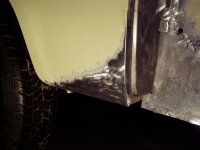
Tonights little project was to tackle the the two spots on the striker post. here they are and here are the patches I made. I welded a loop to the circle so I could hold it in place while tac welding it.
 

Attachments

  • P1010001.jpg
    P1010001.jpg
    118.2 KB · Views: 220
  • P1010002.jpg
    P1010002.jpg
    92.9 KB · Views: 210
  • P1010005.jpg
    P1010005.jpg
    82.3 KB · Views: 196
OP
OP
migs

migs

Sponsor/Vendor
Bronco Guru
Joined
Nov 12, 2011
Messages
1,378
after cutting out the rusted area it revealed a good little chunk of rust on the panel opposite of it. I scraped and ground it off to find some pin holes. it was small enough that I was able to just weld it up from both sides and grind it smooth.
 

Attachments

  • P1010015.jpg
    P1010015.jpg
    90.6 KB · Views: 197
  • P1010012.jpg
    P1010012.jpg
    98.7 KB · Views: 186
  • P1010010.jpg
    P1010010.jpg
    106 KB · Views: 185
OP
OP
migs

migs

Sponsor/Vendor
Bronco Guru
Joined
Nov 12, 2011
Messages
1,378
With that taken care of I could continue with fitting the two patch panels. once fitted they are tacked in place and if everything looks good I finish stitch welding all around. all this work has reminded me that I keep forgeting to get a better welding helmet for home. I have a good one at work but for home use just a bottom of the barrel, pain in the... real cheap auto darkening one that always falls off my head.:mad:
well, after welding, grind it smooth and it's done.
 

Attachments

  • P1010026.jpg
    P1010026.jpg
    102.9 KB · Views: 191
  • P1010025.jpg
    P1010025.jpg
    72.4 KB · Views: 194
  • P1010023.jpg
    P1010023.jpg
    83.1 KB · Views: 202
  • P1010022.jpg
    P1010022.jpg
    86.3 KB · Views: 203
  • P1010021.jpg
    P1010021.jpg
    95 KB · Views: 205
  • P1010017.jpg
    P1010017.jpg
    112.3 KB · Views: 208
  • P1010019.jpg
    P1010019.jpg
    113.1 KB · Views: 202
  • P1010008.jpg
    P1010008.jpg
    92.2 KB · Views: 193
  • P1010035.jpg
    P1010035.jpg
    68.5 KB · Views: 195
  • P1010030.jpg
    P1010030.jpg
    77.9 KB · Views: 190
  • P1010028.jpg
    P1010028.jpg
    81.3 KB · Views: 203
OP
OP
migs

migs

Sponsor/Vendor
Bronco Guru
Joined
Nov 12, 2011
Messages
1,378
Pete, I forgot to ask you if you knew what is with all the sand in and on this truck? it's everywhere, if you start banging on things you get piles on the ground underneath. I should start bagging it for the next flood:p;D I need to get it outside and give it a good pressure washing so I don't have to sweep the garage floor as much.
 

broncoitis

Bronco Guru
Joined
Jul 23, 2010
Messages
4,449
Mig,

Just skimmed through the thread and NICE JOB! Lookin really good for sure. I will be keeping an eye on this one for sure. ;D
 

dave67fd

Bronco Guru
Joined
Sep 24, 2010
Messages
2,863
Is it like beach sand? Wouldn't think it was a coastal truck for how clean it is.

Just filter it and run it through your blaster.;D
 
OP
OP
migs

migs

Sponsor/Vendor
Bronco Guru
Joined
Nov 12, 2011
Messages
1,378
Mig,

Just skimmed through the thread and NICE JOB! Lookin really good for sure. I will be keeping an eye on this one for sure. ;D

Thanks! words of encouragement help kep me motivated.

Dave, Pete said this one made it's way up from florida and spent some time in the carolinas years ago. so it may be sand from up and down the east coast...or... maybe he just used it for doing doughnuts in the sand pit:D
 

fatboy

Contributor
Glad to be here.
Joined
May 15, 2006
Messages
7,062
Loc.
New Hampshire
With that taken care of I could continue with fitting the two patch panels. once fitted they are tacked in place and if everything looks good I finish stitch welding all around. all this work has reminded me that I keep forgeting to get a better welding helmet for home. I have a good one at work but for home use just a bottom of the barrel, pain in the... real cheap auto darkening one that always falls off my head.:mad:
well, after welding, grind it smooth and it's done.

First let me say I saw these repairs first hand last night and the pictures do not do them justice, I am very impressed!

Pete, I forgot to ask you if you knew what is with all the sand in and on this truck? it's everywhere, if you start banging on things you get piles on the ground underneath. I should start bagging it for the next flood:p;D I need to get it outside and give it a good pressure washing so I don't have to sweep the garage floor as much.

I had wondered that myself Brian. I actually found clumps of dried dirt underneath that I had to use a screwdriver to break free.
 
OP
OP
migs

migs

Sponsor/Vendor
Bronco Guru
Joined
Nov 12, 2011
Messages
1,378
Since I'm just about ready to install the rocker panel I finally got around to taking a closer look at the rear quarter behind it. after seeing the crease in the rocker I figured there was no way the quarter could be spared. sure enough, after a little chiseling, some more thick filler popped out. I wanted to address this area before the rocker goes on permanently... so let the fun begin.
these pictures are after chiseling the filler out.
 

Attachments

  • P1010001.jpg
    P1010001.jpg
    145.9 KB · Views: 168
  • P1010002.jpg
    P1010002.jpg
    73 KB · Views: 171
  • P1010003.jpg
    P1010003.jpg
    65.5 KB · Views: 166
  • P1010004.jpg
    P1010004.jpg
    84.9 KB · Views: 172
OP
OP
migs

migs

Sponsor/Vendor
Bronco Guru
Joined
Nov 12, 2011
Messages
1,378
Here it is after sanding away all the filler back to where its just good metal and paint, exposing what needs to be reworked.
 

Attachments

  • P1010015.jpg
    P1010015.jpg
    82.8 KB · Views: 152
  • P1010014.jpg
    P1010014.jpg
    66.7 KB · Views: 147
  • P1010012.jpg
    P1010012.jpg
    68.5 KB · Views: 153
  • P1010010.jpg
    P1010010.jpg
    71.1 KB · Views: 147
  • P1010007.jpg
    P1010007.jpg
    67.1 KB · Views: 151
OP
OP
migs

migs

Sponsor/Vendor
Bronco Guru
Joined
Nov 12, 2011
Messages
1,378
Here it is after working it over with hammers and dollies and whatever other means necessary. notice that there is a small vertical crease on the edge that cannot be removed because the edge of the door post is right behind it.
 

Attachments

  • P1010016.jpg
    P1010016.jpg
    81.4 KB · Views: 154
  • P1010017.jpg
    P1010017.jpg
    95.2 KB · Views: 165
OP
OP
migs

migs

Sponsor/Vendor
Bronco Guru
Joined
Nov 12, 2011
Messages
1,378
And finally, after welding in that little crease and grinding it smooth. after the rocker is in I will come back and fine tune it and make sure that the transition matches.
 

Attachments

  • P1010018.jpg
    P1010018.jpg
    76.2 KB · Views: 133
  • P1010019.jpg
    P1010019.jpg
    106.7 KB · Views: 137
  • P1010023.jpg
    P1010023.jpg
    48 KB · Views: 129
  • P1010025.jpg
    P1010025.jpg
    82.1 KB · Views: 131
  • P1010030.jpg
    P1010030.jpg
    70.6 KB · Views: 134

dave67fd

Bronco Guru
Joined
Sep 24, 2010
Messages
2,863
Great work Brian. Hope you don't find too much more if any. Do you suspect any more areas that will need attention on the body?
 

tasker

Contributor
all knowing of nothing
Joined
Jun 2, 2006
Messages
21,091
Loc.
NH
Migs....you are my wicked super hero! i just love your attention to detail and the way you go about making it right. Let's hang soon! BYOB right?
 
OP
OP
migs

migs

Sponsor/Vendor
Bronco Guru
Joined
Nov 12, 2011
Messages
1,378
Thanks Dave, other than the spots on the front floor pans, this should the last of any serious repair.
and thanks Randy, don't know if the bronco will be ready for BYOB but I'm planning on being there.
 
OP
OP
migs

migs

Sponsor/Vendor
Bronco Guru
Joined
Nov 12, 2011
Messages
1,378
Im keeping my calendar clear that weekend.:)
 

dave67fd

Bronco Guru
Joined
Sep 24, 2010
Messages
2,863
Brian,
After you get that rocker in, prime it up, throw in a seat, pull the drivers door and steal the plates off the wifey's car. Go roadster style. I can follow behind ya.;D
 

fatboy

Contributor
Glad to be here.
Joined
May 15, 2006
Messages
7,062
Loc.
New Hampshire
Looking Good Brian. I recieved this update on my phone this am with no pictures so I was afraid to see what you uncovered after the rocker, but not nearly as bad as my imagination made it out to be.
 
OP
OP
migs

migs

Sponsor/Vendor
Bronco Guru
Joined
Nov 12, 2011
Messages
1,378
yeah, when I took the fender off I could see it started at the bottom of it, so I was pretty sure it was going to end on the quarter. the ding on the fender is not as big, but they still decided to just fill it rather than hammer it out a bit first.?:?
 
Top