


Community
Message Forum
Photo Gallery
Event Calendar
Book Reviews
Bronco Wallpaper
Bronco FAQ
Link Back to CB!
Photo Gallery
Event Calendar
Book Reviews
Bronco Wallpaper
Bronco FAQ
Link Back to CB!

Buy / Sell


Bronco Tech
3 Arm Wiper Setup
Fix Motor Mount
Roll Cage Braces
Throttle Body 65mm
Wheel Alignment
Heat Riser Replacement
Vent Window Repair
Center Console Mount
Straighten Bumper
Ford 6R80 6 spd
More Tech...
Fix Motor Mount
Roll Cage Braces
Throttle Body 65mm
Wheel Alignment
Heat Riser Replacement
Vent Window Repair
Center Console Mount
Straighten Bumper
Ford 6R80 6 spd
More Tech...

Install the app
-
Welcome to ClassicBroncos! - You are currently viewing the forums as a GUEST. To take advantage of all the site features, please take a moment to register. It's fast, simple and absolutely free. So please join our community today!If you have problems registering or can't log into your account, please contact Admin.
You are using an out of date browser. It may not display this or other websites correctly.
You should upgrade or use an alternative browser.
You should upgrade or use an alternative browser.
More work on my 67
- Thread starter A4x4Junky
- Start date
OP
OP
A4x4Junky
Full Member
Appreciate the advice, but have heard good things about the strength of the POR15...gonna give it a go. However, NYLES has first dibs at "I told ya so!!" if it fails on me ;D
Ok, new irritation. The shock hoop is powercoated. There were a couple chips in the coating (bought em used) and I have heard that once it chips rust will begin. No problem. Ill just clean em up and paint em with the rest of the frame...right? No.
That crap literally just melts under a flap disc. I expected it to come off so much more easily. Couple hours grinding away at it tonight...and a couple more at least to finish. How have others taken powdercoating off?
Anthony
NYLES
Bronco Guru
- Joined
- Aug 13, 2004
- Messages
- 9,846
OK oK ill give ya a even better idea.......get 1 quart por CLEAR one quart tie coat primer and one quart hardnose paint
POR it prime it paint it.......
You get your POR, and itll look awsowme oh and you get to pick a color other than black! will be tough as nails(nyles...however you wanna say it!)LOL
Im sticking to my epoxy rattle can ...black
Ive got that lil baby blaster for stuff like that!
POR it prime it paint it.......
You get your POR, and itll look awsowme oh and you get to pick a color other than black! will be tough as nails(nyles...however you wanna say it!)LOL
Im sticking to my epoxy rattle can ...black
Ive got that lil baby blaster for stuff like that!
OP
OP
A4x4Junky
Full Member
OK oK ill give ya a even better idea.......get 1 quart por CLEAR one quart tie coat primer and one quart hardnose paint
POR it prime it paint it.......
You get your POR, and itll look awsowme oh and you get to pick a color other than black! will be tough as nails(nyles...however you wanna say it!)LOL
Im sticking to my epoxy rattle can ...black
Ive got that lil baby blaster for stuff like that!
Was planning to POR the bare metal. Then was going to topcoat with appliance epoxy rattle can. Even black ;D
Anthony

OX1 your right but does it matter? keen eye!
I'm friends with Tony, I suspect he did it for another reason (clearance for something else). I personally would want full support to the rear, since the highest impact would be in that direction, if you slam into a rock.
OP
OP
A4x4Junky
Full Member
I'm friends with Tony, I suspect he did it for another reason (clearance for something else). I personally would want full support to the rear, since the highest impact would be in that direction, if you slam into a rock.
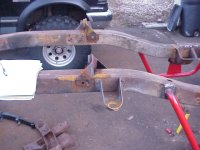
I have been sitting here looking at this for a while...then did a couple searches trying to find pics of others ... and now my brain hurts. I dont see how it could be wrong. The legs on both sides do not go the same direction.
If I flip one over then the ... um ... donut will be facing the wrong direction.
Anthony
Attachments
Last edited:
OP
OP
A4x4Junky
Full Member
NYLES
Bronco Guru
- Joined
- Aug 13, 2004
- Messages
- 9,846
Then I assume your gonna do a header upgrade later? I used P's and mustang FRRP shortie headers they dump on the frame pass side but I think it does turn back a lil not a straight down like in your pic. Not a big issue if you use a 1/2 decent exhaust shop.
ztoolman44
Jr. Member
Appreciate the advice, but have heard good things about the strength of the POR15...gonna give it a go. However, NYLES has first dibs at "I told ya so!!" if it fails on me ;D
Ok, new irritation. The shock hoop is powercoated. There were a couple chips in the coating (bought em used) and I have heard that once it chips rust will begin. No problem. Ill just clean em up and paint em with the rest of the frame...right? No.
That crap literally just melts under a flap disc. I expected it to come off so much more easily. Couple hours grinding away at it tonight...and a couple more at least to finish. How have others taken powdercoating off?
Anthony
When I talked to the guy that does my powdercoating about fixing small chips in the powder, he said to just scuff it a little and spray some quality epoxy enamel rattle can over it. His opinion is that powder coat is the ultimate primer so long as it was applied correctly in the first place and is not peeling.
OP
OP
A4x4Junky
Full Member
Then I assume your gonna do a header upgrade later? I used P's and mustang FRRP shortie headers they dump on the frame pass side but I think it does turn back a lil not a straight down like in your pic. Not a big issue if you use a 1/2 decent exhaust shop.
Yea, been looking at headers a few of the vendors sell. Im sure the fit and finish will be nice, but my wallet is pissed off at me for even looking at the web sites.
Anthony
OP
OP
A4x4Junky
Full Member
When I talked to the guy that does my powdercoating about fixing small chips in the powder, he said to just scuff it a little and spray some quality epoxy enamel rattle can over it. His opinion is that powder coat is the ultimate primer so long as it was applied correctly in the first place and is not peeling.
In hind site this would have been perfectly acceptable...but after my grinder ordeal last nite I do believe I am way past that point ;D
Anthony
Thats what I was thinkin before I came back.....dougnuts same direction? Get to paintin!
First pic is deciving
Yeah, guess I need to look at stock stuff a little closer next time, Heehee!!
OP
OP
A4x4Junky
Full Member
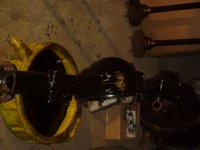
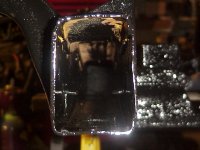
Finally got everything prepped. Hopefully it is all where it belongs. Cleaned out the inside of the frame and started putting on the POR15. Easy to spread out and looks good. They mean it when they say it doesnt come off skin too ;D
Got a little more to do, but happy with the way it turned out.
Anthony
Got a little more to do, but happy with the way it turned out.
Anthony
OP
OP
A4x4Junky
Full Member
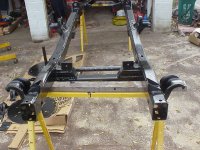
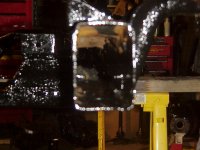
Got a bit more done tonight. I always underestimate the amount of time it will take me to complete a task...
Got the second coat of POR15 on the rear axle. Cleaned up the front axle out to the ball joints and got the first coat on those. Got the second coat on the bottom and sides of the frame and a few brackets. Also got the top of the inside of the frame coated pretty well. Worked out nicely and was pretty easy to accomplish. Next time Ill second coat the 44 then flip the frame and get the final coat on the top as well as the rest of the inside of the frame.
Anthony
Attachments
-
 MVC-030F.JPG45.2 KB · Views: 44
 -
 MVC-028F.JPG40.9 KB · Views: 37
 -
 MVC-033F.JPG52.9 KB · Views: 39
 -
 MVC-034F.JPG42.1 KB · Views: 47
 -
 MVC-027F.JPG86.5 KB · Views: 56
 -
 MVC-026F.JPG83.5 KB · Views: 63
 -
 MVC-025F.JPG63.2 KB · Views: 77
 -
 MVC-024F.JPG85.1 KB · Views: 73
 -
 MVC-032F.JPG54.2 KB · Views: 64
 -
 MVC-031F.JPG55.4 KB · Views: 54
OP
OP
A4x4Junky
Full Member
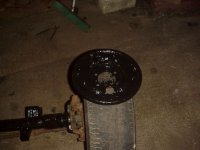
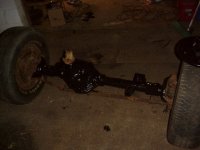
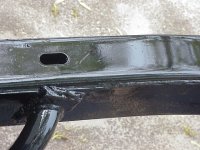
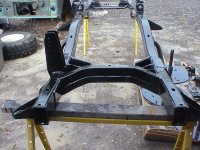
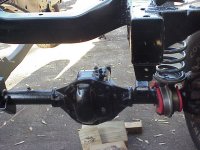
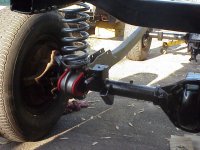
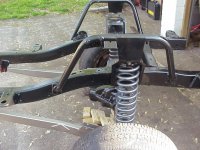
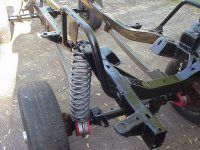
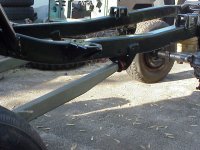
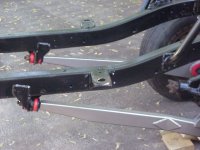
Over the last couple days I finished the POR15 and topcoat on frame, front and rear axles, shackles and a few other pieces. I was pretty happy with how it came out.
Today I got the rear axle reassembled. New axle seals installed. Put the cover back on the 44, then put the front axle in the truck. No real problems.
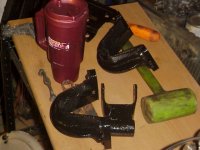
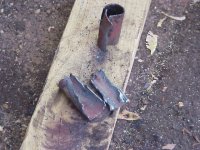
Moved to the rear and started getting the bushings ready for the leaf springs. The 2 in the shackle didnt fit. Find out that there is a metal collar inside the shackle that has to be "removed". Removed? I think the directions can kiss my "ass" ;D I beat the snot out of that collar for a while...didnt move. Grabbed a chisel and that was rather ineffective. Fired up the acetalyne torch...that got it done, but I hated having to resort to that. How have others gotten these out in the past?
Torched the paint off the shackle, so decided to repaint that and call it for the day. Wanted to get both axles in, but I guess that is what next time is for.
Anthony
Today I got the rear axle reassembled. New axle seals installed. Put the cover back on the 44, then put the front axle in the truck. No real problems.
Moved to the rear and started getting the bushings ready for the leaf springs. The 2 in the shackle didnt fit. Find out that there is a metal collar inside the shackle that has to be "removed". Removed? I think the directions can kiss my "ass" ;D I beat the snot out of that collar for a while...didnt move. Grabbed a chisel and that was rather ineffective. Fired up the acetalyne torch...that got it done, but I hated having to resort to that. How have others gotten these out in the past?
Torched the paint off the shackle, so decided to repaint that and call it for the day. Wanted to get both axles in, but I guess that is what next time is for.
Anthony
Attachments
-
 Metal Shackle Bushing.JPG81.4 KB · Views: 36
 -
 Dana 44 Installed.JPG70.8 KB · Views: 41
 -
 Dana 44 Installed 2.JPG71.1 KB · Views: 50
 -
 Passenger Coil Spring Installed.JPG76.1 KB · Views: 53
 -
 Passenger Coil Spring Installed 2.JPG81.5 KB · Views: 49
 -
 Radius Arm Installed.JPG73.4 KB · Views: 41
 -
 Radius Arm Installed 2.JPG49.9 KB · Views: 45
Similar threads
- Replies
- 45
- Views
- 2K
City: Buhler
Price: $Auction
- Replies
- 2
- Views
- 445
- Replies
- 2
- Views
- 387