lucky you! I sported around in a ‘60 F-150 inline 6, 3 on a tree. Fully loaded with heater and 2-60 air conditioning. LolI was driving a Bronco...")
Randy


lucky you! I sported around in a ‘60 F-150 inline 6, 3 on a tree. Fully loaded with heater and 2-60 air conditioning. LolI was driving a Bronco...
Stock speedometer? If so, it does not use a VSS.Speedo works and it won’t start in gear, so I’m guessing they’re connected and working.
Stock speedometer? If so, it does not use a VSS.
And even if you have an electronic speedometer, it doesn’t mean the computer is connected to a VSS. Not that it’s an absolute necessity with Efi, but it does help with things like stalling, when put into drive, or stalling when coming to a stop at a stop sign.
Doesn’t mean it’s your issue. Just means that it might still be worth checking into.
Does the system come with a VSS?
What speedometer are you running?
@reamer, how's the Edelbrock EFI sump kit working out for you? The reason I ask is I just ordered most of the parts for a top end rebuild (Pro Flo 4 EFI, Performer heads, Performer plus cam, Bronco script valve covers, aluminum water pump, TBP Tri-Flo 4-core Aluminum radiator, timing chain, and all associated hoses, gaskets and bolts) and I got the #36031 universal sump kit for free (i.e., as a promotional gift) from Summit. Originally I had planned to also order the WH M1A1 SS tank with the in tank electronic pump (which would also require buying a fuel pressure regulator for the PF4 EFI), but like you said, I could avoid the electronic fuel pump and fuel pressure regulator (and hence save a few hundred dollars) and just use the sump kit. Any problems or regrets going the sump kit route? Anyone else have an opinion?I did the pro flow 4 in @ 8 hrs time, 2 hrs doing tear down and the rest with the install. I DID NOT do any sort of special EFI pump-in-new-tank, .....Edelbrock offers a EFI sump kit,, You use the stock mechanical fuel pump, and original gas tank. your original pump pumps gas to the sump. In the sump is the high pressure fuel pump that goes to the intake. Turn key, set timing, and some other stuff (on your phone) and have not looked back (16 months now) NO loss of "memory" and "re-programing" (like a sniper or Fitech)... Sweet and simple!
Is there a reason the stock throttle linkage won't work? Do you have any photos of your throttle setup?Continued…
How it went/what I learned:
- As can be seen from the parts list, this (for me anyway) was not just something you bolt on on a Saturday. Even without some of the non-related EFI project stuff on the list, it still takes quite a bit of additional stuff to do it in what I would consider, or what my knowledge tells me is, the "right way". So, consider this if the PF4 is something you're thinking about doing.
- I only got to work on this project this winter on a few days off work and for a couple hours on Saturdays and Sundays while my kid napped. With installing everything above, and including reinstalling the accessory drive and radiator, new trans cooler and coolant/washer fluid tank, I had 40-50 hours in it...or at least that's what I'm telling myself.
- Educate yourself about the system (I'm still doing this part). There is a PF4 forum out there that is both helpful AND terrifying. Lots of good, specific info and lots of horror stories that make you question what you're getting yourself into and why you didn't just learn more about carb's. The system comes with a set of pretty detailed installation and operating instructions - follow them. Most of the problems I've read about come from people not following the instructions (e.g., buying the wrong kit for the application, picking the wrong map for the system, wrong fuel pressure setting, not wiring the fuel pump correctly, not wiring the ECU correctly) - all stuff explicitly described in the instructions.
- Hood clearance: This setup did sit higher than the stock 302 intake + EGR carb spacer + 2100 carburetor (I want to say it ended up about 3/4" taller). With a 1/4" air cleaner spacer and a 2" air cleaner, I have about 3/8" of space between the top of the cleaner housing and the hood. This is also with original body mounts that are probably about 1/2" thick.
- The M1A1 is a bit of bear to install by yourself, but it's possible. Just make sure your vent, feed/return lines, and wires for fuel pump and sending unit are long enough to go over the back cross member while the tank is sitting on the ground (if you're in a retro-fit situation). The construction of the tank is awesome and high quality. The in-tank pump is louder than I hoped, but this is my first experience with in-tank, so maybe it is what it should be. So far, the sending unit they supply works with my original wiring and gauge. I'm with @jamesroney , I don't understand why the vent for the tank is below where the "full" level would be. I didn't do any mods to this but just used the rollover valve and plan on trying not to go over 20-ish gallons when I fill it.
- I had the original intake manifold that has never been removed, and it took a big ol' gooseneck crow bar and some leverage to get the thing loose. If you have the same, keep the threaded studs and use them to help with the new intake install. They keep you in the right place when you're dropping it down.
- It took me 3 sets of intake gaskets. With the first set of 1250 S-3's I was worried I didn't get enough RTV at the front and back of the block, so I pulled it to re-do those areas. With the second set of 1250 S-3's, I discovered that the opening for the water passages is too big for my heads and it allows water to leak at the front edge of the head. That took me to just the standard 1250's, which people seem to have really strong negative feelings for, but so far, so good. I chose to use RTV only at the front and back of the block.
- The intake and distributer drop in place like any other intake and distributer I suppose (this was my first time). Lots of retorquing of the bolts. Not sure why, but I did have a leak at where the fuel sensor screws into the front of the fuel rail. It is a NPT thread, so I put some sealant rated for fuel on it and it did the trick. It comes with the fuel rail crossover hose at the back, but that and the fuel sensor/fuel line input can all be moved around. It looks like some guys move the crossover hose to the front, but it seems like you'd fight the distributer doing that. I left the fuel input on the front, drivers side and ran the fuel line up kind of how it already did from the mechanical fuel pump on that side. The distributer diameter is big and my 14" air cleaner, with the help of a 1/4" spacer, clears the #5 plug wire by less than 1/8". I'm not sure why that thing has to be so big. I've seen other builds where they didn't have a chance of getting a 14" air cleaner on, so not sure how I was able. I'm looking at trying a Spectre carb hat type assembly too.
- I mounted the fuel pressure regulator on the drivers side fire wall, just to the right of the steering shaft, and ran the supply and return lines on the inside face of the frame rail. Getting rid of the dual exhaust I had before made this easier and cleaner and less susceptible to heat.
- I got rid of the stock coolant expansion tank and replaced it with the coolant/washer fluid tank that mounts to the front drivers corner so I could clean up the passenger side and mount the ECU to the top of the inner wheel well. I don't love it here but I was running out of options based on harness lengths and other things to install and I didn't want to open the can of worms/spend the amount of time to install it inside the cab.
- Connecting the harness to everything is pretty straightforward. You just have to follow the instructions. The one connection I was worried about was the 12v switched power (it has to be 12v both in On and Cranking). From reading on this forum, it looks like there is only one viable option for that on a Bronco. The PO had installed a kill switch that came off the back of the ignition switch, so I was lucky and already had a source that worked for this.
- The maximum draw for a fuel pump that can be wired directly to the ECU is 10 amps, otherwise you have to run a relay. I'm pretty sure the in-tank pump in the WH M1A1 is 10 or under, but I went ahead and still ran a relay. I mounted it in the engine bay, but the fuel pump lead off the harness is 84", so it is plenty long to run closer to the tank area.
- I mounted the O2 sensor on the passengers side header collector. It seemed like there was only one real option for its orientation on that side. The O2 sensor lead from the harness is 35" long, so I think it could reach the drivers side where it seemed like there were more options for orienting the sensor. The Scott Drake headers come with O2 bungs in both collectors.
- Duff's 2-into-1 exhaust was pretty straightforward. The only piece I had to end up cutting was the tailpipe where it extended too far past the face of the fender. With the O2 sensor and the exhaust needing a good seal, I used the exhaust band clamps instead of the saddle clamps. I will say that the tailpipe and the strap from the M1A1 tank don't play nice in the same space, so that will take some head scratching and a custom solution.
- I abandoned the original evap cannister behind the drivers seat and added the Delorean rollover valve (mounted on the outside of the frame rail on the passengers side) and Doorman vapor cannister (mounted to the firewall on the passengers side). 5/16" hose comes from the M1A1 tank to the rollover valve and from the rollover valve to the vapor cannister. 3/8" hose goes from the cannister to full time vacuum at the back of the intake. In my mind, this should seal up gas fumes/vapors, but it still seems pretty strong in my garage. If you've made it this far in the post and have any ideas, I'm all ears.
- I was able to use the original accelerator bell crank and throttle linkage. It seems like people get mixed results on this and most switch to a throttle cable. I didn't even attempt to use the original kickdown rod, so I broke off half a paycheck and paid for a Lokar bracket and kickdown cable. Both were straightforward installs.
- The first start up: let's just call it very anticlimactic. No crank, no click, nothing. After 10 minutes of electrical tests, for some reason I decided to see if it was in Park. Nope, I had put it in gear to make it easier to put on the #8 plug wire and only got it back to R when I went back to shift it back to P (I love and hate these moments - easy fix but I feel like an idiot). Once in Park, I turn the key and it fires right up. The system uses Edelbrocks E-Turner app, either on your own device or a Fire tablet that comes with the kit, to pick a map for engine and to do the initial setup. It can feel pretty overwhelming at first, but it's fairly easy to understand, follow, and use.
- I'm currently in the self-learning/tuning phase. After reading a lot on the Edelbrock forum, it appears there are a lot things that require you to make an adjustment and then restart the self-learning phase. I have some Idle issues I'm working through, but so far it seems to be running pretty well. Attached is a screenshot of one of the digital displays that shows what all can be adjusted and tracked.
My takeaways:
I'm still thinking about this. What this system is capable of doing is way above my current paygrade and knowledge, so it's made me have to learn a lot more about the "how" and "why" behind engine...science (?), which is where I should have started anyway. It was definitely fun to think about, plan, buy (not pay for), figure out, install, and now enjoy. Would I do it again with the exact situation I had and the problem I was trying to solve? Probably not. I would've started with smaller (and cheaper) bites. Hopefully I can remember this post the next time I want to jump in the deep end.
View attachment 904012
View attachment 904019 View attachment 904016
Is there a reason the stock throttle linkage won't work? Do you have any photos of your throttle setup?


Great informative post.
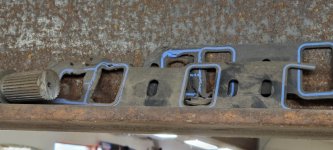
If you used the 1250 Felpro w/o steel inserts be careful as they will distort/warp and allow coolant to leak into your valley or worse into a port and hydrolock your engine.
Be even more careful ever washing your engine as it just takes a 1/2 cup of water to hydrolock a cyl and I found plenty of sbf owners on Corral and yellow bullet that had the same faulty 1250 gasket issue I had. (edited 3 spell check changes)
Pic below isn't a great pic but yeah, the heads were new and torqued to spec.
Great writeup.
this is so helpful. I bought the lokar bracket like you did, but I don't need the throttle kickdown, so to keep it simple, i am tempted to save the $$ and use the stock bell crank.Mine was almost too short when I had to unthread it, so I ordered a new one that was basically the same but longer. I also flipped it so it lined up better either throttle body. I think I loosened the bell crank bracket and shifted it towards the passenger side a little to also help with alignment.


this is so helpful. I bought the lokar bracket like you did, but I don't need the throttle kickdown, so to keep it simple, i am tempted to save the $$ and use the stock bell crank.
Thank you for the write up, It's very helpful.
I have this 302 ready almost ready to go into a 1976 Bronco.
I just bought it locally here in Iceland. It's a freshly rebuilt 1995 302 with E7 heads
Would you advice against using the stock fuel tank?
If not, what measures would I need to take?
You shouldn’t need that (overpriced) Lokar bracket if you’re not using a kickdown cable.
I remembered that I also had to push the bell house crank bracket up and grind a little off the the leg of the arm that connects to the linkage because it was pretty close to rubbing on the drivers side fuel rail.
I have a body lift, so the geometry will be different for me and I shouldn't have any clearance issues (?). Thanks for saving me like $130!You shouldn’t need that (overpriced) Lokar bracket if you’re not using a kickdown cable.
I remembered that I also had to push the bell house crank bracket up and grind a little off the the leg of the arm that connects to the linkage because it was pretty close to rubbing on the drivers side fuel rail.
Thank you I think so to.That sure is a good looking engine you got there!
Is that just a fancier looking version of a PCV valve? Or is it one of those custom tunable ones that we were talking about a while back?
I have looked at M1A1 at WHWell, I don’t remember the instructions as well as when I did the install, but you have to run a return line to your tank regardless if you use their sump system or not and your stock tank isn’t setup for that. I also wanted more fuel capacity and an in-tank fuel pump, so I went aftermarket (Wild Horses M1A1). I think most of the bronco-specific tanks that are sold by the vendors on this forum will go right in barring any previously done crazy mods. I’d say the biggest issue you will run into with one of them is routing the exhaust around it.
I have looked at M1A1 at WH
Actually I think I would go with a Locally made tank. I was hoping to be able to use my stock tank, But next on the list was to make a tank for Coyote fuel pumps.
I am running another project with a 2019 Coyote and I would be nice to be able to make two identical tanks and use the 2019 Mustang In tank Fuel pump. I believe they are self regulating. I don't know if they Coyote pumps work with Edelbrock PF4. But I believe the pressure is around 55psi and I understand the EPF4 requires 43psi.
Use this: https://www.edelbrock.com/adjustable-universal-efi-sump-fuel-kit-67gph-35-90-psi-36031.html - read the descriptionThank you for the write up, It's very helpful.
I have this 302 ready almost ready to go into a 1976 Bronco.
I just bought it locally here in Iceland. It's a freshly rebuilt 1995 302 with E7 heads
Would you advice against using the stock fuel tank?
If not, what measures would I need to take?
Use this: https://www.edelbrock.com/adjustable-universal-efi-sump-fuel-kit-67gph-35-90-psi-36031.html - read the description
Specifically designed to eliminate return-lines to tank. Could even be made to work with the stock aux tank switchover valve.
THX,
-JB