• Just a reminder that you won't be able to start new posts or reply to existings posts in the Archive forum.

    This is where all the old posts go so they can still be used for reference and searched.
  • Welcome to ClassicBroncos! - You are currently viewing the forums as a GUEST. To take advantage of all the site features, please take a moment to register. It's fast, simple and absolutely free. So please join our community today!
    If you have problems registering or can't log into your account, please contact Admin.

New Project for Tito - Explorer Radiator Mocked up, Hydro mocked up, aligning doors..

Green or Blue, what say you?

  • Med Green Glow Poly

    Votes: 65 58.0%
  • Reef Blue

    Votes: 47 42.0%

  • Total voters
    112
OP
OP
Tito

Tito

CB Fire Starter
Joined
Jan 29, 2006
Messages
10,781
Loc.
Bakersfield, CA
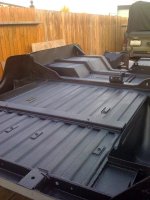
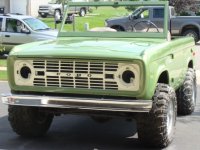
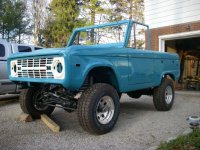
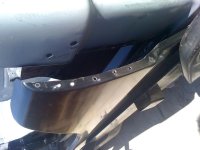
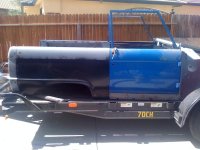
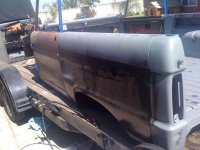
Well quarter panels are welded on!!!

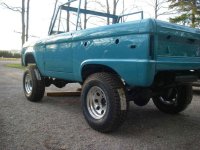
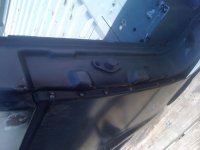
Put the doors on to check fit one last time before welding, pretty happy with the fit. Just need to flip back over 1 more time to weld the quarters to the rockers and lower tail light panels.

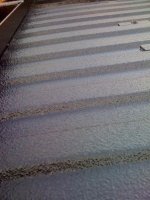
Then when done with that, time to seam seal and bedline the bottom. Going to try and get those seams real good so I wont have any issues in the future.

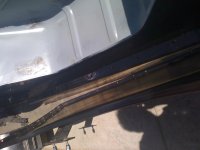
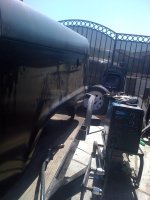
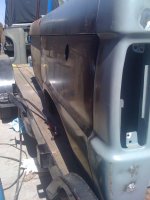
First few pics are the prep I did.
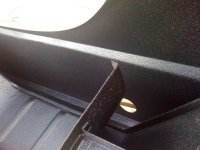
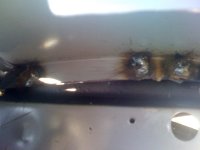
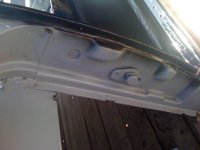
Filled all the holes that i had put in the striker posts as this will get welded to now.
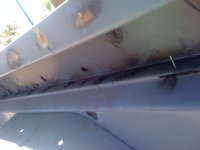
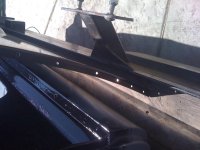
I drilled holes in the front of the quarters to weld through into the striker, the bottom will be welded through the lower brace into the quarter.
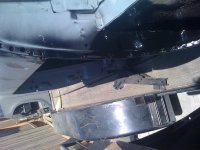
Holes at the bottom of the rear of the quarter to weld through into the tail light panel, the upper gets welded through the inside of the tail light panel (pain).
Also predrilled the inner quarter so that I could weld down through the inner quarter into the quarter panel.
 

Attachments

  • IMG_0216.jpg
    IMG_0216.jpg
    61.4 KB · Views: 80
  • IMG_0229.jpg
    IMG_0229.jpg
    52.9 KB · Views: 76
  • IMG_0228.jpg
    IMG_0228.jpg
    43.4 KB · Views: 77
  • IMG_0227.jpg
    IMG_0227.jpg
    64.8 KB · Views: 69
  • IMG_0220.jpg
    IMG_0220.jpg
    69.4 KB · Views: 72
  • IMG_0219.jpg
    IMG_0219.jpg
    85.4 KB · Views: 79
  • IMG_0218.jpg
    IMG_0218.jpg
    68.1 KB · Views: 77
  • IMG_0217.jpg
    IMG_0217.jpg
    98.7 KB · Views: 77
  • IMG_0231.jpg
    IMG_0231.jpg
    88 KB · Views: 90
  • IMG_0232.jpg
    IMG_0232.jpg
    91.6 KB · Views: 73
  • IMG_0233.jpg
    IMG_0233.jpg
    85.6 KB · Views: 74
  • IMG_0234.jpg
    IMG_0234.jpg
    80.9 KB · Views: 69
Last edited:

sprdv1

Contributor
REBEL
Joined
Mar 8, 2007
Messages
81,983
LOL, you know how he is, I see multiple projects in the future. ;)
 
OP
OP
Tito

Tito

CB Fire Starter
Joined
Jan 29, 2006
Messages
10,781
Loc.
Bakersfield, CA
I wish I could do it myself but have had an extra set of hands to pick it up and flip over when I need it.
 

Dave

Contributor
Bronco Guru
Joined
Aug 25, 2006
Messages
2,264
If anyone has suggestions on colors feel free to suggest, really not sure if I want to do a stock retro color, a modern color or a bright fun color.

We are on our fall color tour driving east through northern Minnesota. Saw a 30 something Buick pulling a small retro travel trailer. Both were painted a maroon or burgandy with a sorta of a beige or tannish top. I've seen that color scheme on vehicles of that era. It was really sharp. Especially the matching paint scheme. I almost did a uturn and ran them down to take a picture. Thinking about it for my Bronco.

http://www.tcpglobal.com/autocolorlibrary/aclchip.aspx?image=1940-buick-pg01.jpg

Might have been the royal maroon / sequoia cream from the above link.
 
OP
OP
Tito

Tito

CB Fire Starter
Joined
Jan 29, 2006
Messages
10,781
Loc.
Bakersfield, CA
Here are some old photoshops I did, one has kind of a maroon and tan.

I like the first, the seller kinda photoshopped his for sale pics, I dont think it was quite as pearly. The second is real clean, 3 and 4 of course are shopped.
 

Attachments

  • olivegreencreamcicle.jpg
    olivegreencreamcicle.jpg
    97.8 KB · Views: 53
  • redcreamcicle.jpg
    redcreamcicle.jpg
    97.8 KB · Views: 64
  • green.jpg
    green.jpg
    61.8 KB · Views: 53
  • greenBetty.JPG
    greenBetty.JPG
    127.9 KB · Views: 50
OP
OP
Tito

Tito

CB Fire Starter
Joined
Jan 29, 2006
Messages
10,781
Loc.
Bakersfield, CA
Well got the tail light panel replaced, all welds ground on the bottom of the tub from hole fills, and quarters all welded up.
Got some time yesterday to finally spray the liner down. Its Raptor from UPOL, I got tintable as I didnt know what color initially but ended up tinting it black as I need to get this tub inside and installed before we get some weather next week. I used the Raptor liner on Pinky's floor and inside the top. You can go thick or thin if you want with the stuff but I usually keep it thin for more coverage, less product needed. Of course I have a couple thin areas I am going to have to go back over today as it got dark on me while I was working. I used 5 quarts, will use 1 more. They come 4 to a kit, I got 2 but will need to get 1 more kit looks like, I figured I would, just could only afford to buy the 2 at the time. I really like the texture of the product and although not as durable as a hot sprayed liner (linex or other high $$$ coatings), it is a solid DIY product. Really isnt too messy to apply although I am not excited about taping again today to touch up.
 

Attachments

  • photo4.jpg
    photo4.jpg
    49.9 KB · Views: 42
  • photo3.jpg
    photo3.jpg
    95.8 KB · Views: 41
  • photo2.jpg
    photo2.jpg
    103.3 KB · Views: 40
  • photo.jpg
    photo.jpg
    98.9 KB · Views: 48

johnnybgood74

Bronco Guru
Joined
Mar 4, 2009
Messages
1,135
Loc.
boise, idaho
man Tito, thats looking sweet! i am going to go the Raptor liner on my 69 project. gave the herculiner a shot on the 72 but wasnt impressed with the texture. your doing a hell of a job! keep it going! what did you end up spending to spray it on including the gun?
 
OP
OP
Tito

Tito

CB Fire Starter
Joined
Jan 29, 2006
Messages
10,781
Loc.
Bakersfield, CA
man Tito, thats looking sweet! i am going to go the Raptor liner on my 69 project. gave the herculiner a shot on the 72 but wasnt impressed with the texture. your doing a hell of a job! keep it going! what did you end up spending to spray it on including the gun?


The Raptor kits are online for $100 each WITH a gun, a great deal. I will use 1.5 kits per side basically so $300 to do the top and bottom. Out here to get that sprayed is whole heck of a lot more.

Its amazing to see when I remember how many holes were in that floor and wheel wells. Well over 150 holes I had to fill and grind on both sides. Went through a whole tank of gas doing that project, at least a dozen holes were half to three quarter inch in diameter.
 

stupidboy

My wifes porn star.
Joined
Dec 29, 2009
Messages
5,790
Loc.
Morrisdale Pa.
Oh man you have that thing lookin good! Its alot of work, are you at this full time or don,t you have anything else to do. I can't seem to ever get that much done.
 

marty

Full Member
Joined
Apr 18, 2008
Messages
867
Loc.
massapequa, n.y.
don't know if i missed it somewhere but who's quarter panel did you use. and how would you say the fitment was overall. i know these things don't just usually just line up perfect but getting the best fitting one helps. i have to do one on the passenger side and was thinking of maybe not using steel but a fiberglass quarter. spoke to very nice guy from broncodesign.com yesterday who makes some very nice fiberglass stuff. just keeping my options open here. i am going to probably have to replace the lower section of the upper where the upper part of the lower meet. my truck is a sport model which has the trim running right above that seem and i figured i could just cut right in the middle of the trim area and in the wheelwell area and replace that metal. i just bought a upper quarter section from another memeber here so i am prepared. thanks for all the pictures and insight will help me a great deal.
 
OP
OP
Tito

Tito

CB Fire Starter
Joined
Jan 29, 2006
Messages
10,781
Loc.
Bakersfield, CA
Oh man you have that thing lookin good! Its alot of work, are you at this full time or don,t you have anything else to do. I can't seem to ever get that much done.

Haha, yeah right, you are rollin with yours and had way more work to do!!!

I get some time here and there, more than most guys but not as much as I would like. My goal was to be able to take it for a drive on my birthday Nov 19 but the way its going that is possible but isnt likely. I've had a whole lot of honeydo's on the list lately. I have some parts to get from Portland during Thanksgiving including the bench seat for the front that is all redone and ready to go in, hopefully stop by Tom's Bronco Parts and get the last few things I might need as well.
 
OP
OP
Tito

Tito

CB Fire Starter
Joined
Jan 29, 2006
Messages
10,781
Loc.
Bakersfield, CA
don't know if i missed it somewhere but who's quarter panel did you use. and how would you say the fitment was overall. i know these things don't just usually just line up perfect but getting the best fitting one helps. i have to do one on the passenger side and was thinking of maybe not using steel but a fiberglass quarter. spoke to very nice guy from broncodesign.com yesterday who makes some very nice fiberglass stuff. just keeping my options open here. i am going to probably have to replace the lower section of the upper where the upper part of the lower meet. my truck is a sport model which has the trim running right above that seem and i figured i could just cut right in the middle of the trim area and in the wheelwell area and replace that metal. i just bought a upper quarter section from another memeber here so i am prepared. thanks for all the pictures and insight will help me a great deal.

You know its a real mixed bag and I think I ended up with a new stock redesigned driver side and an old stock passenger. They are definitely different and not from the same manufacturer or production. The new stamped driver is really nice, great complete mounting flanges where it meets the upper and the lines are pretty darn close. The passenger side upper flange was half the size it should have been and a little skimpy where it meets the rocker panel as well. It was also a bit wavier than the driver at the upper bend. I'll get it to work but wasnt the most impressed. Driver side I was. It was a lot of work but not as bad as I thought it would be. I would definitely do it again if needed, actually contemplating uncutting the other tub I have in the garage as well, although that one I could get away with just cutting an inch or so in from the seams, cutting the replacement a half inch bigger, then using a flanger all the way around to allow the new panel to fit behind the existing and then plug weld it on and seal it up. I had to replace these completely as there was rust in the seam and a good dent in the corner of 1 side. Had to replace a bottom tail light panel as well.
 
OP
OP
Tito

Tito

CB Fire Starter
Joined
Jan 29, 2006
Messages
10,781
Loc.
Bakersfield, CA
Alright, coming down to it, deciding between only 2 colors now. What do you guys think?

Med Green Gloy Poly - pic of Mono's sweet project
Reef Blue -croft75's, looking to get a pic of it all done
 

Attachments

  • mono1.jpg
    mono1.jpg
    42 KB · Views: 44
  • mono2.jpg
    mono2.jpg
    92.1 KB · Views: 38
  • croft1.jpg
    croft1.jpg
    146.9 KB · Views: 39
  • croft2.jpg
    croft2.jpg
    117 KB · Views: 32

regshawn

Bronco Guru
Joined
Feb 23, 2006
Messages
2,597
Loc.
Portland
Alright, coming down to it, deciding between only 2 colors now. What do you guys think?

Med Green Gloy Poly - pic of Mono's sweet project
Reef Blue -croft75's, looking to get a pic of it all done

I think you should pick a color that makes you happy and not what is most popular........................just saying!%););D
 
OP
OP
Tito

Tito

CB Fire Starter
Joined
Jan 29, 2006
Messages
10,781
Loc.
Bakersfield, CA
I think you should pick a color that makes you happy and not what is most popular........................just saying!%););D

Thats the thing, I really like both of these colors and am having a real hard time choosing between them. I should ask my kids, already know what the wife will pick!!!
 
Top