• Welcome to ClassicBroncos! - You are currently viewing the forums as a GUEST. To take advantage of all the site features, please take a moment to register. It's fast, simple and absolutely free. So please join our community today!
    If you have problems registering or can't log into your account, please contact Admin.

One Piece Door Window kit

ba123

Contributor
Bronco Guru
Joined
Oct 29, 2022
Messages
1,889
Loc.
CA
This is excellent. Thank you for the inspiration. Any chance you can take some pictures? I have the delete kit and it’s working okay but could be way better. I just hate to pull the door apart again.
Mark


Sent from my iPhone using Tapatalk
Meaning you have the one piece window but no power window, or you're interested in the window sweeps part?

Happy to help.
 
Last edited:

ba123

Contributor
Bronco Guru
Joined
Oct 29, 2022
Messages
1,889
Loc.
CA
I just ordered. I need 2 3 foot strips for each side and they are sold in pairs of 4 ft.

Was about $100 and then another $20+ for tax and shipping. Certainly not inexpensive, but should be a huge upgrade and well worth it. I do plan on gluing these in and either going to use weatherstrip adhesive of silicone.

Anyone have any experience gluing these things on? Ideally, I'd want them to stay put but be able to remove and reuse if anything comes up, but priotity #1 is for them to stay put because it's unlikely I'll need to remove.
 

ba123

Contributor
Bronco Guru
Joined
Oct 29, 2022
Messages
1,889
Loc.
CA
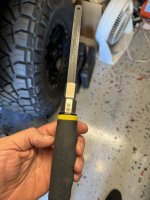
I knew I had this but was confused, been too long since I used it…this thing holds a hacksaw blade. Worked MUCH better than using my hands on a blade. 😎
IMG_7072.jpeg
 

markw

Contributor
Bronco Guru
Joined
Sep 10, 2009
Messages
2,053
Meaning you have the one piece window but no power window, or your interested in the window sweeps part?

Happy to help.

I have the one piece kit installed. Stock cranks. Interested in the rubber sweeps and how you install them.
My cranks feel rough and as though they may break off any time. Never was happy with the way the were built and found them hard to install. Very early kits several years ago.


Sent from my iPhone using Tapatalk
 

ba123

Contributor
Bronco Guru
Joined
Oct 29, 2022
Messages
1,889
Loc.
CA
Ok, so…this has been a stressful thing to figure out the right way to do it. Ya know, window in vs out; corner filler piece in vs out; clips vs silicone vs adhesive.

For the outer sweep I settled on weatherstrip adhesive as I want that to stick no matter what.

Put a little bead and then tough it so it spreads. Don’t smear it or you’ll move it. Just a little touch touch down the line so it looks like this:

IMG_7154.jpeg

Then, since your window edges are ALREADY taped and protected, you just put it there by reaching your fingers down and smooth it constantly until it holes and then check it again ever few minutes but it should set up pretty quickly.

IMG_7155.jpeg

I’ve already done the whole passenger door but I’m not sure about the inner.

I first tried double stick tape but didn’t like that, then just did it with silicone but (1) I’m not sure if it’ll hold and (2) the butyl rubber holding the window in hits right there so I might have to remove the inside strip, cut a bit of the butyl and then put it back and use weatherstrip adhesive. I’ll check when I finish the drivers side.

I was VERY nervous about using the weatherstrip adhesive anywhere around there but as long as you apply it on the weather strip only and protect the door, it seems fine. If I do the inside that way, I’ll have to cover the window as well.

Also, in order to do the inside after installing the window you have to tape and hold the window so that it pulls back the outside weatherstrip and also have to use tape to pull back the weatherstrip in order to put the window in.

IMG_7145.jpeg

3 pieces held it, the. Rest was to keep it clean.

For the filler piece, I had to cut part of the tab in order to put it in with weatherstripping in there. The outside piece runs the entire length of the window and makes the filler piece fit so much better and seals it as well.

I’ll post more when done but here’s a pic of both on the pass side.

IMG_7157.jpeg
 

DirtDonk

Contributor
Bronco Guru
Joined
Nov 3, 2003
Messages
48,744
Lots of work. But lots of result!
Is that both the inner and outer edge of each door that you’re doing? Looks like it.
Looks like it’s an almost perfect fit too. Good choice of product, it seems…😉😁

I was just thinking that, if the inner seal is too aggressively up against the glass, it might preclude someone from adding aftermarket window tint film.
Pre-tinted glass would be no issue, but it might scratch a film over time. It’s pretty tough stuff, but I think I remember seeing it scratching over time when the fuzzies were too tight.

Personally, I like a tight fit on the glass for the reason I stated originally. Wiping the dew and frost off.

Thanks for the details and pics.
 

ba123

Contributor
Bronco Guru
Joined
Oct 29, 2022
Messages
1,889
Loc.
CA
Yes, both doors. I got lots of samples and that’s definitely the best for the outer and there were two I liked for the inner but think this one is the best one. Neither one really presses aggressively as they are at a nice sweep angle and felt on the inside touching the window. I’d think it would be fine with tint. My windows were supposed to be tinted and go figure they messed up my order.

Only trouble I have is trying to get the angle at which the window comes down in the track to be right with this Nu-Relic power window mechanism. Seems off but not sure. Might have to add some spacers on the top mounts to address it. Will post if I do.
 

ba123

Contributor
Bronco Guru
Joined
Oct 29, 2022
Messages
1,889
Loc.
CA
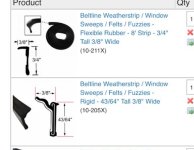
Yes, and the top larger one is outer

The dimensions are literally perfect, but these windows SUCK! I've got to take the drivers one back out as the rubber holding the window in is high on that side as well and it pushed the weatherstrip loose when I raised the window all the way up.

looking more, I’m not sure it’s going to work at all with this window. The glass frame sticks up too far. NO felt will work with this BS. II e wasted soooo much time on this crap product.

Look how far it stick up above where it should when rolled up:
IMG_7171.jpeg
 

ba123

Contributor
Bronco Guru
Joined
Oct 29, 2022
Messages
1,889
Loc.
CA
Now that it’s off I see it might work with this bottom lip removed.

1705446835548.png
 

ba123

Contributor
Bronco Guru
Joined
Oct 29, 2022
Messages
1,889
Loc.
CA
I cut it off, not very easily with tin snips and reinstalled. Will try this again and see. Two of the inners would work for sure but that might leave a tiny space I didn’t want.
 

Qumanchew

Contributor
Jr. Member
Joined
May 16, 2018
Messages
236
Loc.
Kutztown PA
Thanks for doing the leg work on this, I hope that weather striping works out for you. I really like the clean look of the one piece windows and would like to order a set, but I have 66 doors and I don't think they work in them.
 

ba123

Contributor
Bronco Guru
Joined
Oct 29, 2022
Messages
1,889
Loc.
CA
Mike is on here who makes the one piece kit that WH sells.

I would check with him and see if anything is possible:
https://mikesmetalworx.com/store/bronco-window-conversion-kit/

I don't know the differences but I'm sure he does.

Or if no luck, try WH. Actually, I just looked and there are some explanations on the WH page:

1705455699260.png


You might be able to figure something out but I'd check with Mike first.
 

bronco italiano

Contributor
Bronco Guru
Joined
Feb 1, 2004
Messages
2,117
Yes, that’s who I bought from and they are a bunch of fuck faces. The motor assembly is Nurelics. They just make the glass and channel and spacer assembly.

Did I mention they are fuck faces? I am holding back too.

Excuse my language.
They must be related to the fuck faces at Pro-M.
How I can relate.
 

ba123

Contributor
Bronco Guru
Joined
Oct 29, 2022
Messages
1,889
Loc.
CA
That solved the problem but even though it’s soft, it just pushes the window over too much. It doesn’t take much it seems to make it not want to stay in the attack without the vent window there. Maybe not the best design of this filler piece channel, but I’m gonna have to dump this outer, use this inner for the outer (will need a new piece since I cut one and then order the 211x for the inner.

IMG_7203.jpeg

Also going to order the clear weatherstrip adhesive they have—I didn’t see it until after my last order.

I also cut the rubber part on the window that sticks up too far and that helped solve my issue.

I marked with a piece of tape before removing the window where I might want to do that in case I decided to.

IMG_7201.jpeg
 

ba123

Contributor
Bronco Guru
Joined
Oct 29, 2022
Messages
1,889
Loc.
CA
I've changed things a few times now and keep wasting money on new pieces. The ones I'm on now fit great, but this damn window from this damn company keeps pushing the inside sweep out, even if I want until the adhesive is dry for a day.

I love the 1-205x on the outside and it does stay.

I'm going to try one last combination of the 10-205x also on the inside and see if that works, otherwise, I'm gonna have to try and raise hell again with this manufacturer cause nothing works.

I think any of these things would work great on a stock Bronco front window. My problem is just this window from One Piece Products and how high up the window base comes up when the window is closed.
 

mustanggarage

Contributor
Sr. Member
Joined
Aug 14, 2018
Messages
574
I installed the one piece windows from wildhorses with just the stuff in the kit and using billet industries universal cranks. my windows work very smoothly with very little cranking effort. I had to modify the door lock rod, and It took quite a bit of finagling to get everything working smoothly but I am happy with the results. I considered making them powered, but then remembered how much I hate wiring lol. I put a piece of machined aluminum along the bottom of the doors with molding tape to cover the holes that are no longer used.
 

Attachments

  • IMG_0659.jpg
    IMG_0659.jpg
    240 KB · Views: 35
  • bpEOvq2.jpg
    bpEOvq2.jpg
    134.6 KB · Views: 31
  • IMG_1412.jpg
    IMG_1412.jpg
    175.3 KB · Views: 30
  • IMG_7358.jpg
    IMG_7358.jpg
    225.2 KB · Views: 37

ba123

Contributor
Bronco Guru
Joined
Oct 29, 2022
Messages
1,889
Loc.
CA
I installed the one piece windows from wildhorses with just the stuff in the kit and using billet industries universal cranks. my windows work very smoothly with very little cranking effort. I had to modify the door lock rod, and It took quite a bit of finagling to get everything working smoothly but I am happy with the results. I considered making them powered, but then remembered how much I hate wiring lol. I put a piece of machined aluminum along the bottom of the doors with molding tape to cover the holes that are no longer used.
I've looked at your build. Really nice. I've had a lot of struggles including my dash that Double D built for me as well. A lot wasn't correct.

Anyway, on the window, any chance you have pics or can take a pic of where the window support is relative to the base of the door where the sweeps go? That is my problem. The forward side of the window channel goes up too high and that channel pushed the sweep out of place. The window is level, so not sure if maybe that should have made something differently or what but it's a problem on both sides.
 

mustanggarage

Contributor
Sr. Member
Joined
Aug 14, 2018
Messages
574
I've looked at your build. Really nice. I've had a lot of struggles including my dash that Double D built for me as well. A lot wasn't correct.

Anyway, on the window, any chance you have pics or can take a pic of where the window support is relative to the base of the door where the sweeps go? That is my problem. The forward side of the window channel goes up too high and that channel pushed the sweep out of place. The window is level, so not sure if maybe that should have made something differently or what but it's a problem on both sides.
I will try to get some pictures tonight when I get home. I looked and I don't have any on my phone that show that area. I will say that I had to replace the sweeps once because I didn't get things just right and the window caught on it. I guess ignorance is bliss a lot of times with me. I just assume when things don't work the way they are supposed to that it is my fault so I just keep plugging away till I get it figured out. one way or another. sorry to hear about your dash. I did have a problem with mine having the gauge holes too small when I first got it. I had to send it back to him and have him fix it. he was pretty good about it, and since it was a prototype I just again assumed growing pains.
 

ba123

Contributor
Bronco Guru
Joined
Oct 29, 2022
Messages
1,889
Loc.
CA
I will try to get some pictures tonight when I get home. I looked and I don't have any on my phone that show that area. I will say that I had to replace the sweeps once because I didn't get things just right and the window caught on it. I guess ignorance is bliss a lot of times with me. I just assume when things don't work the way they are supposed to that it is my fault so I just keep plugging away till I get it figured out. one way or another. sorry to hear about your dash. I did have a problem with mine having the gauge holes too small when I first got it. I had to send it back to him and have him fix it. he was pretty good about it, and since it was a prototype I just again assumed growing pains.
I decided to work on this some more just now. I felt that if I could just get the window to stay centered and in the track the whole time, what I've already done should be enough to be ok. See one problem with this kit is there is only one bolt that holds the front window track/filler piece. I slotted my hole some and was able to get that part to work better.

I just removed the window and have to clean up the adhesive and redo the inside sweep, a pai, but nice that you can clean this clear adhesive up --it is a bit of work though.

I'll get that all re-done for the 15th time and update.
 
Last edited:
Top