







• Welcome to ClassicBroncos! - You are currently viewing the forums as a GUEST. To take advantage of all the site features, please take a moment to register. It's fast, simple and absolutely free. So please join our community today!
    If you have problems registering or can't log into your account, please contact Admin.

One Piece Door Window kit

ba123

Contributor
Bronco Guru
Joined
Oct 29, 2022
Messages
2,757
Loc.
CA
As I redo the windows again, and again, the more I learn and see now that at least this one part I was frustrated with is my own doing, but in my defense, the directions suck on a whole new level.

When I put the filler piece in, it should be more specific and say to roll the windrow halfway up, pull the channel to the window edge by putting your arm inside the door, and bolt it there. It should not say to simply put it in and parallel....or whatever crappy directions are there.

Window is back in, hole for channel modified some more, will put the inside sweep on tomorrow.
 
Last edited:

mustanggarage

Contributor
Sr. Member
Joined
Aug 14, 2018
Messages
647
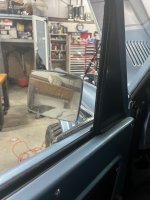
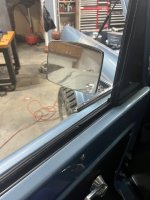
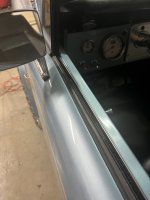
I took some pictures. hopefully this is what you were asking for.


Attachments

  • IMG_2915.jpg
    IMG_2915.jpg
    137.5 KB · Views: 151
  • IMG_2914.jpg
    IMG_2914.jpg
    142.8 KB · Views: 141
  • IMG_2913.jpg
    IMG_2913.jpg
    125.6 KB · Views: 151

ba123

Contributor
Bronco Guru
Joined
Oct 29, 2022
Messages
2,757
Loc.
CA
Thanks for doing that. Nice to see it works so well!

I'll post a hopefully final and good one of mine in the next few days.
 

mustanggarage

Contributor
Sr. Member
Joined
Aug 14, 2018
Messages
647
Thanks for doing that. Nice to see it works so well!

I'll post a hopefully final and good one of mine in the next few days.
the most important thing I figured out is to make sure you get the bottom stop set right because if you roll it down too far it will slip behind those sweeps and it is a PITA to get it back up without damaging them. but I am sure as many times as you have assembled and re assembled it you have figured that out lol
 

ba123

Contributor
Bronco Guru
Joined
Oct 29, 2022
Messages
2,757
Loc.
CA
the most important thing I figured out is to make sure you get the bottom stop set right because if you roll it down too far it will slip behind those sweeps and it is a PITA to get it back up without damaging them. but I am sure as many times as you have assembled and re assembled it you have figured that out lol
The power window mechanism stops on its own right where the stop is and really doesn't even need the stop, but I do have them in there.
 

ba123

Contributor
Bronco Guru
Joined
Oct 29, 2022
Messages
2,757
Loc.
CA
I gotta clean up the glue remnants but that turned out perfectly. You'd never know that I did it 15 times.

The next one will be cake.

Really hope this helps someone.

If you want the felts, get the 10-205x for BOTH inner and outer. The one I got that is stickier rubber just grabs too much.

IMG_7362.jpeg
IMG_7364.jpeg
 

ba123

Contributor
Bronco Guru
Joined
Oct 29, 2022
Messages
2,757
Loc.
CA
Drivers side was a pain, but easier than all the effort put into the pass side!

DONE ✅
 

ba123

Contributor
Bronco Guru
Joined
Oct 29, 2022
Messages
2,757
Loc.
CA
Someone asked cause it was not totally clear so updating this old thread.

The adhesive I used that worked well was:
23-005X Weatherstrip Adhesive, IES, 5 oz.
https://www.rubbertherightway.com/adhesives-cleaners-sealers-ies-super-100504-prd1.htm?
(The 3M stuff was not good at all for this)

I am pretty sure that I did the outside without the window in, then once dry (24 hours to be sure), put the window in (with tape to protect the paint) & pulled the window against the weatherstrip and taped in there like this: (and then installed the inside)

IMG_7361.jpeg
 
Top