• Welcome to ClassicBroncos! - You are currently viewing the forums as a GUEST. To take advantage of all the site features, please take a moment to register. It's fast, simple and absolutely free. So please join our community today!
    If you have problems registering or can't log into your account, please contact Admin.

Peel & Seal

OP
OP
lonesouth

lonesouth

Contributor
Bronco Guru
Joined
Dec 18, 2003
Messages
5,045
3BF082E9-0133-4BE7-8E4D-16E003902AA3-7817-000005F46C716E08.jpg


took about three hours of working with the material to get it all down. I ended up cutting it to ~6" sections, so it would have worked out fine to use the smaller rolls, just would have cost more. I did my daily driver car in dynamat extreme a few years ago and this stuff is much easier to work with. The dynamat is thicker and has a thicker foil, which translates into, it doesn't bend as easily. That said, I think it would be faster to lay down one layer of dynamat than two layers of Peel & Seal.

I really can tell a big difference in the way the tub sounds. It is no longer tinny at all. I can drop a tool and all I get is a thud, more of the kick drum and less of a top hat. I read elsewhere that a 4" paint roller with the rolling part removed, so you have a wire with a sturdy handle, works wells to get into the nooks and crannies, and they were right. I used that joker for about 75% of the time to get the material to flatten out. The other tools I found useful were a 12" section of copper pipe and a copper T with about 4" of pipe sweated to it to form a handle.

I did notice that I had significantly fewer cuts after laying the peel & seal than I did after the dynamat. I chalk this up to the thinner foil retaining less of a straight, cutting edge after being paired down from the full size mat. That said, I still have a few cuts on my hands, my back is soar, my knees hurt and my hands generally feel like I've been clearing thorny vines all day. I found out with the dynamat that wearing gloves helps, but you lose the tactility required to peel and handle the material.

I will report more after I have the carpet, seats and cage installed.
 

Scoop

Contributor
Have Bronco, Will Travel
Joined
Feb 1, 2006
Messages
10,670
Loc.
Cuchara, CO
Nice installation. What did you do about seat belt or seat mounting holes? Or will you go back and cut them out?
 
OP
OP
lonesouth

lonesouth

Contributor
Bronco Guru
Joined
Dec 18, 2003
Messages
5,045
I'll go back and cut them out. It would have been more trouble to try and go around them. The P&S is not so thick that you can't feel the slight depression where the holes are, so they should be easy to find.
 

Fireball05

Bronco Guru
Joined
Oct 7, 2012
Messages
1,822
Looks nice, let us know about the smell! I had an old Cherokee I did with a roofing type material available at Home Depot about 10 years ago, and it stunk for a long time. Plus in the summer on long drives you could feel the material on the tranny tunnel getting soft and sticky underneath the carpet.

Here is the dynamat install tool, basically just a heavy wood roller. More expensive than your paint roller trick, but useful for the smaller areas and to make sure the first layer goes down nice and solid.
 

Scoop

Contributor
Have Bronco, Will Travel
Joined
Feb 1, 2006
Messages
10,670
Loc.
Cuchara, CO
I used a wall paper seam roller. It was ~$5 at a local hardware store.
 
OP
OP
lonesouth

lonesouth

Contributor
Bronco Guru
Joined
Dec 18, 2003
Messages
5,045
I was looking for a seam roller, but no one local had one for less than $10...didn't check wallpaper stores though.
 
OP
OP
lonesouth

lonesouth

Contributor
Bronco Guru
Joined
Dec 18, 2003
Messages
5,045
I took the bronco on the SOWEGA run, and drove it all day, mostly less than 20mph. I can say that the noise is drastically reduced. On prior runs, the exhaust would reverberate back into the truck and the drone was almost unbearable. That reverb was cut back and made the ride much more pleasant.

I can also say that the heat was cut back a lot more than I expected. Under the carpet, the top of the peel & seal was hot, but nothing like the bare metal was in the past.

I have to say this is a great, and cheap, upgrade that will make riding around a more pleasant experience.
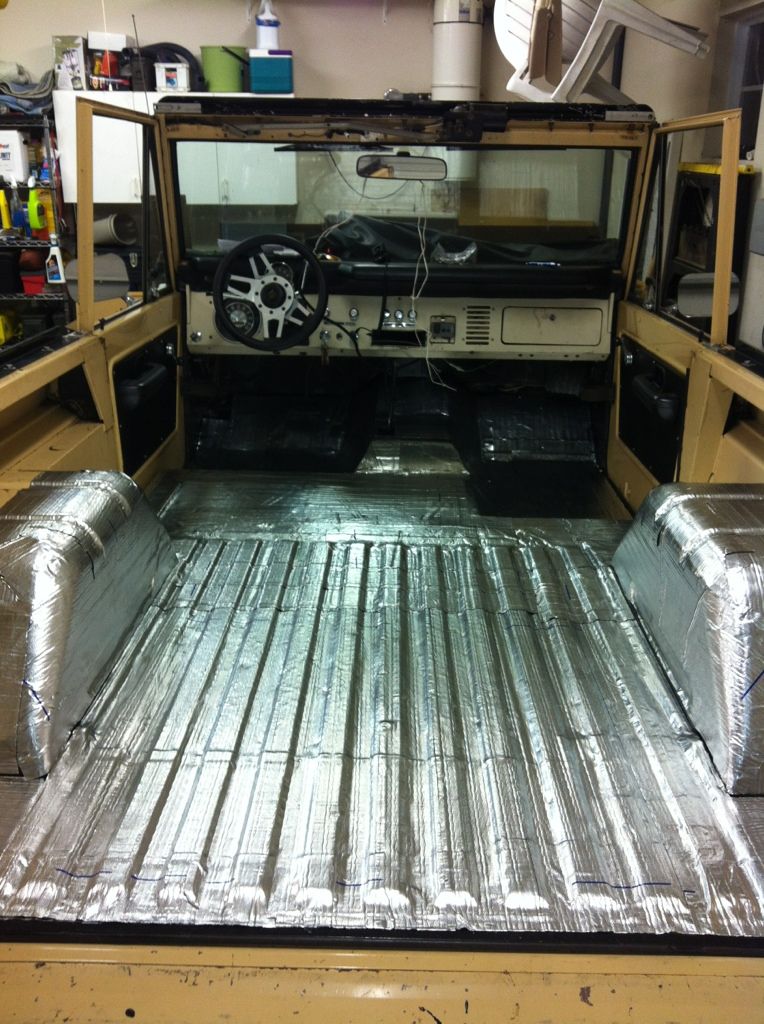
Installation notes:
1. mark your bolt holes as you go. It is not impossible to locate them afterward, but it will save you time when you go to install your seats/belts.

2. After installing the peel & seal and carpet, then drilling holes for the cage, the drill bits were extremely gummed up with a mix of tar/foil/carpet. I simply left the bits in a cup of mineral spirits and they cleaned up easily after about 30 minutes. I left mine overnight because I was done for the evening, and they came out perfectly clean. I suspect mineral spirits could be used to clean the tub after scraping off the bulk, should it ever need removing.

3. I overlapped all of my pieces, so that 1" layed on top of the last piece. This should give a better seal as it appears to me that peel & seal sticks better to itself than to the substrate. I used a 2" strip in the corners where vertical pieces met the floor, to help ensure the verticle piece would not fall off.

4. Keep in mind when covering the bed, that the ribs will cause the 3' piece to only cover 2.75' of area because of the rib surface area. So don't lay down your 3' piece all at once and expect to work it into the rib. Instead, peel off 2" on the end and work it into the rib as you go and peel back a couple inches at a time.

5. You will want a big roller, I used a piece of 1" pipe, and a small roller, i used a paint roller with the rolling part removed. I also found the back of a plastic screwdriver to be useful in working the peel & seal into the nooks and crannies.

6. When working on a depression, such as on top of the wheel wells, lay out your piece so that it covers the depressions, then cut the foil in the middle of the depression. This will allow you to work the material into the depression more easily, then cover the cut with a small 1" strip. The tar material will stretch easily, but the foil does not.
 

DFWBroncoNewbie

Full Member
Joined
Jun 8, 2011
Messages
170
Lonesouth, you beat me to the punch with the quick tips. Those are all points I learned the hard way.

The stuff your laying down will help a lot with temps and noise reduction, but the one thing that did the best job with the Dynamat like stuff was the Racket Jacket from Wildhorses. This combo (with carpet) makes the biggest impact in my opinion. I put two ply of the Dynamat like stuff between the firewall and the cab because I wanted to make sure I killed any heat that could come from the engine.

Smell wise, I could smell it for about 2wks and that was it.
 

Attachments

  • Stage 2.jpg
    Stage 2.jpg
    119 KB · Views: 191

deltarat

Bronco Guru
Joined
Jul 12, 2006
Messages
3,371
Loc.
Drew,Ms
Has anyone ever stuck the peel and seal to the bottom of a vinyl floor covering? My floors are LineXed and I want to insulate them, but do not want the insulation to stick anything permanent to the LineX. Would a different type of insulation be better? I had thought about sticking it to the bottom of the tub.
 
OP
OP
lonesouth

lonesouth

Contributor
Bronco Guru
Joined
Dec 18, 2003
Messages
5,045
Lowes and Home Depot have a foil double bubble type insulation that would probably work really well for insulation.

Like This
 

Bigbird

Sr. Member
Joined
Jan 12, 2004
Messages
505
I would never use this stuff. The PO of my Bronco put this stuff in the tub. I needed to do some pannel replacement (shotty work done by PO) and found out that this stuff is damn near impossiable to remove. I wound up scrapping the tub and now I'm going fiberglass.

If you do go this route, make sure you never have to drill a hole. This stuff cakes your drill bits. I wasted a few when I installed a rear seat and seatbelts.
 
OP
OP
lonesouth

lonesouth

Contributor
Bronco Guru
Joined
Dec 18, 2003
Messages
5,045
I would never use this stuff. The PO of my Bronco put this stuff in the tub. I needed to do some pannel replacement (shotty work done by PO) and found out that this stuff is damn near impossiable to remove. I wound up scrapping the tub and now I'm going fiberglass.

If you do go this route, make sure you never have to drill a hole. This stuff cakes your drill bits. I wasted a few when I installed a rear seat and seatbelts.

I did address the issue of gummed up bits

Installation notes:

...

2. After installing the peel & seal and carpet, then drilling holes for the cage, the drill bits were extremely gummed up with a mix of tar/foil/carpet. I simply left the bits in a cup of mineral spirits and they cleaned up easily after about 30 minutes. I left mine overnight because I was done for the evening, and they came out perfectly clean. I suspect mineral spirits could be used to clean the tub after scraping off the bulk, should it ever need removing.
 

FRKNSTYN

Jr. Member
Joined
Jul 19, 2011
Messages
121
Loc.
Williamsburg
I used that on the inside of my hard top before installing the head liner. Made a big difference and no smell. Beats paying for Boom Mat and alike.
 
OP
OP
lonesouth

lonesouth

Contributor
Bronco Guru
Joined
Dec 18, 2003
Messages
5,045
Forgot to mention that I drove it for about 6 hours at the SOWEGA run and didn't smell the first bit of asphalt. This was with the windows up and top buttoned down as best it could be.
 
OP
OP
lonesouth

lonesouth

Contributor
Bronco Guru
Joined
Dec 18, 2003
Messages
5,045
So now it has been about two years. I never did smell anything from the peel-n-seal. I won't hesitate to do this on the next bronco too.
 

agboy91

Full Member
Joined
Aug 29, 2013
Messages
214
Loc.
Bishop, GA
Great write-up and replys, this is very helpful. Has anyone tried to paint POR15 over any of the sound and heat insulators? I may do carpet or may want to just have a painted bed in muddy situations, any thoughts or experiences painting this with POR or Expoxy Primer? Thanks.
 
Top